In this article, we will look at the Search API and Facets modules. This truly smart combination allows you to set up a versatile search and filter comparable to any major online marketplace. We will first look at why you may want to add Search API and then look at a basic setup. I will wrap up with some add-on modules that will be covered in a future article.
Why use Search API?
The basic search module that comes with Drupal is great. It is added to your site at installation, it is easy to use and provides good search results. Even though Search API is a replacement for the core search module, the reason I usually add it, and possibly a more common reason, you will want better search and filtering or faceted search in your views.
In this article, we will be looking at a basic set-up of Search API and then look at some more advanced Search API features, which will then be discussed in another article. Even though you can use other search platforms, such as Solr, to index and search your content, using the Drupal backend and database is sufficient for most use cases. So now we know why you may want to use Search API and that we can use the Drupal database, let's set up it.
Setting Up Search API
Install
Add the Search API modules to the modules directory of your Drupal site, or use the UI to do this for you. I will mention here that it is now recommended to use Composer to add modules to your site. If you are unsure of the process, please check installing Drupal modules on this site.
Add Search API
https://www.drupal.org/project/search_api
- 47,399 sites report using Search API module at the time of writing.
- 151,210 sites report using Search API module in May 2025.
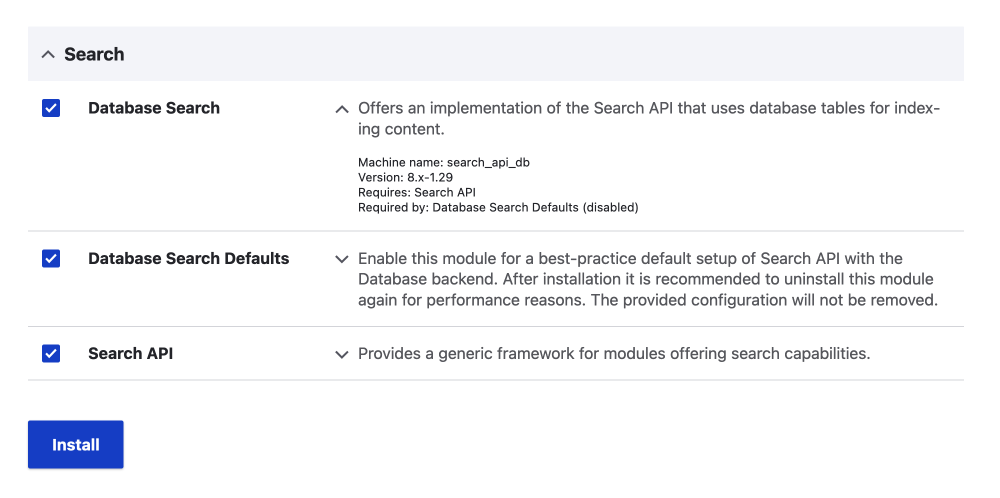
Once the module is added, visit the extend page and install the below modules by checking the checkbox and clicking the install button at the bottom of the page.
Install
- Search API
- Database Search
- Database Search Defaults
If you are using Drush: drush in search_api search_api_db search_api_db_defaults
Facet Module
If you like, you can install Facet Module now in the same way.
https://www.drupal.org/project/facets
Uninstall Database Search Defaults
As stated in the module description in the above image; After installation it is recommended to uninstall this module again for performance reasons. The provided configuration will not be removed. Let's do that now.
Go to the Uninstall tab on the Extend (modules) page:
- Check Database Search Defaults
- Click Uninstall Button
Or if you are using Drush: drush un search_api_db_defaults
Configuration
After you have installed Search API, visit the Search API configuration page.
Manage > Configuration Search and metadata > Search API
/admin/config/search/search-api

You will see that a Database server and Index have been set up. This is because you installed the Database Search Default module.
The Database Server uses the Drupal database, which is perfect for most use cases. However, if you have a large site, you may want to use an external 3rd party search index.
You can check out the Database Server and Default content index that was set up by clicking on the links illustrated above, but since we used the Database Search Default module we don't really need to for now, so let's continue with building a view.
Building a View to Display Your Content
Adding a View for Your Search API Data
Building a view using a search index is no different from building a standard content view, except you need to show Index Default content index and then use the index fields. If you haven't used Views, you can check my article on that, where I run through Drupal View basics.
To create a view, visit the view page and click Add view.
Manage > Structure > View
/admin/structure/views
- Click Add View.
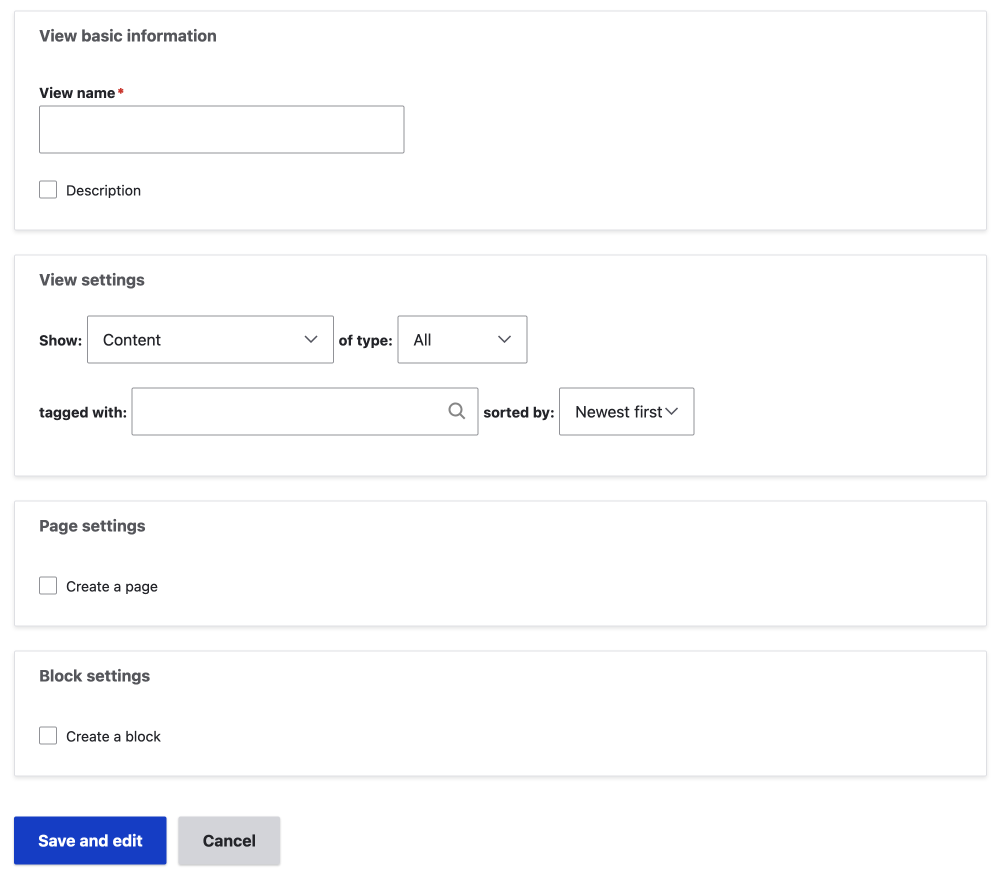
- Fill in the Add View from.
- View Basic information.
- View name.
- View Settings.
- Show - Index Default content index.
- Check Create a Page.
- Modify page settings to your liking.
- Save and edit
Add Fields to Your View
- Add field Content datasource - this is the same as Content in a normal view.
- Add Title (indexed field) for now.
- Add Filter for Content Type if you want or for something else.
- Click Save
You’ll notice that there is no content. In another tab open the Search API page again. On the Search API page, we need to go to the default content index page, where you will see the Run Index button. We could have run this before, but I wanted to illustrate that the data isn't available until it is indexed.
Return to the Search API page
Manage > Configuration Search and metadata > Search API
/admin/config/search/search-api
- Click on Default content index
- Click Index Now
Now check your view and you will see we have results. Now go back to the Index page and visit the fields tab.
Adding fields to the Index
Let's add the fields we know we will want to use as filters, and also for facets.
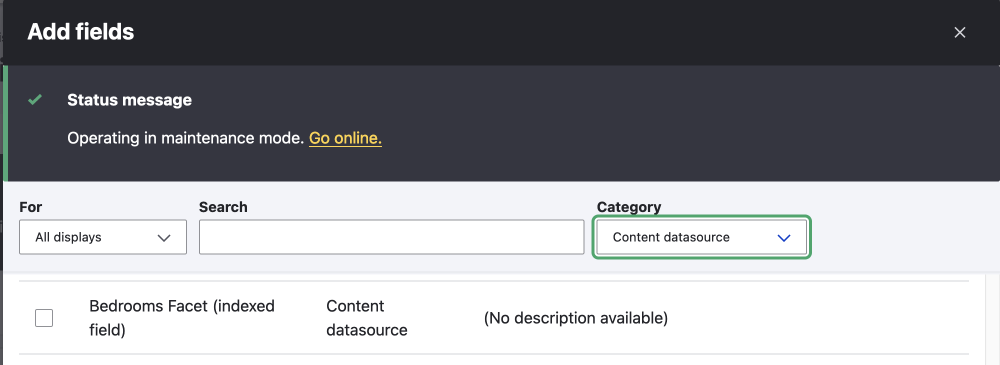
- Select the field tab
- Click Add Fields
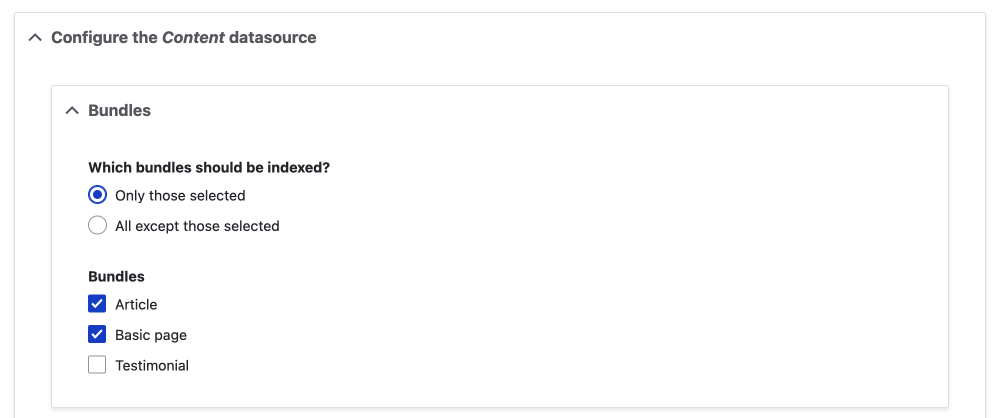
All fields are available as content datasource, but if you want to use the field as a filter or facet you need to add it here.
After clicking Add Fields, a dialog module will open.
Use the Add button to add the fields you want to show as indexed fields.
- Once you have added the fields you want, Click Done
Clicking done will close the dialog and the field(s) will have been added to the table in the content section.
I like to suffix the Label with Facet for any field I want to use for filtering or facet.
Also, make sure that the type is correct.
Personally, I haven't needed to update the machine name as the system automatically does this for you by adding _1 to the field machine name and this works for me.

- Make any changes you want to the field in the content.
- Click Save Changes
These become indexed fields when used in Views and can be used for filtering and facets. So with the fields added, let's get back to the view.
Now go back and Edit the View
Add the Fields you want to use in the View
Add the fields you want to use in the view, and any that you want to use to filter on.
They have the name you added with the suffix and (indexed field) in parentheses, I.e. Bedroom Facet (indexed field)
- Click Add and configure the fields.
- Configuring a field is the same as normal.
- After each click, Apply and Continue.
- On the last one, click Apply and then save the view.
Now you’ll have a view of the data in the Preview ready to theme.
I won’t cover themeing here as it is the same as views theming, and you will have your own way to do this depending on the use case.
You may want to add a Sort to your View
Authored On (date) with descending is a good default sort. This will put the latest items at the top.
- Click Add next to the Sort Criteria section title.
- Check the field(s) for sort and click Apply (all displays)
Note: You can apply only to This page (override). You do this at the top of the Add sort criteria modal using the For dropdown. - Configure the sort and apply.
Rearrange the sort if you have a few sorts. To do this, use the dropdown next to the Add button we use above and click Rearrange.
Now, Add the Main Exposed Filter
You can filter the data by a category before you use the facet to refine the search. In the following image, the top row of dropdowns has a search button next to them. You can use this to filter the result if you want. Once you have filtered the results, you can then use the second row, which is faceted search, to further refine the results. The first row with the search button is an exposed filter. We will add that now.
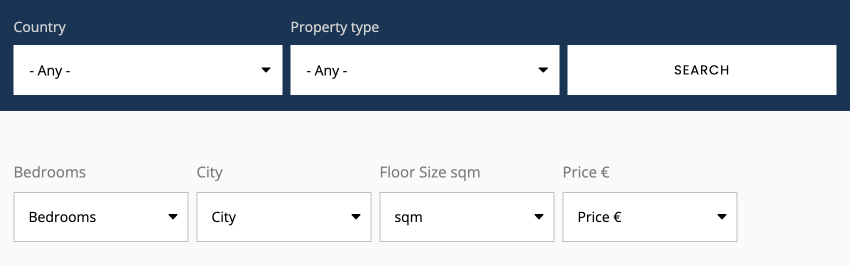
For this, I am filtering on the type. The other fields I added I will be using as facets.
- Click Add next to the Filter Criteria section title.
- Add the field(s) you want.
They should have the suffix Facet appended from when you added the fields to the index.
Note: The same applies to filters you can add to all displays or for this page override. - Click Apply.
The configure modal will then open.
- Check Expose this filter to visitors.
- Use the default settings.
- Maybe you'll want to change:
- Label
- Filter identifier
- Maybe you'll want to change:
- Click Apply.
By default, the filtering uses the word Apply on the button. You can change this to any word you like in the Advanced settings of the view in the Exposed form section.
- Click on the Settings link.
- Modify the Submit button text.
- Click Apply
- Save the view again.
Your view should now show the filter at the top with the view items below.
Detach the Filter and add it as a Block
Before we add some facets, I am going to detach the filter. This may not be necessary, but I want to add the facets under the filter. To detach the filter, follow the steps below.
On the display configuration UI, find the Exposed form in block: No in the Advanced section.
- Click No
- Select Yes
- Save
Now the Filter has disappeared.
Add it to the region you want on the Block Layout page
Manage > Structure > Block Layout
/admin/structure/block
The block will have a name, Exposed form: view-name-page_#
Add it to the region you want it in.
- Click Place Block next to the region you want to place it in.
-
Search for your exposed form block.
Image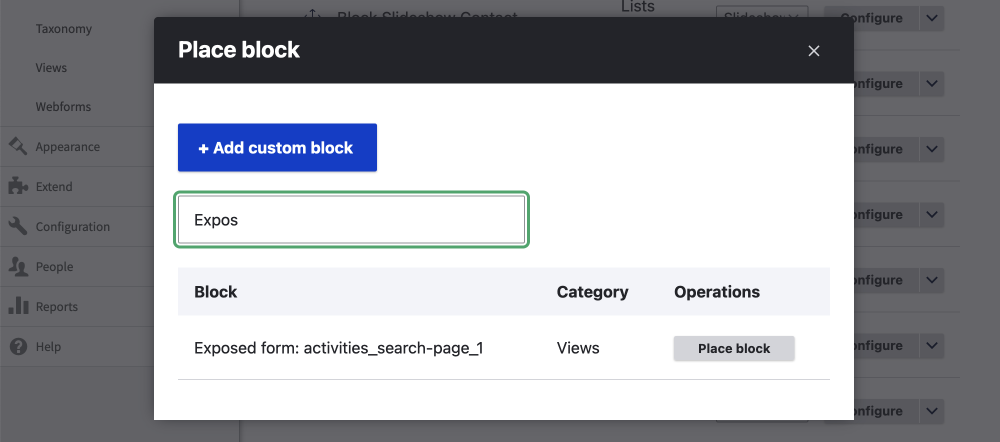
- Click Place Block
- Configure Block
This is where you can restrict visibility to the path of your view page. - Save block
Now check your view again, the filter is back on the page where you want it.
Now let's add some facets.
Adding Facets to Your Search
As we have already discussed and therefore prepared, you need to have the Indexed Fields for the facets to work. You'll also need to have the Facet module installed.
Install Facets if you haven't already, and then visit the Facets configuration page.
This works for both Facets module 2.x and 3.x. If you are are setting up a new site it is recommended to use the Facets Exposed Filters submodule. When setting up a new Facet you will get a message with a link to some new documentation.
It also state the following method, add Facets as a block, is still supported, and in a review of this method done in May 2025 the following in still valid.
Adding Facets as a block
Manage > Configuration Search and metadata > Facets
/admin/config/search/facets
- Click Add Facet
- Select the source: the view you want to use
- Select the field.
- Leave the machine name as is.
- Leave the title as is field facet.
- Click Save
- Choose a Widget
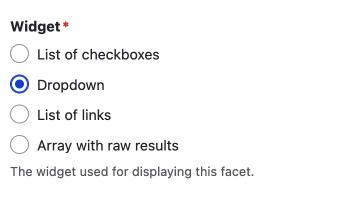
- Check over the settings for the Widget.
- Check over the Facet setting.
There are a lot of settings here, but one I will point out is for using a dropdown select menu. You need to check the option, ensure that only one result can be displayed, otherwise, you will get weird functionality, as it will be possible to select more than one option. Check the below option in case you are using dropdowns.


- Check, Ensure that only one result can be displayed.
Other settings are varied so I suggest you get familiar with them. The settings include being able to use the label instead of the key and adding a list of your own key|label pairs, to combining facets, and hide certain results.
I suggest you check over the options per facet, as each widget has different settings.
Another setting that I check for set-up is Show title of facet.
I like to have the title show and the label to have the same name.
At the bottom, you have Facet sorting and Advanced settings. You can leave these for now and come back and adjust if needed.
- Click Save
Now you have a facet you need to add it to your page. You do this on the block layout management page.
Add the Facet to your page
To add the facet to your view page, you add it as a block in the region you want it to display. See the block section above for where you do this. This is where the title comes in handy(more so if you are cloning a facet, which we will discuss in a future article).
For the use case we have just built, I think that good UX is having the facet under the main filter. This is the reason I detached the main exposed filter when setting it up.
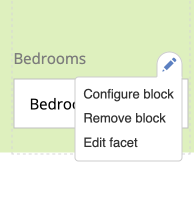
After adding the facet block to the region under the exposed filter, check the block configuration by visiting the view again.
Remove the title if need be. This is done using the contextual menu and configuring the block.
Repeat to add other facets.
In the end, you may also need to change the name of the facet. This won’t change the machine name, so it is okay to do.
You can do this using the contextual menu again, but use the Edit facet option. Then, on the facet setting tab, you can change the name.
Why would I want to change the name of the facet?
When creating the facet, you probably name the field with a simple name such as Price, but the Price is actually in yen, for example. So it may make sense to change the name of the facet to Price ¥ or Floor Size sqm.
Final Tweaks and Troubleshooting
After setting up the Search API, you will need to test. I have had times when adding new content doesn't always get indexed straight away, even when you have checked index items immediately in the index options section on the edit page of your content index.
There may be many things that could cause this, and even a flush of the cache might fix it. That said, I suggest you check over the settings on the edit page and make the settings as specific as you can. You may need to play around and continuously tweak this to get it right.
Summary
In this article, we have looked at setting up a basic view using the Search API. Search API is a powerful module that you may want to use if you require better search and filtering capabilities than what is offered by the core Search Module.
Search API is a powerful addition to your Drupal site, but if you are new to it, you will have to test it and refine it to get working right.
I hope this article has been helpful to you. If you would like to learn more about Drupal and how you can leverage it to build and power awesome web applications, then be sure to sign up for my newsletter below. I write about Drupal and front-end development, and design.
Thanks for dropping by, and until next time, have a great day!
Add new comment