In this part, we will look at adding some regions to the simple custom theme we made in part 2. Up until now, we have used the default regions that come from the Drupal system or as in part 1, the regions that come with the (new core check part mentions this) Olivero theme. In parts 1 and 2 we learnt how to add them to our theme info file so with that understanding add some new regions to our theme.
Regions are a great feature of Drupal, all you need to do is add them to your THEME.info.yml and then you can use them in your templates. To keep things simple in this article we will stick with the default regions, rename a few and add a couple.
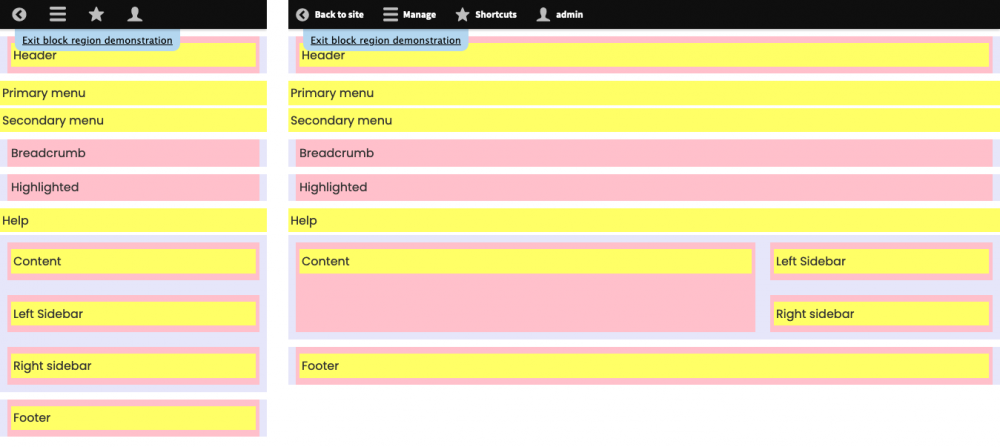
From part 2 we have a basic responsive theme. As shown below, you can see the layout of the regions for both mobile and desktop. These screenshots are from the Demonstrate block regions (the theme name) link that you can find on the Block layout page; /admin/structure/block.
rename regions in the THEME_NAME.info.yml
I am going to rename a few regions first. Looking at the above regions I will rename the Left sidebar and Right sidebar regions. Note that I am only renaming the human-readable name of the region. I'm going to rename them Sidebar first and Sidebar second.
  breadcrumb: 'Breadcrumb'
  content: 'Content'
- sidebar_first: 'Left Sidebar'
+ sidebar_first: 'Sidebar First'
- sidebar_second: 'Right sidebar'
+ sidebar_second: 'Sidebar Second'
  page_bottom: 'Page bottom'
  footer: 'Footer'
If you now clear the cache you will see the renamed region.
One thing to remember is if you want to keep things simple and use most of the base theme's templates then you need to be aware of where the regions are in relation to the templates. All default regions are in the page.tpl.twig, this is the main layout template. It is possible to add regions to other templates, however, this will require a little more work and thus I will cover it in a future article. I have done this before in Drupal 7 but going forward I think I will referain for doing it unless obsolutley is neccessary.
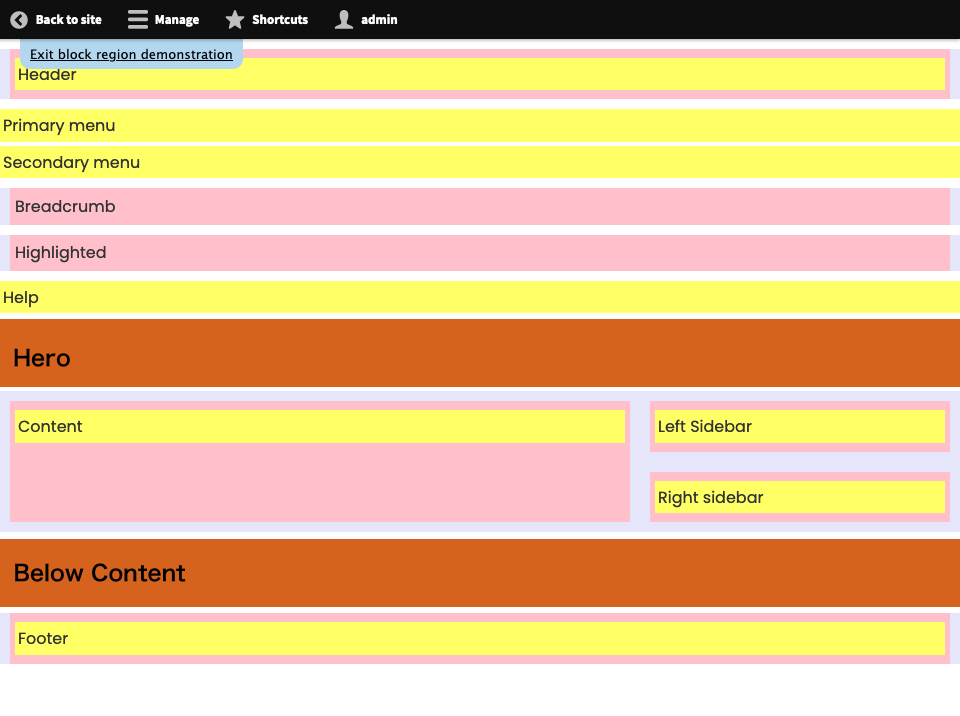
Next, I will add a few regions to give more options for a site builder or content manager to place blocks. One region will be a hero region and another is going to be a below content region(s). I think that will do it for now, below is my new regions layout.
Add regions to the THEME_NAME.info.yml
The first step is to add the regions to the THEME_NAME.info.yml, below is the new regions section.
regions:
  header: 'Header'
  primary_menu: 'Primary menu'
  secondary_menu: 'Secondary menu'
  highlighted: 'Highlighted'
  help: 'Help'
  page_top: 'Page top'
  breadcrumb: 'Breadcrumb'
+ hero: 'Hero'
  content: 'Content'
  sidebar_first: 'Sidebar First'
  sidebar_second: 'Sidebar Second'
+ below_content: 'Below Content'
  page_bottom: 'Page bottom'
  footer: 'Footer'
Yes, it's that simple, add region machine name and human-readable name pairs. One thing to note here is; the order you add the regions will be the order they appear on the block layout page at admin/structure/block in the Drupal backend.
Adding templates to your theme
Up until now, we have relied on the base themes templates which are great to get going, in fact for a basic website or blog you can get a long way with what comes out of the box. However, there will be a time when you want to modify a template and adding new regions to your theme is one of those times. So let's take a look at how to add the new regions to your theme.
Related: Modify a contact page theme template
First, you need to get a copy of the base theme you want to override. In this example, we are using Classy. Classy is a core theme so you need to look in the core/themes/classy directory to find the template. You will find a directory named templates and in that, you will find a bunch of other directories. We need the page.html.twig which is in the layout directory. Copy this to your theme with the same name using copy and paste or the below command from within the Drupal root directory.
cp core/themes/classy/template/layout/page.html.twig themes/custom-theme/Adding the new Regions to your copied theme template
Now open up the copy of the page.html.twig in your favourite editor.
Since we only renamed the human-readable name of the default regions we don't have to touch those regions.
Also, I feel that the sidebar content being after the main content is perfect as with modern grid layout we can place it anywhere we like. However if you want to move the region then you need to move the whole block of code which will include a conditional.
 {% if page.sidebar_first %}
      <aside class="layout-sidebar-first" role="complementary">
        {{ page.sidebar_first }}
      </aside>
 {% endif %}
As you can see there is a twig conditional wrapped around some of the regions. Since our new regions are going to be optional we are going to wrap the mark up in the same conditional. Looking at it is quite self-explanatory, but just in case, the syntax for a region in the page.html.twig is "page dot region name" like page.sidebar_first. Twig conditionals are simple too, using the {% %} to indicate a logic block we can use if and then after use endif. Inside the conditional, we can use any markup we like. Check Twig website for more info on logic in twig.
Adding the hero region to the page.tpl.twig
Let's add the new hero region to just above the main element and the below content to below the main element. Below is our code.
 {% if page.hero %}
    <div role="contentinfo">
      {{ page.hero }}
    </div>
  {% endif %}

  <main role="main">
    <a id="main-content" tabindex="-1"></a>{# link is in html.html.twig #}

    <div class="layout-content">
      {{ page.content }}
    </div>{# /.layout-content #}

    {% if page.sidebar_first %}
      <aside class="layout-sidebar-first" role="complementary">
        {{ page.sidebar_first }}
      </aside>
    {% endif %}

    {% if page.sidebar_second %}
      <aside class="layout-sidebar-second" role="complementary">
        {{ page.sidebar_second }}
      </aside>
    {% endif %}

  </main>

  {% if page.below_content %}
    <div role="contentinfo">
      {{ page.below_content }}
    </div>
  {% endif %}
So now if you go to the Block layout page you will see the new regions in the UI and also on the demonstrate regions page. This means the regions are ready to be used. However, you will still need to add some styles to them or at least some layout rules. We will do that in the next part along with what CSS rules you need to include in your theme to cover basic Drupal functionality, default pages, and regions.
More about the Content Region
{{ page.content }}The content region is where the main page content is rendered. The content from a content type can be quite complex if it has many fields. There are many way to control the content region; from using templates to using the out of the box UI for managing display to using layout builder, or you can add modules to assist in building beautiful content pages on your site. When starting out though, with a well set up CKEditor and a few Media (or image) fields you can start adding content to your site that can be styled up to look professional. I will look at creating more advanced content areas in the coming months so be sure to keep an eye out for that content.
Well, that's it for adding regions to your custom theme, a fairly simple and straightforward process and very powerful feature available to themers and site builders in Drupal. If you have read the first 3 parts you now have all you need to get a simple Drupal theme ready for your site. In the following parts, we will look at modifying node or content types, field content, and cover what a theme, in general, should include for most use cases. If this is of interest to you or front-end tips and tricks be sure to sign up for my newsletter!
Thanks for reading. Bye for now.