CKEditor 5, the default Drupal WYSIWYG, is powerful and you can use it to create beautifully laid-out and presented content.
As discussed in the Nice Editing experience & Content Management Experience you may want to set up the WYSIWYG so that users have the ability to create beautiful layouts right in the WYSIWYG. This is actually a great way to add articles if the creator knows how to use the editor and it has been set up correctly.
One of the features that CKEditor provides is the ability to add custom classes to elements. Then all you need to do is add CSS rules to add a unique style and or alignment.
In this article, we will look at how you can add styles to elements and in a bonus article we will look at how we can use these to add aside content. Read on to find out more.
How to Add Custom Styles to CKEditor 5 in Drupal
This article is primarily about using CKEditor 5 with Drupal but with that said you should be able to do the same with any instance of CKEditor 5. The only difference is Drupal provides a nice UI to configure your editor.
To add custom styles you need to visit text formats and editors page.
Manage > Configuration > Content authoring > Text formats and editors
/admin/config/content/formats
From this page select the text format you want to use and use the configure button under the operation heading. Once on the configuration page, follow the steps below.
- Drag the Style button from the available buttons to the active toolbar.
This will add a style section in the CKEditor 5 plugin settings section. - Click on the Style tab and add your styles for the elements you want to target. There is some help text below the text area where you can add your styles. The basic pattern for adding a style is "element dot class" followed by a pipe and then the label for the style as shown below.
h2.title|Title H2
p.hint|Hint
blockquote.hint|Hint Quote
Add the styles to your theme CSS
With the class being added to the element you now need to add the rules to your theme. To make your classes specific to CKEditor you may what to use the .text-formatted class that is added to a field that uses CKEditor as shown below. However, this will be a personal preference and you will find if you are using Olivero that there is a class .text-content that is added.
blockquote.hint,
.text-formatted blockquote.hint,
.ck-content blockquote.hint {
  padding: 1rem;
  color: #107A0E;
  background-color: #F5FAF2;
  border: 1px solid #B6DEA5;
  border-left: 5px solid #B6DEA5;
  font-style: normal;
}
Making the Styles Show in the CKEditor form when Editing and Adding Content
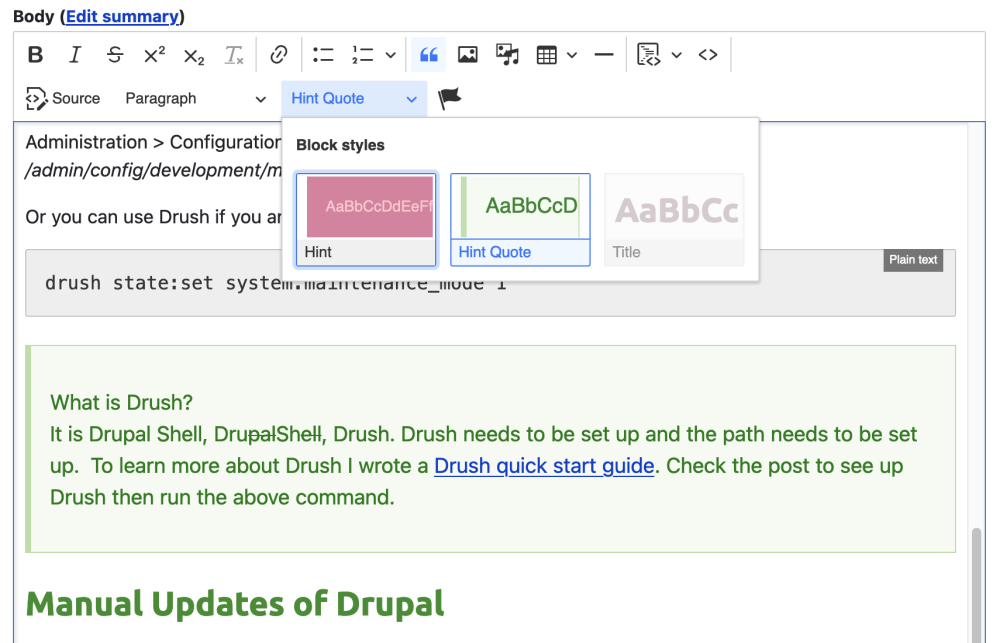
One last thing that you'll need to do is add the classes to the CKEditor stylesheet. This is an essential step so content creators can actually see the style they applied as shown in the image below.
I have written about this in another short article Add Theme Styles to CKEditor WYSIWYG in Drupal so I suggest you head over there to find out how to do that.
Well, that is about it for this article, we have just learnt how you can add custom styles to elements in CKEditor 5 in Drupal. If you found this article interesting I ask you to sign up for my newsletter below. I share tops tips on Drupal, front-end development, and design to help you become a better developer. See you there!
Thanks for reading.