Layout Builder is a game-changer in Drupal’s page-building capabilities. Layout Builder comes with a standard Drupal install profile; the profile that most of you would have installed. To use Layout Builder you will need to install it from the extend page and then configure and style it. In this article, we are going to run through everything you need to know to get started with Layout Builder.
What does Layout Builder give me?
Layout builder converts the content area of Drupal into a configurable and drag-and-drop canvasfig1. It has been considered stable since Drupal 8.7 and there is a host of great add-on contributed modules that enhance it.
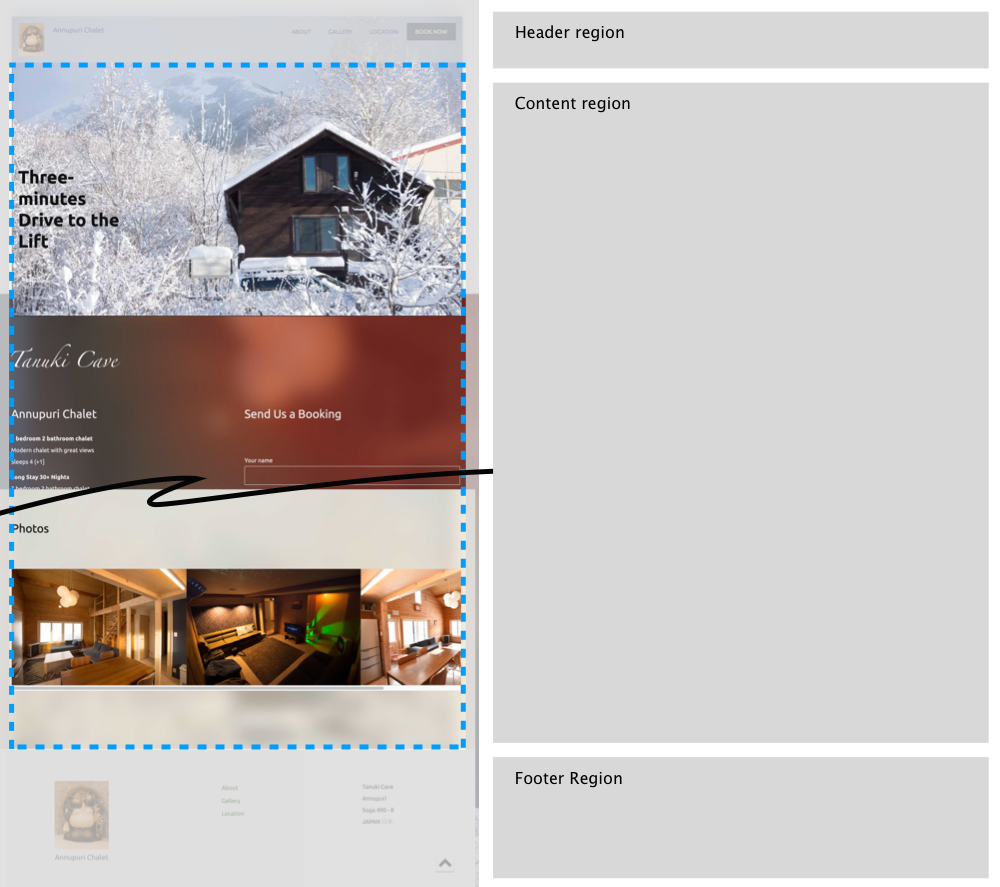
fig1
Layout Builder as stated currently converts the content region into a canvas which means you still need to use the Block system to manage the global areas of your site. This is a great feature but for someone new to Drupal it may seem weird you don't have the same control over the global header and footer regions in the Layout Builder UI.
The reason I bring this up is to show you that Layout Builder is for content design and not the whole site. As you will read in the next section; What Layout builder is not.
What Layout Builder is Not
Let's first take a quick look at what Layout Builder is not.
Layout Builder is unlike SAAS no-code design options out there, like Square space or WIX, or WordPress no-code design plug-ins, which are WYSIWYG design tools. LayoutBuilder is for a developer and site builder to configure layouts minus design tools such as colour, font selection, and pixel-precise layout and positioning. That said, you could enhance Layout Builder to provide the former.
It allows a developer or site-builder to create templates that can be used on a content type by content type case. The layouts can be locked or they can be unlocked to allow content creators the flexibility in adding content to a site. You can enable content creators to change colour, layout, and the arrangement of content blocks on the page. However, it will usually be restricted to a pre-defined design system.
If you use layout builder you will still need to design or have someone design the UI, the layouts, and the aesthetic look, and then create a theme in a conventional way.
In a nutshell, Layout Builder isn't a site-building WYSIWYG design no-code tool; it is a drag-and-drop content creation tool that allows as much control as configured by the developer, site builder, and design team. It allows for unique variations of content within the bounds of what is allowed by a design system.
- You need a developer to configure it and set up styles and a design system so that your team can create a consistent-looking page.
- It is a tool which enables the creation of easy-to-use drag-and-drop functionality for content creation by an end user, but at its core, the styling is pretty bare bones.
Though, as it is, it is a mighty tool to have for your marketing or content-creating teams, it gives them the flexibility to make unique layouts while at the same time keeping the look and feel on brand.
Getting Started with Layout Builder
In this article, I am going to:
- Start by running through the basics of setting up Layout Builder.
- Then look at the templates and touch on how to override or modify default templates and styles.
- Next, look at some modules that I feel are excellent additions so that creators have even more control over the pages they create and less clutter in the UI.
By the end, you will see how powerful Layout Builder can be.
So with this let's get started.
Installing Layout Builder
To get started with Layout Builder.
- Visit the extend page and enable Layout Builder; check Layout Builder.
- Click Install at the bottom of the page.
You will be prompted to enable the Layout Discovery module, click okay.

- Click Continue.
Related: Installed a Drupal module
Layout Builder Permissions

Once installed you will get a status message that Layout Builder is enabled. It will also guide you to the permission page.
Manage > People > Permissions
/admin/people/permissions
There are 2 permissions you need to think about.
Configure any layout
Warning: Give to trusted roles only; this permission has security implications.
Create and edit custom blocks
Manage the single-use blocks within the Layout Builder
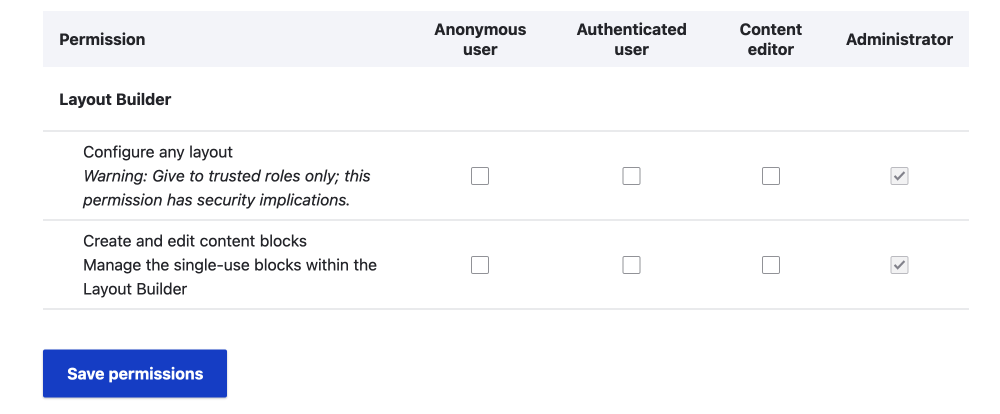
If you are using an admin role, you don't need to visit the permissions page because you have full access to all configurations. However, if you set up other roles with fewer privileges you may need to set these, especially the ability to manage single blocks. As with everything, you will need to test that user roles have correct access. Basic permissions are pretty simple stuff and self-explanatory so let's continue.
In the next step we will add some contributed modules that allow for more control over which blocks can be added to Layouts and by which roles. These modules are essential to remove clutter from the UI and make it a pleasant page-building exeprience as the sheer number of blocks can become large very quickly and overwhelming even for someone who knows Drupal. It is also a good idea to think about the naming of blocks so they have meaning. We will cover this later so let's continue.
Setting up Content Types to Use Layout Builder
Once you have Layout Builder installed, you need to enable it for the content type you want to use it with. If you are familiar with Drupal, you will already be aware of the manage displays page for content types and you will understand that for each content type, you can have multiple view modes or displays.
On a newly installed site, each content type comes with two custom displays (or view modes): default and teaser. We will enable Layout Builder for the default display. However, you may want to set it up for a custom display, such as for Full Content.
Enable Layout Builder for Basic Page Content Type
Okay, let's get this set up.
Visit the manage display page for the content type you want to enable Layout Builder for. For this setup, I will use the basic page content type with one extra field added. The extra field is a media image field.
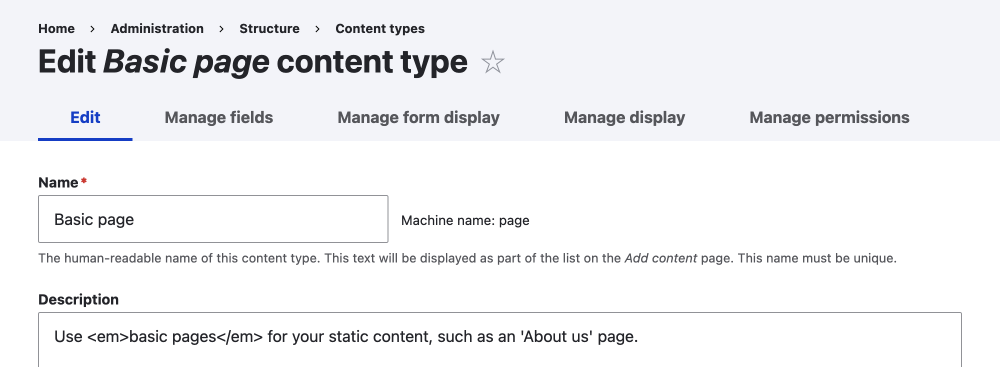
Manage > Structure > Content types
/admin/structure/types
/admin/structure/types/manage/page
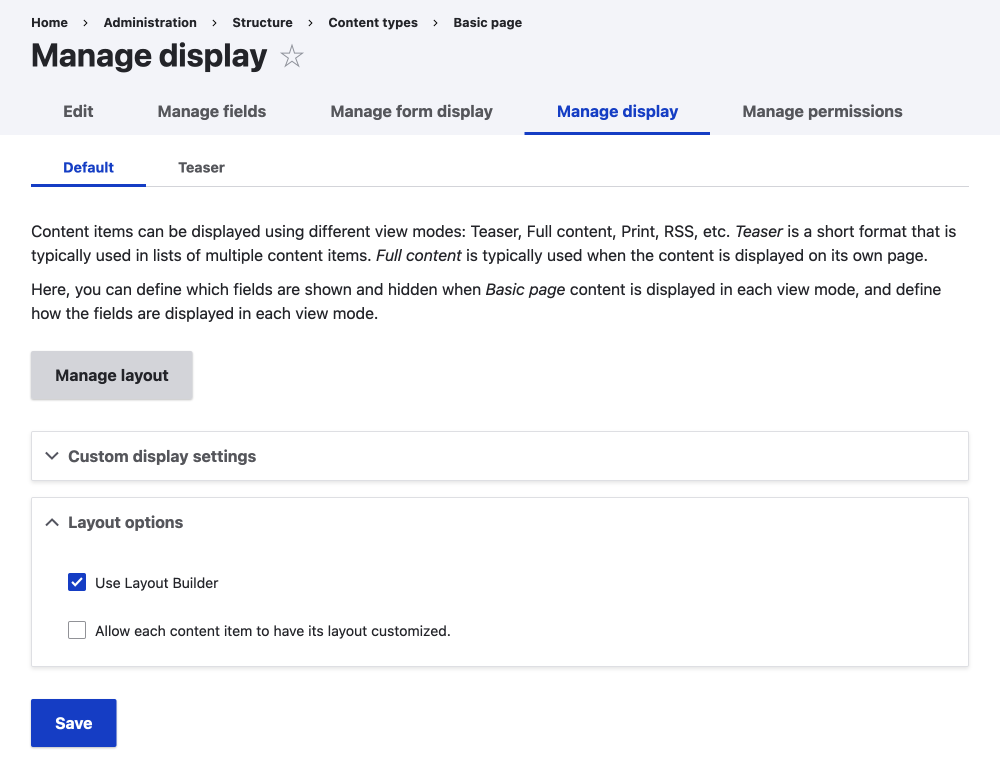
On the Edit Basic page content type click on the Manage display tab.
- Click on the display you want to enable it for. We are using default so it is already selected.
If you want to set up a custom display you will need to use the custom display setting section and select one of the available views mode. If you want to create a custom view mode you will need to set that up first. Setting up a view mode is as simple as using the link and adding it. A view mode set-up is a one-word value which acts as a reference so it can be shared in different views and used in template naming hints. If you do use a custom view mode display you may also need to add the templates. I have found using the default display is fine for most simple sites.
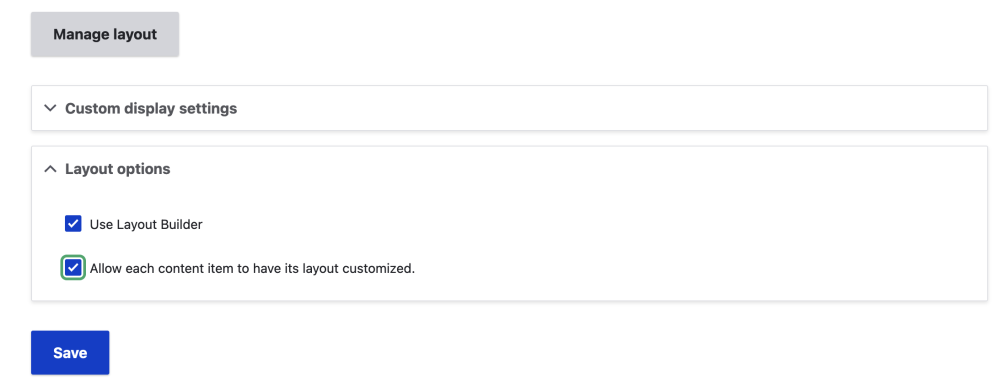
- Check Use Layout Builder In Layout options
- This shows: Allow each content item to have its layout customized.
What this does is allow people other than the site builder to modify the layout of individual items of content as per the permissions given in the configuration set-up.
Alternatively, if left unchecked, you'll have a predefined layout for all content of this type. I.e content creators and editor roles can't modify the layout they can only add content to the predefined layout blocks.
- This shows: Allow each content item to have its layout customized.
Let's leave this unchecked for now as this can be changed later.
- Click Save
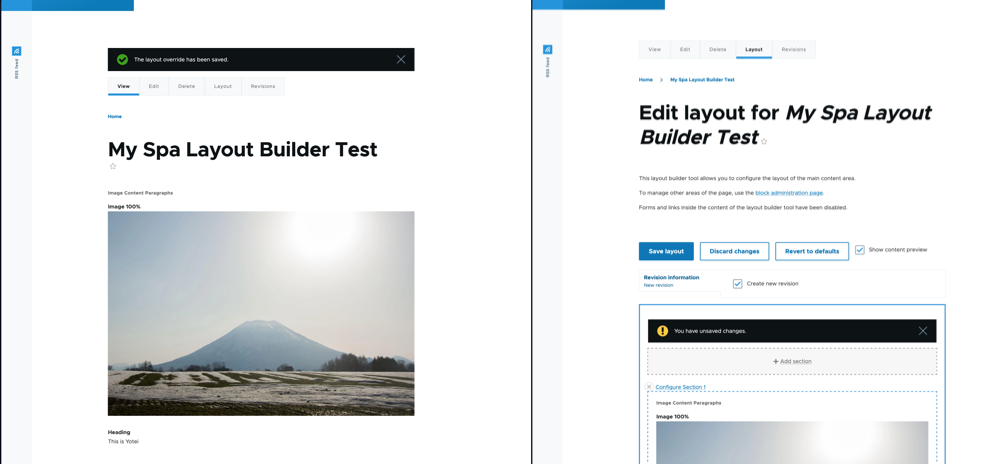
On clicking save, the field management table is replaced with a Manage layout button for the current display. This won't affect the teaser or any other custom displays you have set up. Let's now take a look at what a basic install of layout builder gives us.
Manage Layout to Create a Custom Layout for your Content Type
- Click on the Manage layout button.
This page is where you create the default layout. It comes with a section with the body field place-holder and the links place-holder already included. In my case, it has also added the header image field I added. Feel free to delete any of these placeholders and add them as you please.
On this page, you can:
- Add sections above and below any of the sections already configured.
- Delete sections.
- Place blocks in the sections.
- You can place the content fields that are part of the content type.
- You can add custom blocks.
This list is only a basic overview so make sure you play around with it to get fully used to it. Below I will cover some of these features in more detail.
Adding Sections
When adding a new section you can choose the number of columns. A default install comes with one, two, three, or four columns. You can't modify the number of columns after you click add section.

Configuring Sections
- You can add an administrative label
- For 2-column and 3-column you can adjust column percentages.

When you add a new section you can then add a section above and below any of the current sections.
Adding New Section Layouts
If you want other types of sections, you can set these up. This will be covered in an advanced article shortly.
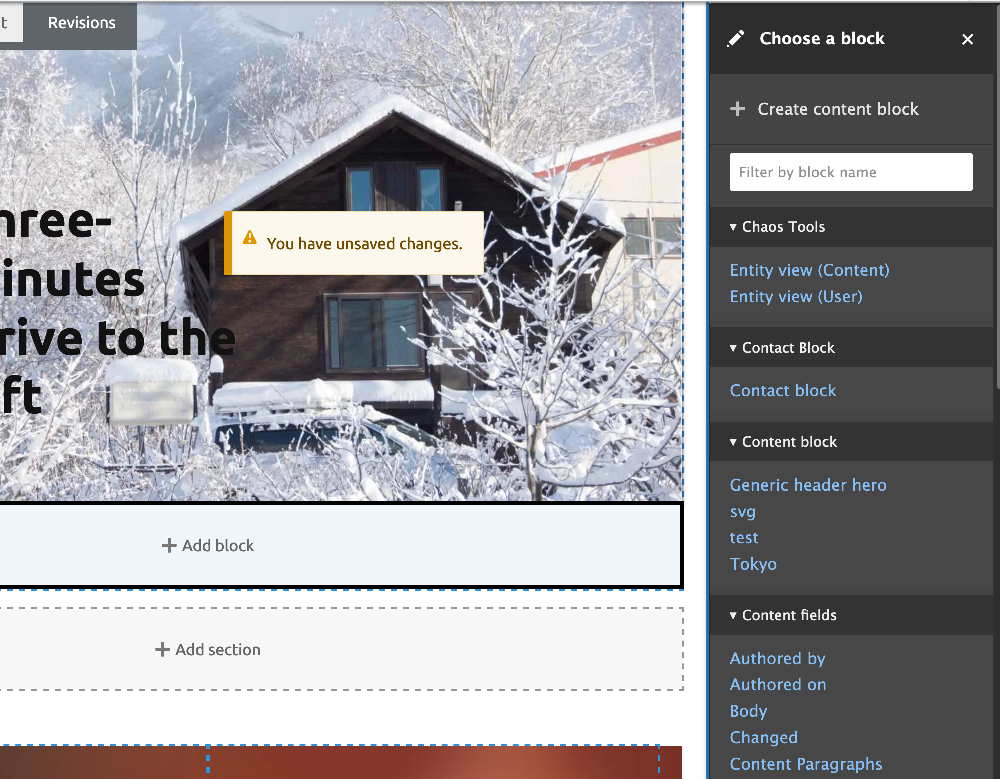
Add Blocks to Sections
In the active sections, you can add blocks. This may be:
- The content that is part of the content you are modifying. The fields that you have added to the content type.
- The multitude of system blocks.
- Custom blocks.
I cover the blocks available in more detail in the following section, Types of Blocks available in Layout Builder. For now, have a look around by clicking Add block in one of the active sections.
Once you've added blocks to your pleasing, save the changes and it is time to check out the page.
View the Page
This assumes you left "Allow each content item to have its layout customized" unchecked as we did in the above section Enable Layout Builder for Basic Page Content Type.
When adding a new page it is the same as adding any other page except the new layout is applied.
Go ahead and add a new page. You will see it is the same as adding a page without Layout Builder enabled except the new layout is given to it when saved. Other things to observe are:
- Older content has the new layout applied as well.
- There is no option to modify blocks in the layout.
As such this is a great way to make layouts, all powered by flex by using the new starter kit (that uses Stable 9 as a base) or Olivero.
If you want to create theme-specific templates, you can easily drop a new template into your theme using the theme suggestions found in the Twig debug mode.
The above setup only allows admin roles with the permission to modify the layout at the manage content type display level. Users can add the data to the fields on the edit form and that is it. If you want to allow content creator user roles more control over the layout, then you need to set that up.
Allow Modification of each content item
Got back to the Manage Display page
Manage > Structure > Content types > Basic page > Manage Display page
/admin/structure/types/manage/page/display
- Check Allow each content item to have its layout customized.
- Save.
If you allow this, which is a great feature because it allows for unique and engaging content, you have to remember each content item will be detached from the master. It is possible to make changes to the master layout builder display but these changes will not be reflected in any current content items.
Let's go check this out by editing a page or creating a new page.
Edit the Layout for the page
If you add a new page you won't have the option to edit the layout until you do the initial save. Once you save the content you will have access to the layout tab.
The Layout Tab
Once the content is saved, you will see that the body field and other fields are placed in the layout sections as set up on the manage display page for the content type. However, you will see that you can now move the blocks in the UI on the layout tab.
For a content creator or editor role (you'll need to set these roles up and give the correct permissions) or as the admin, you can add new sections and add any blocks to the regions in each section. You can also rearrange the blocks by drag and drop. You can drag and drop blocks in the sections and from section to section.
Types of Blocks available in Layout Builder
Content Fields
These are the blocks created automatically by the content item and can be edited on the edit page. They are the fields that are available to the individual piece of content you are currently editing.
Create a Custom Content Block
If you add a custom content block using the Layout Builder sidebar this is only associated with this piece of content. The block doesn't become a global object and isn't available in the sidebar content block section. It is considered in-reusable.
You can create custom block types to use as well which is a good way to keep block content consistent.
Global Custom Content Blocks & System Blocks
There are a lot of global content blocks and system blocks you have access to.
- Global Blocks are custom content blocks created on the blocks page or on a View page. I am unsure if global blocks is a term used by Drupal but it is something I use to distinguish them from system blocks.
- Custom block library.
- Lists (Views) Blocks.
- System blocks are the host blocks that come with a Drupal install.
- Login form
- Search form
- Menus
- User
- User Fields
- System
The above list of blocks covers most if not all types of blocks available. As you see there are a lot.
Unruly Content
You will notice if you do allow individual pages to be created and modified that you end up with a lot of options for content creators. Not only will this become confusing for content creators, but it will also allow for untold variations of layouts, meaning inconsistencies in layout, design, and brand will creep in. This is where using a few contributed modules for adding restrictions is necessary. Also, a good design system and theme are imperative.
In the next article we will look at what contributed modules are useful to combat unruly design by allowing the admin to restrict what blocks a content editor has access to.
Re-usable layouts between content types
Thus far we have only changed one content type to use Layout Builder to manage the content region of the page. Usually, this will be perfect as a content type will have a specific use and unique fields and therefore its layout configuration will also be unique. Plus, if you have different categories of content needing the same layout, you can use a taxonomy to distinguish them.
That said, if you want to re-use the layout setting between content types, this is possible with various contributed modules and I will cover this in a later article. In the meantime, search for re-usable Drupal layouts Layout Builder on your favourite search engine.
Conclusion
Taking the fact that Layout Builder and the ecosystem being built around it is widely used and supported it is a great addition to your Drupal site. It has been considered stable since Drupal 8.7 and from my own experience, it is a powerful tool that only gets better with each use.
Since Layout Builder is part of Drupal core, you can be assured by using it your site will be future-proofed. If you decide to use contributed modules, that we will cover in the next part, make sure that they are also well-supported and actively developed or get involved if the module is something you feel is a needed enhancement.
As you will soon see, in part 2, using contributed modules is the key to making a good user experience with Layout Builder.
Layout Builder is maybe not the best option If you want more control over the body field of the content. If this is what you are after then you may need to look at other options or look for a unique configuration for Layout Builder.
Other options are:
- Setting up CKEditor with custom settings and configurations can be a great option. For a deeper look at this, I have written a few articles about using CKEditor and configuring it.
- I haven't used it but Gutenberg (WordPress port) could be an option.
This is subjective and if you have mastery over your tools and users have good restrictions in place anything is possible with either Layout Builder, CKEditor, Gutenberg or a combination thereof.
In Summary
Layout Builder does take a little to get used to and set up and it does need to be used with contributed modules. However, as a tool to allow non-technical users the ability to add unique layouts and content to content types, it is awesome. I look forward to working with it more in the coming months and years.
Thanks for reading and be sure to sign up to get small titbits and thoughts about front-end development and design and of course Drupal.
`til next time, keep creating!