Basic CSS Prerequisite: You need to be able to set up a basic HTML page.
What you will learn: CSS Position, document normal flow, CSS selectors.
A deep understanding of positioning in CSS is one of the things that can really up your CSS game, and is also one of the fundamentals that most developers possibly don't truly understand. Joke of the man who has problems with his living room blinds aside, I will be looking at positioning in CSS in this miniseries.
In this first part, we will look at the position property, but as you will find out, we have other methods available to position elements in CSS. That being the display property and the transform property, and the raft of values and assisting properties that each of these properties have.
Understanding Position
To understand position, we really need to look at the normal flow of the elements on an HTML page. The best way to see that is to add a few elements to a page. If you don't have a basic page with a linked CSS document, set one up now if you want to follow along.
If you like, you can use my GitHub template, run in your CLI:
You can then navigate into the directory and start work. Don't forget to remove the .git directory and reinitialize as your own.
The Document's Normal Flow
To see how elements naturally position themselves; inside the main element of your page add a div with a class name outer, and then inside that add another div with the class name inner.
The thing to note here is we haven't added any position rules. So naturally, we can see the inner element sits on top of the outer element and both their positions are top 0 left 0. This is illustrated by the default code in the above snippet's comments.
Note that I have also added margin using logical properties to give the elements a bit of space on the top (margin-block-start) and both sides (margin-inline).
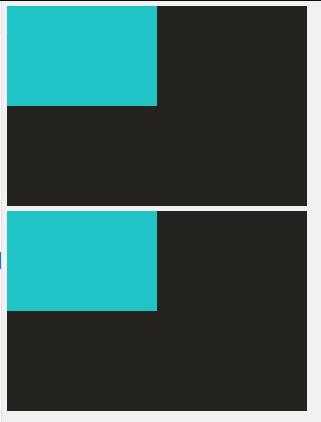
By adding a second set of the inner and outer DIVS, we can see that it naturally goes underneath, which shows that the flow of the document is down the page. This is because div elements are block elements; I have again added the default display for the element in the comment block.
Image
This all we need to know for now in regard to the normal flow of DIV or block elements; that is that DIV elements are block by default and for this reason they stack from top to bottom.
Next, we will now look at how we can position the blue box within the black one using the CSS position property.
The CSS Position Property
The CSS position property has 5 possible values, but in this article, we will only look at 3. The 3 we will look at are:
static (Default)
relative
absolute
Fixed and sticky are the other values. I will look at fixed and sticky in another article as they have their uses, but for now, I want to keep it simple.
We will look at the 3 values above and how we use other assisting CSS properties to position our elements.
Again this won't have any effect visually, but by adding these properties with the respective values, we can now adjust the position.
The top, right, bottom, left, and z-index properties
To adjust position we have the top, right, bottom, left, and z-index properties. The first four take exact values or percentages. The z-index property is used to adjust the stacking order of layers. Since we don't need to change the stacking order in this demonstration, we will look at z-index at a later date.
To adjust the position we use the top, right, bottom, and left properties on an absolutely positioned element. Some things to note about an element positioned absolute are:
The element is removed from the normal flow of the document.
They will be contained by (but not within) the parent or closest positioned ancestor or the body if no other element has a position value set. In this example, our inner element is container by the outer element.
Position or move the inner element to the bottom right corner
Taking that, our element is 300px by 200px and our child element is 150px by 100px, and we want to move our inner child element to the bottom right corner. We need to move it from the left and top by half, so 150px and 100px respectively. To only move the second set, we need to add a new class, let's call it inner-2.
Now we have added a new selector, we can position the associated element. This allows us to compare. Add the following CSS to your CSS.
Using left and top
.inner-2 {
  left: 150px;
  top: 100px;
}
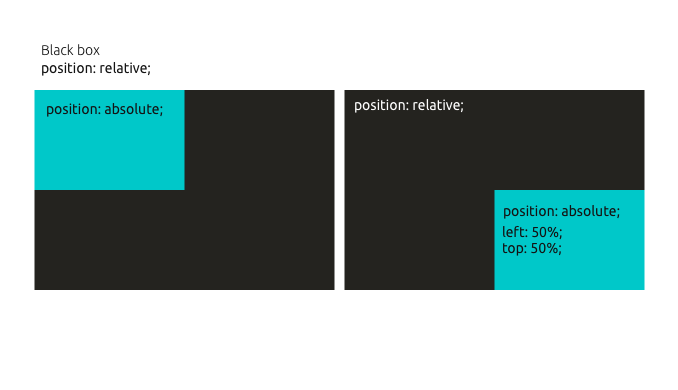
Or, since we can use relative values, we can also use 50% on both.
.inner-2 {
  left: 50%;
  top: 50%;
}
The above code will result in the below example.
Image
Using right and bottom
Alternatively, since the element is contained by the parent (but removed from the normal flow) we can position it from the bottom and right as shown in the code below.
.inner-2 {
  right: 0;
  bottom: 0;
}
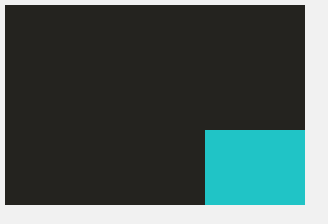
It is important to note, since we have removed the child element from the normal flow of the document that in fact, we can move it out of the element, that's why I said contained by, not within. Let's have a look.
.inner-2 {
  left: 200px;
  top: 125px;
}
Image
So as you can see that an element can be moved outside the parent.
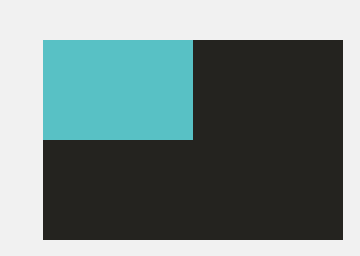
Try changing absolute to relative for the inner DIV
In the case we have just looked at we can also use position: relative on the child and the first rule set would work, that is left and top. However, since the relative value sets the position in relation to itself the bottom and right would have no effect on the position of the child element. That is because you are moving in 0 in both direction from it current position.
Image
However, if you add some values to right and bottom, it will move from its normal position.
Overflow Hidden If we do push the child element outside the parent as illustrate, we can use overflow: hidden on the parent to hide the parts outside of the parent.
Compare this with the one above and see how the inner element is cut off, nice!
Summary
In this article, we have looked at how to position elements in HTML. We did this by first setting the CSS position property to either of relative and absolute, and then using the top, right, bottom, and left properties to move elements from their default position in the document normal flow.
We learnt how, the parent element needs to be set to relative so that the child element is contained by, but not within it. The parent element acts as the origin of the child, and we can then move the elements from the default position, which is the top left in a left to right document.
I wrapped up by showing how you can move elements outside the parent and also how you can set the overflow to hidden so you can visually keep the element inside the parent; any part of an element outside the parent will be hidden.
That's about it for this article, I hope that you learnt something new, or has given you a new way to look at how we can use the CSS position property to position things on our screens. I suggest you play around with the code so you can really see how it works.
In upcoming articles I will be covering more basic CSS positioning techniques and also more on design and development plus other interesting tech-related stuff. So be sure to sign up to the newsletter, you'll be the first to know when new content is published.