You have probably seen the effect where items slide in or slide up when you scroll down the page? Good, so you know what I am talking about. There are many libraries you can use, but if you only want to add one simple effect then it may be better to write your own code. Or even if you want to practice JavaScript and learn how to use a few JavaScript methods. In this article, I am going to teach you how you can implement a basic slide in effect so that interests you, please follow along.
After reading this article you should have a better understanding of:
- Selecting items in the DOM
- Event listeners
- getBoundingClientRect()
- CSS transitions
Creating these effects is as easy as using a bit of CSS, a few built-in JavaScript methods, as listed above, and a bit of maths. \OoO/.
Let's get stuck in.
Set Up the HTML and CSS
The first thing we are going to need is a bit of HTML and CSS, for now, let's keep this simple and use some boxes. Below is the code you can use.
<header id="header">
  <h3>NICE MOVE BRO !</h3>
</header>
<main id="main">
  <div id="one" class="inside-main"> </div>
  <div id="two" class="inside-main two"> </div>
  <div id="three" class="inside-main"> </div>
  <div id="four" class="inside-main"> </div>
  <footer> </footer>
</main>
body {
  margin: 0;
  background-color: black;
  position: relative;
  color: #ffffff;
  overflow-x: hidden;
}
header {
  height: 200px;
  position: fixed;
  width: 100%;
  z-index: 100;
}
main {
  width: calc(100vw - 40px);
  position: relative;
  top: 250px;
  left: 20px;
  height: auto;
}
.inside-main {
  background: hsla(0, 5%, 15%, 0.8);
  height: auto;
  min-height: 400px;
  margin-bottom: 2em;
  padding: 10px;
}
Add the code inside the body element of an HTML page and add the CSS to the stylesheet. You will also need to have a JavaScript file.
If you need a basic starter, you can get my bare-bones boilerplate template from GitHub. Download it to your local, get set up and then come back, I will be waiting.
Related: GitHub primer article and get set up.
Adding the Slide in effect with JavaScript and CSS
Before we start, add this CSS to the CSS stylesheet, this moves the third box with ID three off the screen to the left and makes it invisible.
#three {
  background-color: hsl(113, 100%, 70%);
+  opacity: 0;
+  transform: translateX(-100vw);
+  transition: opacity 2s, transform 2s ease-out;
}
Now you are set up let's continue. Open up the JavaScript file and follow on with these 4 steps.
- First, create a couple of variables, one will be a window height and the other will be the element we want to slide in.
const three = document.getElementById('three');
const windowHeight = window.innerHeight;- Next, add an event listener and listen for the scroll event and pass in the empty listener function.
window.addEventListener("scroll", function (){ EMPTY FUNCTION });- Then we need to add the core of the code, this is where the magic works.
window.addEventListener("scroll", function (){

  let boxThree = three.getBoundingClientRect();
  // Use the top of the box position from DOMRect using .top
  let trigger3 = boxThree.top;

  if (trigger3 < (windowHeight - 200)) {
    three.classList.add('three');
  } else {
    three.classList.remove('three');
  }

});
Let's walk through what this does.
- First, we need to get the position of the box we want to animate, we do this using getBoundingClientRect(). This returns a DOMRect object with position and dimensions. Now we have a DOMRect object we create a variable trigger3 for the top position of the box
What is a DOMRect object?
It is an object that has the position and dimensions of the element as shown below.
var outerTracker = outer.getBoundingClientRect(); console.log(outerTracker); /* output of console.log DOMRect { bottom: 945 height: 750 left: 201.5 right: 1211.5 top: 195 width: 1010 x: 201.5 y: 195 } */I used getBoundingClientRect() and the DOMRect while making a image viewer where you can compare two image with a slider to reveal and hide an image. If you want to find out more details you can read about in on How do I make An Image Reveal & Hide Viewer?
- Back to our JavaScript function, we want to check when the box's top is on the screen, but we also want to make sure it is on the screen for a while as illustrated below.
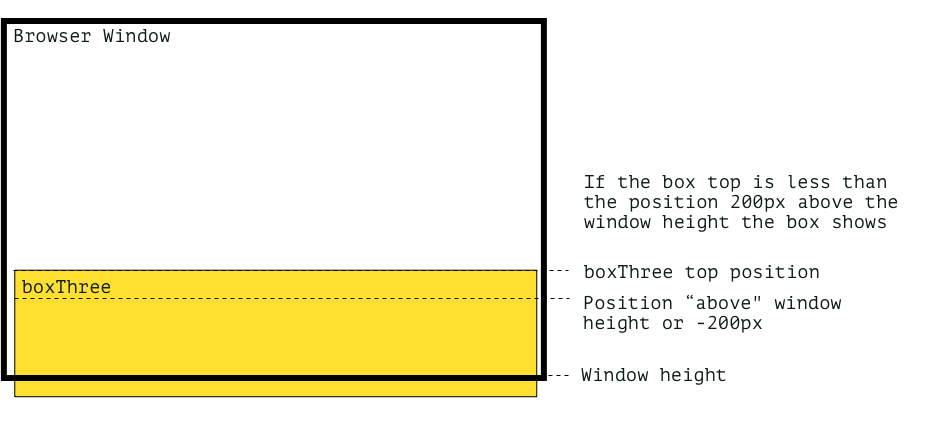
- To do this we need to do a little maths, first, get our window height variable and minus 200px from it, and then we will check when the top of the box is less than the new calculated height. This is done in the If statement.
if (trigger3 < (windowHeight - 200)) { }- Then inside the conditional, we will add a new class to the box and for good measure, we can remove the class when the statement doesn't return true.
three.classList.add('three');- Now back in the CSS, we need to add a rule for the class we added in our JavaScript. Since we have a transition already set on the element when we add the new class the box will transition to the new rule and thus will slide in and when the class is removed it will slide out.
#three.three {
  opacity: 1;
  transform: translateX(0);
}
That's it, less than 1KB of code, and we have a nice effect, see if you can make it slide in from the left or slide up, or a spin could be cool? I will post some other nice transitions shortly.
If you want the full code I have put it on the GitHub Nice Move Bro A1 repository and to see a demonstration checkout the demo section.
Even though this is pretty cool, you do have to make sure that the height of the window is less than the position of the third box, otherwise, nothing will happen. It will take a bit of setting up and experimentation, but that's all part of the fun.
Another thing we can do is make this more reusable by passing classes into the function. If that sounds interesting be sure to leave a message below and sign up for the newsletter. I cover my journey from learning by doing, something I started almost 20 years ago.
Thanks for reading.
Add new comment