Modifying the output of a View in Drupal via the UI is easy for any site-builder or user that has Views administration permissions to do so.
What is Views ?
Views is a way to build customized lists and queries from your database: think product lists, lists of all you articles, a gallery from your post's images, or even placing locations on a map. You can add any field from your content type to your View, or reference any field in another content type and customize the SQL query in an advanced UI. You can even see the SQL that Views built for you. For more information check Views documentation on Drupal.org https://www.drupal.org/docs/8/core/modules/views/overview
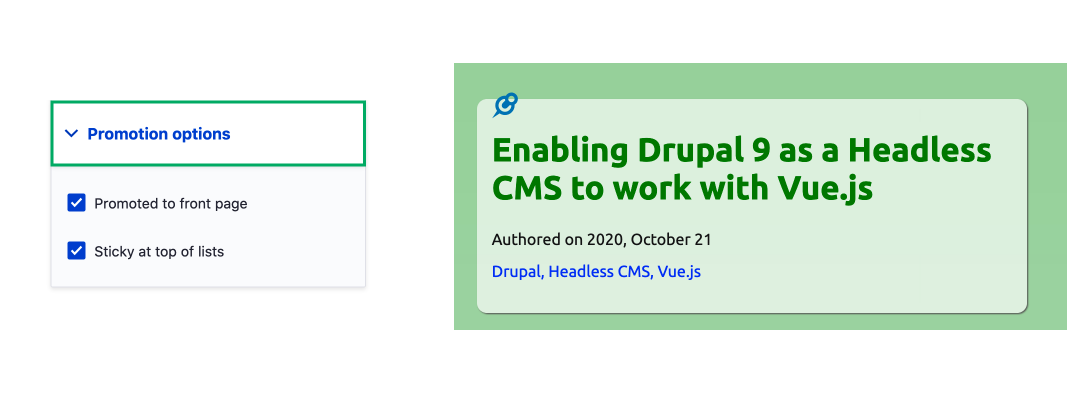
In this example we will modify the sticky field found in all content types by default; it is used to stick content to the top of your list by checking a checkbox. We will modify the output so we can style it with a nice pin icon. To add the CSS for the pin icon you will need to have access to the theme code-base but other than that everything else can be done in the UI.
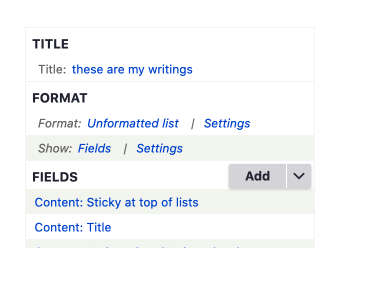
To be able to modify the output you first need to add the field to the view. I will cover this in more depth in another article as it goes beyond the scope of this piece, but to add a field to the View output you have to set the View display format to show fields and then add a field.
Modify a Field Using Rewrite Results
So we have the field as shown above with the label Content: Sticky at top of lists.
Click on this to modify or do it at the time of adding the field.
Clicking on the field opens up the configure field modal dialog box. The options will be slightly different depending on the field type.
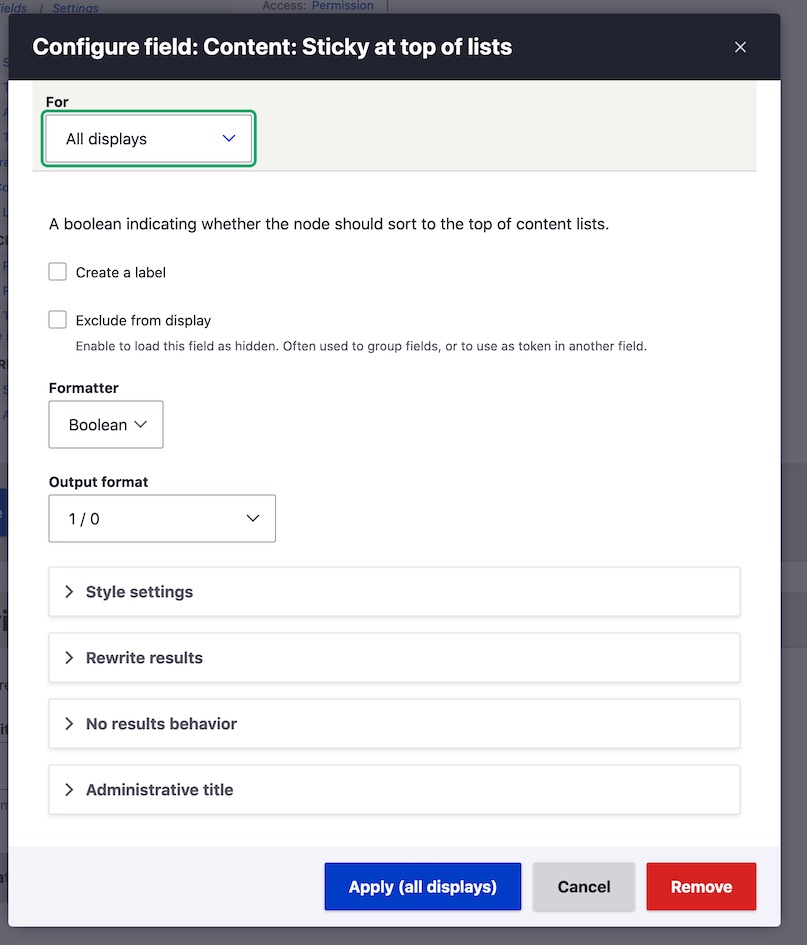
Since sticky is a checkbox we only have the formatter of boolean. Then we have the option to change the output, since I am using this to display code if the checkbox is checked I have chosen 1/0 , but multiple option values are included, including custom.

There are other configuration option as shown but to customize the code output we only need to Rewrite results.
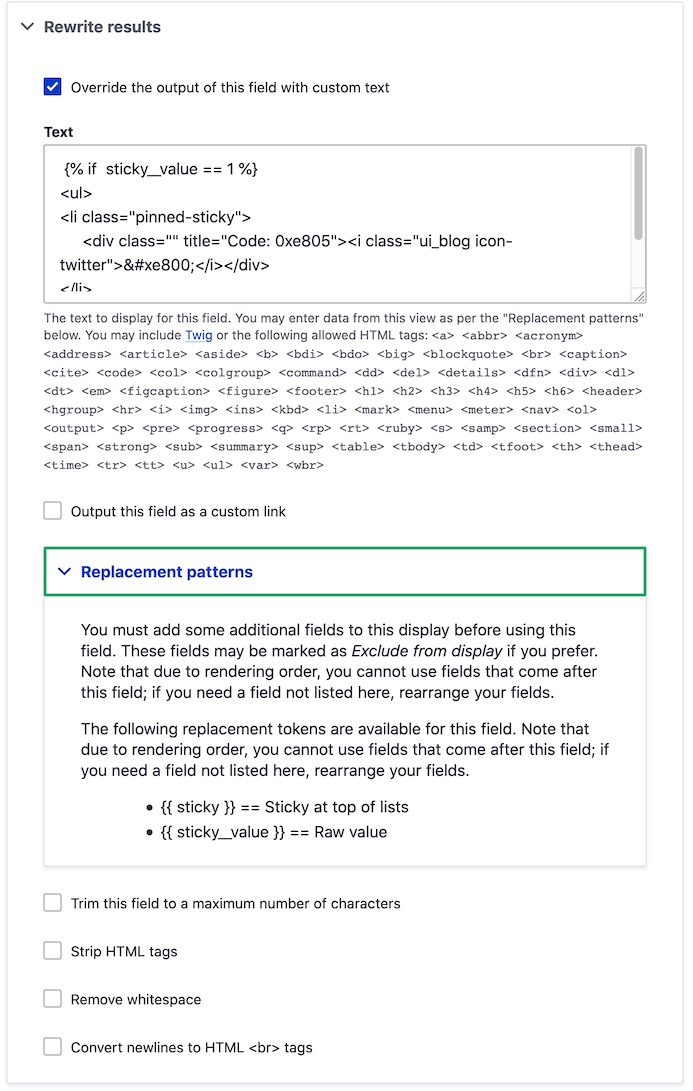
- Click Rewrite results
- Check Override the output of this field with custom text.
Next, we need to get the value of the field.
- Click the replacement patterns
you will see we have 2 options.
I'm going to use{{ sticky__value }} == Raw value.
We can rewrite fields using values from other fields too. To do this you need to rearrange the fields in the UI and then you will have access to all fields above. In this case we don't need access to another field value so leaving it at the top is fine. [IMAGE 6]
- In the Text area we can write our new output.
Using Twig to Rewrite the Output
Since Drupal 8, Twig has been used as the template engine. Twig is a PHP template engine and uses {{ }} and {% %} to render PHP in your templates. Twig is part of Symfony.
We are going to write a conditional, below is our pseudo code.
If the value of our boolean is 1 (checked).Then add a unordered list (ul) with 1 li item.The list item content will be the pin icon's custom character code from our ui_blog custom font.We also want to add a class to the li item and the i element.
This is our final snippet of code, it says if sticky value equals checked then include the code.
{% if sticky__value == 1 %}
<ul>
<li class="pinned-sticky">
<div class="" title="Code: 0xe805"><i class="ui_blog"></i></div>
</li>
</ul>
{% endif %} After adding the code to the text area
- Click Apply (this display)
- Click Save
You will notice at the top For This block (override), if we had more than one display that we want this modification to be applied to we could apply it to All displays. However, in this case I only want to show the pin on the homepage display.
Add CSS rules to the theme
I had already added the code to my theme and included the custom ui_blog font so it shows. I will be writing about how to add nice custom icons, not just to Drupal themes, to any site in an upcoming article, make sure you subscribe to find out how.
Here is the code I added. Note that you would need to add position relative to the parent of the li for the absolute position to work.
.ui_blog {
  font-family: "ui_blog";
  font-size: 1.8em;
  color: #186fae;
}

.views-row li.pinned-sticky {
  position: absolute;
  top: -.5em;
  list-style: none;
  left: .5em;
}
So that's how you can modify the output of a View in the UI, the options are endless, and with Drupal's caching system this remains super fast. We can also create templates in our theme but for things like this that would be a bit of an over-kill. Thanks for reading and be sure to check some other articles.