After using scroll event listeners and getBoundingClientRect to implement a slide-in/up effect, along with scrollTop for a sticky navigation, I found myself constantly needing to calculate and recalculate element positions. Concerned that my code would grow overly complex for intricate or multiple animations, I decided to explore more efficient ways to trigger transitions and animations in JavaScript, and this introduced me to the Intersection Observer API.
Related: How do I make an element slide in with 4 lines of JavaScript?
Related: How to make the Top Navigation background colour and size magically change on scroll
The Intersection Observer API
After researching, the Intersection Observer API came up as a solution. I don't really know where and when I was pointed towards this, as I have spent a lot of time in the last few years mucking around with code, and on MDN reading, but I am glad I took the time to look at it.
On MDN, it explains the Intersection Observer API was created to solve issues of browser performance that other methods have of working out the intersection of elements.
In their words, using other methods to build up the necessary information becomes "unreliable and prone to causing the browser and the sites the user is accessing to become sluggish" and "since all this code runs on the main thread, even one of these can cause performance problems". Boom! Exactly what I was thinking!
So the Intersection Observer API is something worth becoming familiar with if you want to create fast and modern sites with animations or transitions triggered by scroll.
In this article, I will have a look at the Intersection Observer API and illustrate how it works with some practical examples.
Benefits of using Intersection Observer API
If you want to trigger actions based on scroll, the Intersection Observer API is what you need, as the performance is better than using other methods. This is because it hands off all the work to the browser instead of needing the browser to parse, compile and run multiple lines of codes in the main thread. That's it, the Intersection Observer API gives greater performance.
How to set up Intersection Observer API
In this part, we will look at the set-up in more detail. I have broken it down into the steps below in a way that makes the most sense to me, I hope it also helps you.
Before we start, we will need some HTML. We can use the same code from GitHub that was used in the How to add a slide in element in JavaScript article. Please follow the instructions on how to clone a GitHub repository if you are unsure how that is done. If you use this repository, remove all the JavaScript except the first line; const three = document.getElementById('three');
Okay, now we have a nice set-up, let's start writing some JavaScript code!
-
In the JavaScript file, we first create an intersection observer by using the Intersection Observer constructor, we do this by using the
newkeyword and assigning thenew intersectionObserverto the observer variable we created. See below for the code thus far.
let observer = new IntersectionObserver(handleIntersect , options);
The Intersection Observer takes a callback function and options, as you can see. However, before the callback can be called, we need to set a target and also the options. -
The target is set on the observer using the observe method, and we pass the target to it.
You can think that we "observe the target".
observer.observe(target)To set the target, we can select any element on a page by a class or ID using the
querySelectororgetElementByIDmethods. In the code below, we are selecting an element with an ID of three. This code should already be present if you cloned the repository and followed the instructions above.const three = document.getElementById('three');So now this is our code.
observer.observe(three);Now we have a target to observe from our new intersection observer, all we need to do is add the options.
-
There are 3 options we can set.
root: The element that is used as the "boundary-line" for which the target is tracked to cross over. The viewport is implied if it is set toroot: null. It has to be an ancestor of the target.
rootMargin: This adds some offset to the root. It can have similar values to CSS margin, that is top, right, bottom, left and can be a percentage. In this example, I have a negative margin set because I want it inside the root, up from the bottom.
It defaults torootMargin: 0
threshold: The threshold is set on the target. It is used to invoke the callback when the target crosses into the root intersection rectangle. This can be a single number or an array. It can be per cent or pixels value or values.
It defaults tothreshold 0:
Make an object like below and add it before creating thenew intersectionObserver()let options = { root: null, // null means use viewport rootMargin: "0px 0px -250px 0px", threshold: [0.5 , 0.75], };
So this is our code so far.
const three = document.getElementById('three');
let observer;
let options = {
    root: null, // null means use viewport
    rootMargin: "0px 0px -250px 0px",
    threshold: [0.5 , 0.75],
};
observer = new IntersectionObserver(handleIntersect , options);
observer.observe(three);
Now that we have the options set, the Intersection Observer API is ready to be used.
However, as such nothing will happen as we need to create the callback function. The callback function will perform some action and will be custom JavaScript code, so the sky is the limit.
Let's have a look at what happens when the Intersection Observer API is run. When the target crosses into the root element.
The Inner workings of the API
Once the Intersection Observer API is set up, it is listening for the threshold we set to be met.
Once the threshold is met, the callback is invoked and at that time the callback receives a list of the IntersectionObserverEntry interface properties and the observer. See the diagram below.
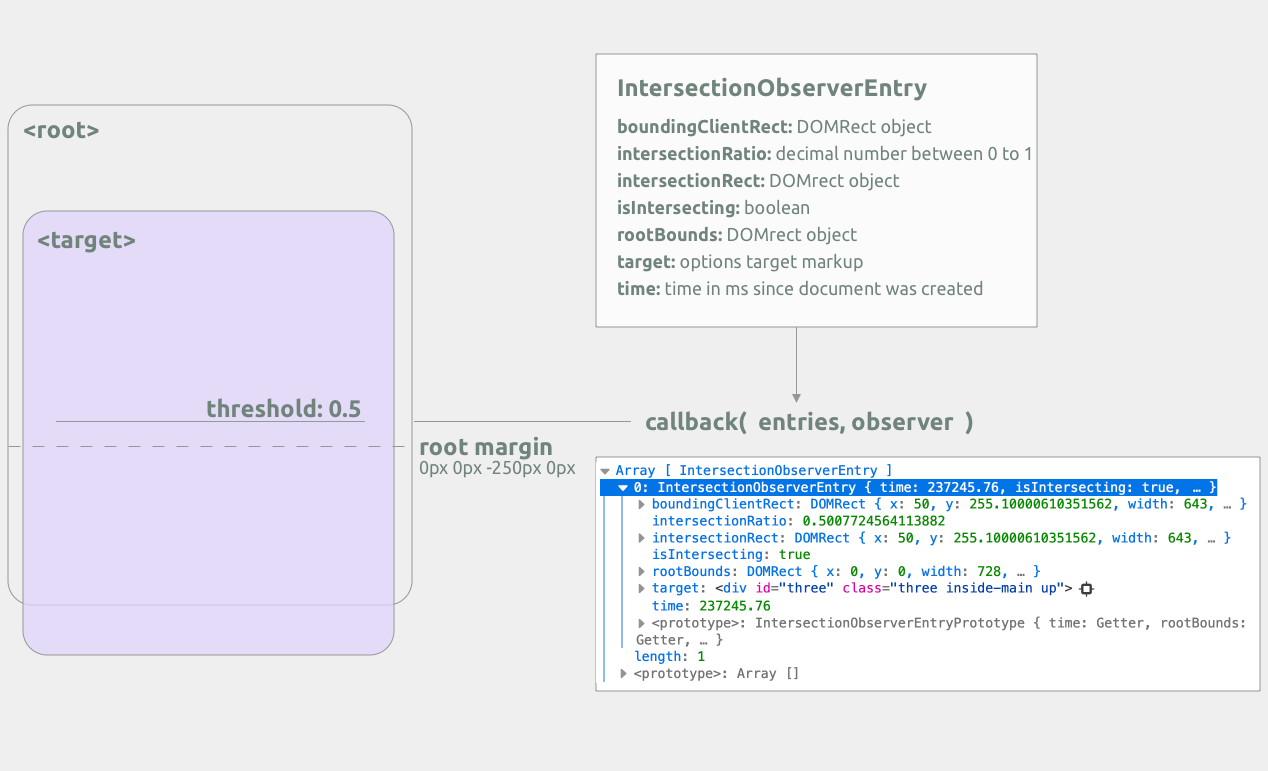
In most examples, I have seen, these are passed back in as entries, but you could use any name. In fact, on W3C they are passed in as changes, but since the interface is named IntersectionObserverEntry let's use entries.
To see the values of the entries as you can see in the above illustration, you can console.log them using console.log(entries); inside your callback function.
Okay, so we have a lot of properties with values we can use in our callback. So let's do something simple using the isIntersecting property.
function handleIntersect(entries) {
  entries.forEach((entry) => {
     if (entry.isIntersecting) {
       entry.target.classList.add("up");
     } else {
       entry.target.classList.remove('up');
     }
  });
}
For the full code, you can check the GitHub repository and for a demo please visit the demo at intersection observer API examples.
Having Multiple Thresholds set
Remember, you can use an array of values for the threshold. How exactly does this work? If you use an array for the threshold option every time a threshold value is hit, the list of IntersectionObserverEntry interface properties is passed into the callback function. In this case, you would need to use a property other than isIntersection. The most likely property you would use is the intersectionRatio property. I will be looking at a more complex example in the weeks to come.
On MDN, there is an interesting demonstration where the threshold is an array, and the array is used to change the hue of the target. When I first read that, it seems quite confusing to tell the truth, and thus I had to write it out in my own way. I suggest you look at those examples, however, as they are quite interesting.
That's about it, under the hood, this is what happens when you create a new intersection observer. Once you grasp this, the sky is the limit and only your imagination and creativity and knowledge of using JavaScript will stand in your way.
In a following article, I am going to add another example that works on adjusting the transform of an element on scroll using an array of 5 threshold values and also play around with colour a bit more, so be sure to sign up for the newsletter and be the first to know.
Thanks for reading and look after yourself! Carpe Diem!