In this article, we will be using a Vue.js frontend to post to a Drupal 9 site using JSON:API.
JSON:API by design only allows for one resource to be requested at a time. The Subrequests module allows you to post multiple records at a time; say a parent with references to other entities. The Subrequests module does this by allowing multiple requests in a blueprint. You can also use the REST API to do this, you can see how that might look on Drupal.org.
That said there will be times you want to use the JSON:API to add one new record and starting simple is a good way to learn about it anyhow. In this article, we will create a new piece of content of article type. This will be done with both sites on the same server. In part two we will look at what needs to be done to post from a remote client on a different domain or what is called cross-origin.
First, we will prep the Drupal site
It is assumed you already have JSON:API enabled; to do that you can check Enabling Drupal 9 as a Headless CMS to work with Vue.js. In fact, if you haven't read it I suggest you do because it will be referenced a few times in this article.
Modify and enable CORS
You need to have access to the services.yml file that was set up with the GET request. Add POST to the allowed methods and add the allowed headers as well. If you haven't already copied the services.yml file and enabled CORS you will also need to do that. I covered this in the Enabling Drupal 9 as a Headless CMS to work with Vue.js. In that article, I cover GET requests and setting up CORS (anchor link: Enable CORS for Drupal). If you need a refresher I suggest you go read it.
This is what our modified service.yml will look like.
   # Configure Cross-Site HTTP requests (CORS).
   # Read https://developer.mozilla.org/en-US/docs/Web/HTTP/Access_control_CORS
   # for more information about the topic in general.
   # Note: By default the configuration is disabled.
    cors.config:
    enabled: true
    # Specify allowed headers, like 'x-allowed-header'.
    allowedHeaders: ['authorization','content-type','accept']
    # Specify allowed request methods, specify ['*'] to allow all possible ones.
    allowedMethods: ['GET','POST']
    # Configure requests allowed from specific origins.
    allowedOrigins: ['https://ADD-YOUR DOMAIN']
    # Sets the Access-Control-Expose-Headers header.
    exposedHeaders: false
    # Sets the Access-Control-Max-Age header.
    maxAge: false
    # Sets the Access-Control-Allow-Credentials header.
    supportsCredentials: false
Drupal Site and User Preparation
You need to have a user, I will be using the admin user that is set up on install which means the user has admin roles and the permission needed to create content. If you use a different user with a different role you will need to make sure the role has permission to create content.
Now that we have a user and a password that can create content we need to enable HTTP Basic Authentication.
HTTP Basic Authentication
So with a user at hand, we then need to enable the basic authentication module. To do this go to the Module page.
Manage > Extend
/admin/modules
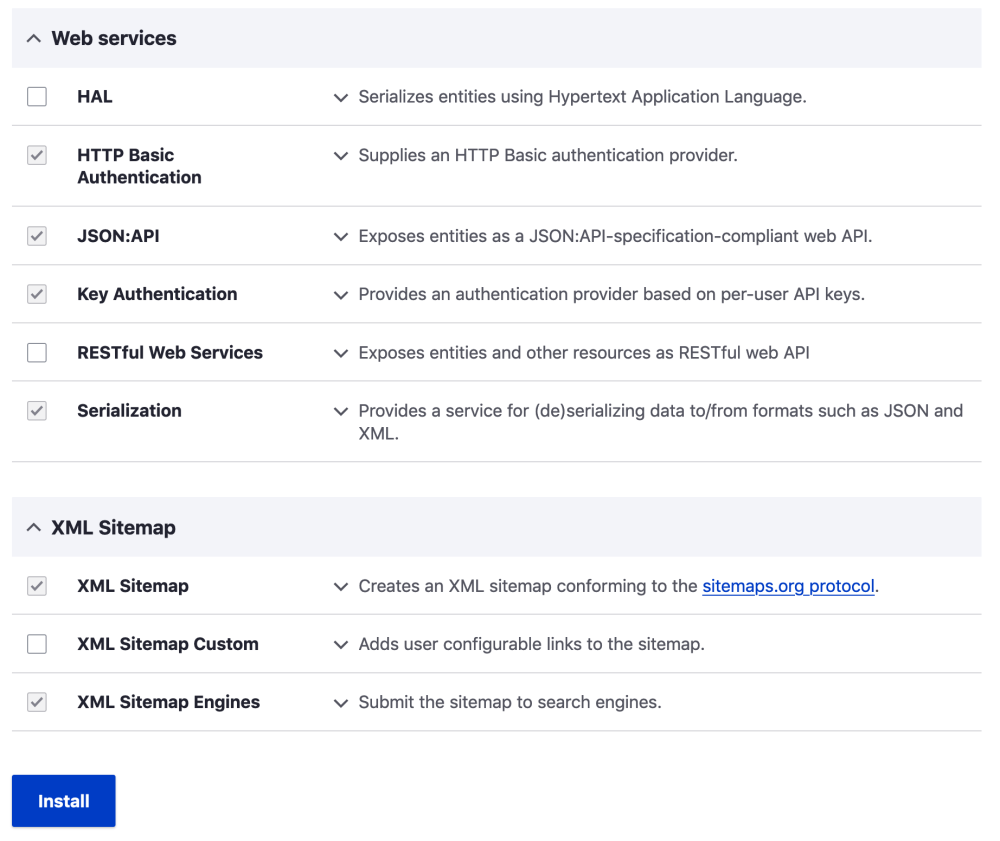
- Look for HTTP Basic Authentication (at the bottom under web Services)
- Check the box
- Click Save
Good, we now have Basic authentication enabled.
Security of using the user and password.
Note that if you were going to allow users to add articles like this you would probably also need to hide the form behind a login. We will revisit this latter so let's move on.
That's it for the preparation of the site so let look at the Vue.js app.
Vue.js App
To start our Vue.js app is going to be basic. We are only going to have a form with inputs for the title and body and use the Vue.js v-model directive to populate an object that mirrors the required format of the JSON:API request as shown below.
{
  "data": {
    "type": "node--article",
    "attributes": {
      "title": "Vue.js Form Title",
      "body": {
        "value": "Vue.js Form Body",
        "format": "plain_text"
      }
    }
  }
}
We are then going to have a function or Vue.js method that is called when somebody clicks on the submit button. The function will use fetch but you could use any async method you like. The function as well as passing the JSON: API object needs to pass the basic authentication.
Here is our app code.
new Vue({
    el: '#app',
    name: 'NewArticle',
    data: function () {
        return {
            postUrl: 'https://myDrupalWebsite.com/jsonapi/node/article',
            response: '',
            formData: {
                "data": {
                    type: "node--article",
                    attributes: {
                        title: '',
                        body: {
                            value: '',
                            format: "full_html"
                        }
                    }
                }
            }
        }
    },
    methods: {
        createPost() {
            fetch('https://digikojo.com/dkone/web/jsonapi/node/article', {
                method: 'post',
                body: JSON.stringify(this.formData),
                headers: {
                    'Accept': 'application/vnd.api+json',
                    'Content-type': 'application/vnd.api+json',
                    'Authorization': 'Basic ' + btoa('DrupalUser' + ':' + 'UserPassword'),
                },
            })
                .then((response) => response.json())
                .then((json) => console.log(json))
                .catch(function (error) {
                    console.log('Error on Authentication' + error);
                });
        }
    }
})
And the HTML.
<div id="app">
    <h1>New Article</h1>
    <form @submit.prevent="createPost">
      <label for="title">Title</label>
      <input type="text" id="title" v-model="formData.data.attributes.title">
      <label for="body">Body</label>
      <input type="text" id="body" v-model="formData.data.attributes.body.value">
      <button>Create Post</button>
    </form>
</div>
As simple as this form is, it is all we need. Moreover, as long as our Vue.js app is on the same origin as the Drupal 9 site this will work.
Go ahead and test and you should get the success message in the console.

Note that if you are logged in to your site and try to post to the API you will get an error;
X-CSRF-Token request header is invalid. This is because you would also need to pass the logged inX-CSRF-Token. Since we know this and it won't be an issue we won't worry about this right now. However, it is good to know that you should be using a different browser or using a private browsing window to test this.
Isn't the basic authentication in the open?
Simple answer, YES it is.
Note if this was going to be exposed to the public that you shouldn't do this as the user name and password will be in full view in the developer tools. As such this is not secure as your user and password will be out in the open. Let's fix that by adding key authentication.
API Key Authentication
Please be aware that you need to also be careful about using the api-key. If the api-key is that of the admin then anyone with it could in theory use it via server-side scripts to access your site. Make sure you limit the permission of the user and role to only the very necessary operations. If the api key belongs to the admin it should be considered private and not used in production. In reality, it would be better to use some form of server-side rendering. In short only use public API keys in the headers.
This is fairly simple as Drupal has a nice module that after being installed creates keys for each user. For more information on the module and installation, you can check the Key authentication page.
What the module does is create a key to be used instead of the user and password combination. You can get the key for the user you want to make the post request from the profile page of the user.
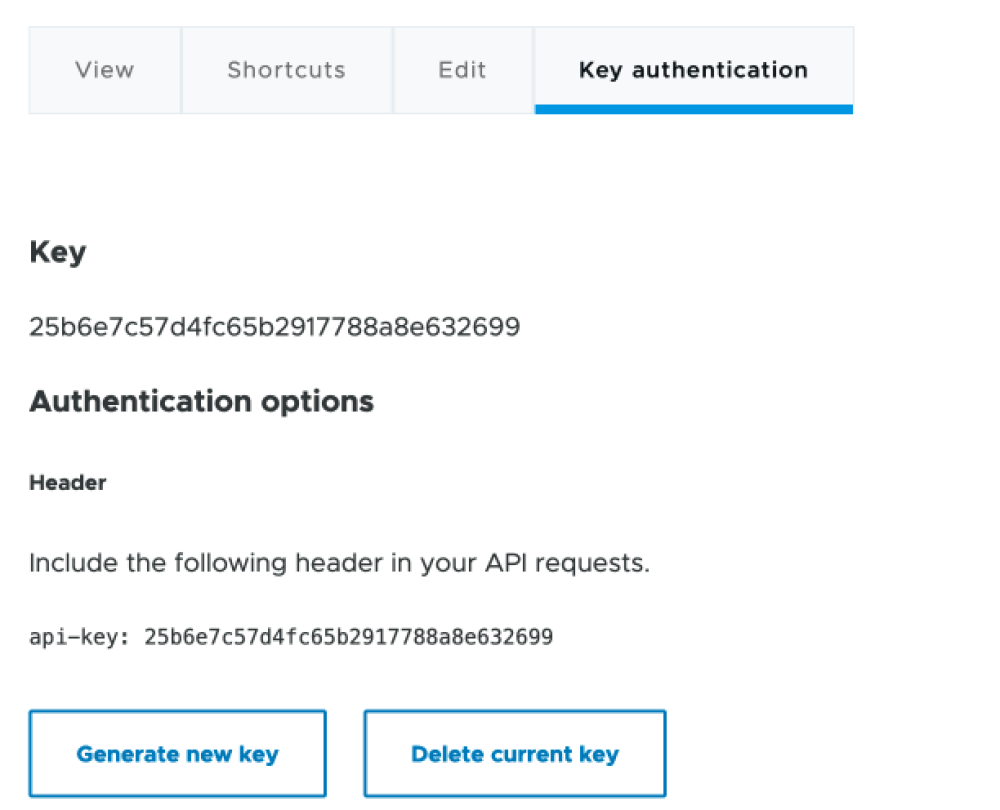
Once you have the key you can replace the basic user and password header with the api-key header as shown in the code following.
                headers: {
                    'Accept': 'application/vnd.api+json',
                    'Content-type': 'application/vnd.api+json',
-                   'Authorization': 'Basic ' + btoa('DrupalUser' + ':' + 'UserPassword'),
+                   'api-key' : '25b6e7c57d4fc65b2917788a8e632699',
                },
This is an easy solution and if you test your form again it will work the same. You may wonder if having a key in the open is a problem and generally no it isn't as with the key alone you can't log in to the site and with having CORS set up to only allow same-origin requests it is impossible for it to be used from other websites. As noted at the beginning of this section, however, it could be possible to use the API key in a request from a server and still access the API endpoint and perform any operations that the owner/user account of the API key has, so be very careful.
Related: Part 2 POST cross-origin from a Vue.js Front-end to Drupal 9
Since our key authentication works let's move on to part 2 where we will do cross-server or cross-origin posting. In part 2, we will also look at validation checks in the Vue.js app and posting a few other fields to the article.
Thanks for reading and be sure to sign up for the newsletter to get notified when part 2 goes live. I will also be doing a giveaway very shortly.