In this article, I will be writing about my first experience in upgrading a basic Drupal 9 site to Drupal 10. This work was done on a development site first and then on the production site. Since I keep a live spreadsheet for my sites and update core and all modules when there are new releases I was already aware that most modules were Drupal 10 compatible. That said, I will assume that you may need to do this so I will start with this step. Without further ado, let's get upgrading.
This article was written when Drupal 10 had only been released, December 2022, and published in March 2023. Some of the issues encountered will no longer be an issue. This will mean your Drupal 9 to 10 and 11 upgrade will be much easier than outlined in this article. That said, the overall process will be the same, you can just skip the sections if you don't come across the issues.
Preparing Your Drupal 9 site for Drupal 10
Update Drupal core and all modules to the latest version
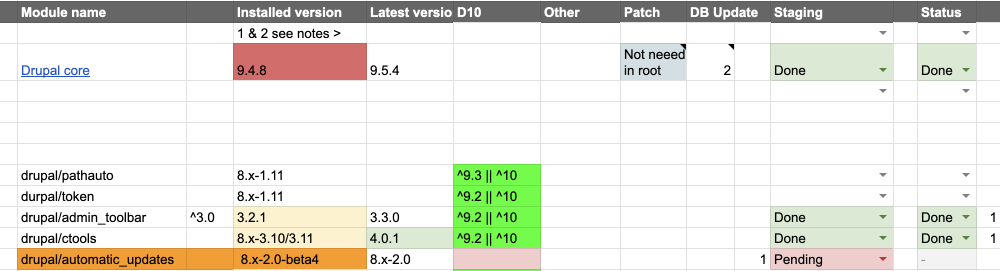
First, make sure all your modules are up to date and document them. This is something I do for most sites I work on so this step is done. Below is a screen capture of the spreadsheet I keep with example modules.
Once you know that your modules are up to date I recommend installing the Upgrade Status Module. I used version 3.18 but since this upgrade, there is a new version, 4.0.0-alpha1, that is compatible with Drupal 10 so it may be better to use that.
Install Upgrade Status Module
Even though I knew that all the modules were up to date, I still installed the Upgrade Status module to see what it suggests. Upgrade Status gives you a good overview of what needs to be done, so it's a good idea to install it.
The Upgrade Status module has an excellent overview of your site's upgrade health. From this I knew I had to:
- Patch the Show Title module. If a module you are using isn't Drupal 10 ready you may need to do this. You can also contribute back your work if you can do it.
- Fix my custom theme. A simple case of adding 10 to the core version requirements in the theme info file. i.e
core_version_requirement: ^8 || ^9 || ^10.
After patching the Show Title module and fixing the custom theme info file everything checked out okay.
Please note that if a contributed module is patched you will need to remove the package with composer and add in it as a custom module. I'll mention this again but please be aware of this; that Update Status is checking your installed version but composer checks the package on the official packages.drupal.org service so when trying to upgrade it will show incompatibility.
Next up, dealing with the deprecated modules and themes. These are shown in Upgrade Status and also on the default status page.
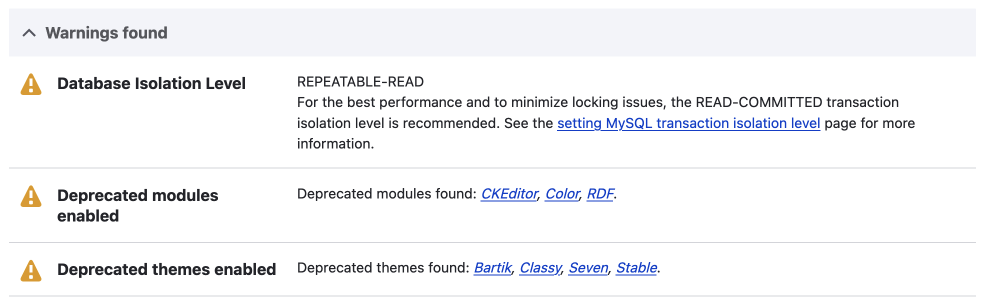
Deprecated modules
The deprecated modules that all sites will have to deal with are:
- RDF
- Color
- CKEditor
The modules I knew that were not in use I uninstalled, namely RDF and Color modules. If you haven't done this before you can do this on the uninstall page.
Manage > Extend > Uninstall
admin/modules/uninstall
This is a fairly easy process and as noted in the documentation, if you don't know what the modules are for the chances are you don't use them. With this in mind, I checked RDF and Color modules and clicked uninstall. I left CKEditor for now as I had to install and set up CKEditor 5 as the replacement.
Deprecated themes
The deprecated themes are:
- Bartik
- Seven
- Classy
- Stable.
You can uninstall themes on the appearance page.
Manage > Appearance
/admin/appearance
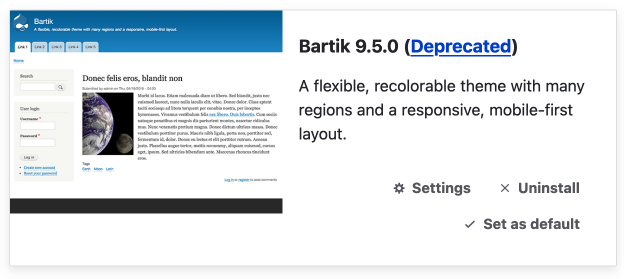
I uninstalled Bartik and Seven for now as Classy and Stable are base themes and aren't displayed on the appearance page. I am also using both Classy and Stable for my custom theme so there are extra steps that I need to take.
Pre-upgrade Tasks and Final Checks
This section, Pre-upgrade Tasks and Final Checks was researched and written before I attempted the upgrade. I include here more so you can see the full process and that researching and planning are important steps.
The last things I needed to do were deal with the themes, namely Stable and Classy, and CKEditor.
Upgrading Classy & Stable base themes
I wrote a plan to do this on Drupal 9 but in the end, it worked out easier to do this after the upgrade and before the database updates were run. For this reason, I have removed this step from this article to keep it shorter.
CKEditor Upgrade
I will switch out CKEditor for CKEditor 5. This shouldn't be a big issue as I am not using any contributed modules on this site yet. However, I have tested the Media module and other contributed modules, such as Linkit and Code Snippets, work in CKEditor 5 on another site that uses them. If you use a customized CKEditor(4) set-up using contributed modules then pop over there and see what I had installed and the path for the upgrade.
Related: Upgrading CKEditor4 to CKEditor5 with contributed modules (Coming soon)
As stated the above was written before the upgrade so I will now review what I did with post-upgrade notes. I am also going to leave out the theme upgrade work as it didn't turn out exactly how I thought, it possibly could but I hit some other issues so decided to reverse the work and I'll do it after the upgrade.
Okay, let's continue with the steps for upgrading a basic CKEditor.
Upgrading CKEditor to CkEditor5
As mentioned above, this isn't an issue for a basic CKEditor upgrade with no add-ons. Also, a lot of the contributed CKEditor modules that add extra functionality are fully upgradable too so if you know you won't end up with broken HTML in your WYSIWYG text editors then proceed. If you are unsure you can do the upgrade in Drupal 10.
To upgrade CKEditor there are a few steps.
Install CKEditor 5
First, you'll need to install CKEditor 5. You do this on the extend page.
Manage > Extend
/admin/modules.
Check the check box next to CKEditor 5 and then click install.

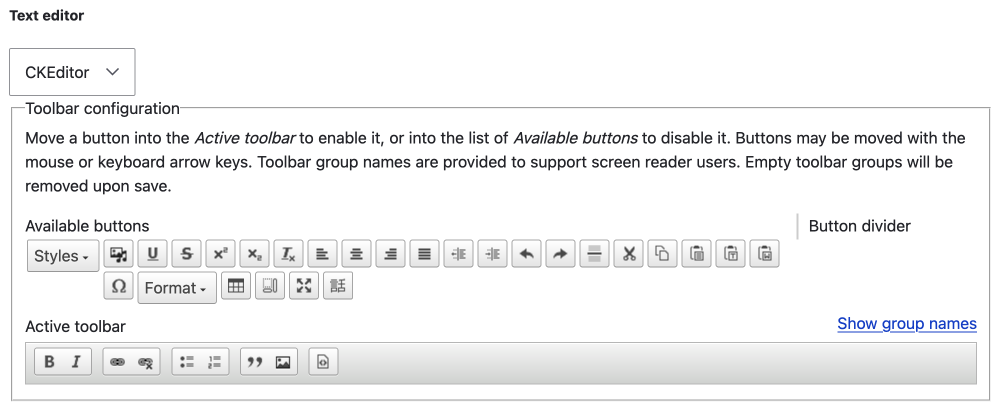
Switch the CKEditor to CKEditor 5 for the text formats that use a text editor
Go to the Text formats and editors page.
Manage > Configuration > Content > Text formats and editors
/admin/config/content/formats
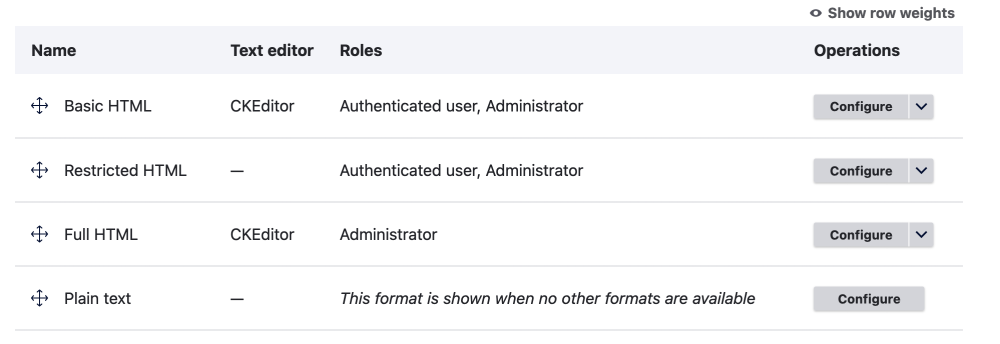
On this site I was using CKEditor for the below text formats:
- Basic HTML
- Full HTML
I started by upgrading the Basic HTML format. You do this by clicking on the configure button shown in the above image and then selecting CKEditor 5 for the text editor.
There were a few messages and links to help pages when doing this so please read the information presented. I read the information and then proceeded.
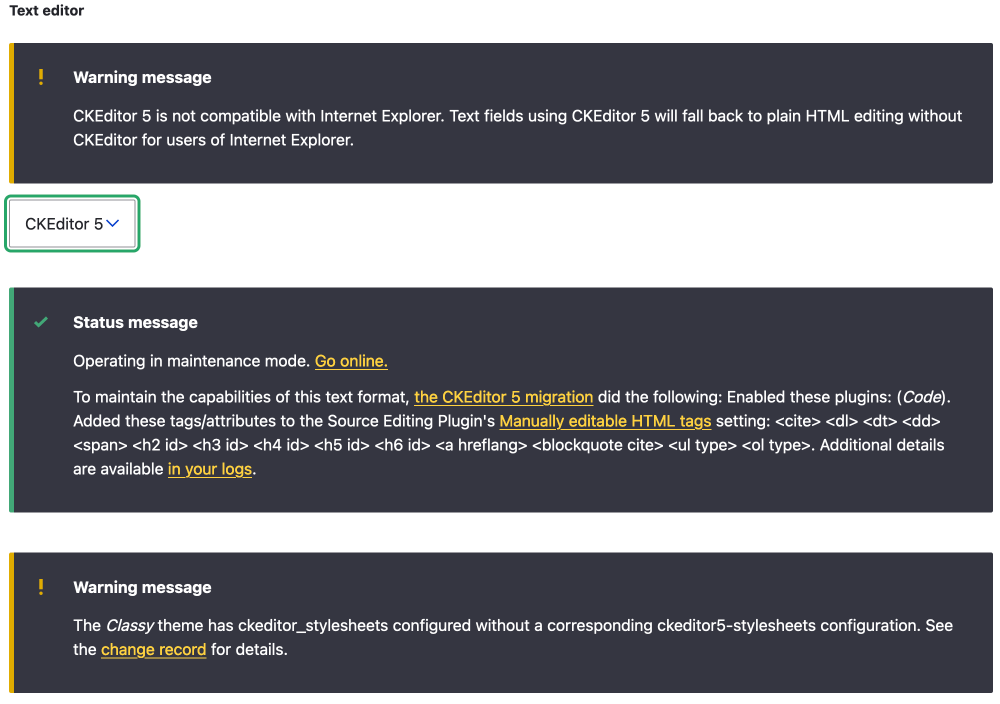
One thing you may need to do is add the CKEditor 5 specific stylesheets. Check the New API for adding theme-specific styles in CKEditor 5 on Drupal.org for more information. Even though I have added CKEditor-specific styles to some sites in Drupal 9 I decided to do this after the upgrade.
The basic HTML text format upgrade was successful so I moved on to upgrading CKEditor to CKEditor 5 for the Full HTML text format.
I then checked over the content quickly. To be honest, this was really to confirm my assumption; since the text areas on this particular site didn't have any reliance on Drupal module markup or entity code, such as link-it or media, there weren't going to be any issues.
You can uninstall the CKEditor module on the extend page or in Upgrade Status it says it will be removed in the next major version. If you know you don't need it I think you are best to uninstall it now, otherwise, you will be prompted to add the contributed CKEditor (4) module during the upgrade. This might be necessary if you are using contributed modules that aren't compatible with CKEditor 5 and you haven't converted the text formats to use CKEditor 5 as we just did in the previous step. Just remember if you need to go this route and continue to use CKEditor(4) you will need to deal with the CKEditor upgrade before EOL at the end of 2023.
CKEditor can be found on the extend page as part of the Core modules, to uninstall follow the same steps as you took to uninstall Color and RDF modules earlier.
So with this, I am now ready to Upgrade to Drupal 10... well not quite
Add Patched Module as Custom modules
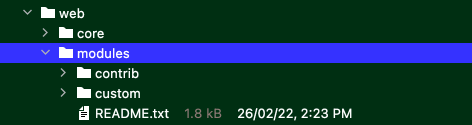
When running composer upgrade I learnt that composer checks the online versions of the package dependencies at the packages.drupal.org service. So for the Show Title module, I had to remove it and add it as a custom module as the Drupal packages code has been upgraded yet. I use the basic convention that you put custom modules in a custom directory as illustrated below.
Note, you don't need to uninstall the module. You only need to remove it as a composer dependency and upload it to the custom directory.
Uninstall and Remove Upgrade Status
Next, you need to uninstall Upgrade Status as at the time of writing 3.18 isn't supported in Drupal 10. Uninstall it using the UI and then remove with composer.
Manage > Extend > Uninstall
admin/extend/uninstall
composer remove drupal/upgrade_status
So with these few small jobs done, we should be ready for the upgrade.
Upgrade Process
How to upgrade Drupal is outlined on Drupal.org. There is only a basic overview page that outlines preparation and a page on how to upgrade your site using composer or more correctly Upgrading a Composer-based site. That's right there is no guide on non-composer-based sites. Luckily, I use Composer for most of my development.
Note: I do manage tarball and UI-managed sites but at present, I haven't tried to update these. When I do I think I am going to suggest moving them to composer. That said it may be easier as you won't get the composer dependency issues.
The page that I have linked above has a bunch of steps. However, I found that it didn't work as advertised due to dependency issues. Let's step through the process now and I will add what I had to do to get it to work.
Step 1
Temporarily add write access to protected files and directories, this allows the update process to write to the files it needs to.
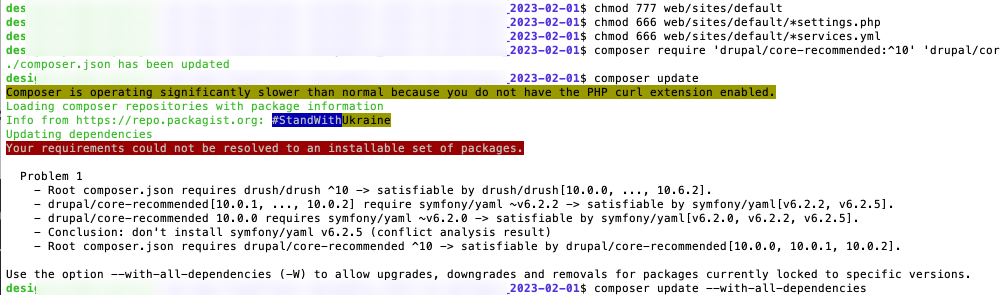
chmod 777 web/sites/default
chmod 666 web/sites/default/*settings.php
chmod 666 web/sites/default/*services.yml
Steps 2 and 3
I found that steps 2 & 3 didn't work as the dependencies were all wrong. This was obviously my doing but I gather a lot of people would have the same issue. What I have learnt is that when updating modules you should use the composer flag --with-all-dependencies. However, I haven't tested updating all the modules first, but instead ran a script I found after having the issue.
I found an issue on Drupal.org with some code to get everything up to date. Skip to Steps 2 and 3 Alternative (below) if you have tried to update and got the dependencies issues. If you are interested in what errors I got using the guide on Drupal.org, continue reading the next section.
Drupal 9 to 10 Upgrade Issues I faced
I will include Steps 2 and 3 from the Drupal.org guide below as this article is documenting what I did for other upgrades I need to do shortly. And also so other people can hopefully use it to update their sites if they have the same issue.
Step 2
As such, this prepares the composer.json with the new versions but uses the --no-update flag so it won't run the update and thus it won't cause any errors.
composer require 'drupal/core-recommended:^10' 'drupal/core-composer-scaffold:^10' 'drupal/core-project-message:^10' --update-with-dependencies --no-update
Step 3
Then I ran Composer update and got the dreaded composer message. Your requirements could not be resolved to an installable set of packages.
It was at this point on my initial upgrade attempt I had an issue with the Drupal Classy contributed module that I mentioned above. If you review the pre-upgrade notes, it does state you can install the necessary contributed modules after the update and before running the database updates. It was at this point I decided to work on the theme work after the upgrade.
Since I was unable to update, I ran composer require again to set the Drupal required version back to 9. This technically may not be needed as it is only updating the composer.json. However, I did it so I could use composer if I needed to.
composer require 'drupal/core-recommended:^9' 'drupal/core-composer-scaffold:^9' 'drupal/core-project-message:^9' --update-with-dependencies --no-update
Then I removed the Classy contributed module and the other adjustments I had made to the theme and tried Steps 2 & 3 again. The second attempt also did not work.
Using composer Run Drupal 10 as 9 command
After the second attempt, I still had dependencies issues so I used the run 10 as 9 suggestion from the Drupal.org guide as shown below.
"Another, less recommended way to get around this, is you can add an alias to drupal/core, such as:"
composer require "drupal/core:10.0.0 as 9.5.0" --no-update && composer update
When doing this I got Drush dependencies issues.
For clarity, it was at this stage that I noticed Show_title had issues. It showed that the package needed Drupal 8 || 9. So I removed require drupal/core 10.0.0 as 9.5.0 from the composer.json. I did this manually by opening the composer.json file. Then run composer remove drupal/show_title, then added show_title as a custom package as I pointed out earlier in this article.
So now 3 attempts in and no cigar I searched for a solution and luckily I found one. Following is how I fixed the dependencies issues once and for all.
Fixing Dependencies Issues for Drupal 9 to 10 Upgrade
Steps 2 and 3 Alternative
After multiple attempts, I then found a useful composer script in an issue on Drupal.org, Unable to upgrade Drupal 9 to Drupal 10, that lists all the projects being used and then a second script that you can run to update all the projects to the latest version and all of the dependencies. This worked for me and from here I could continue with the upgrade process.
The script to run is:
composer show --no-dev --direct --name-only | xargs
The output of the above script shows all the projects you are using, it will be something like below:
composer/installers drupal/admin_toolbar drupal/backup_migrate drupal/core-composer-scaffold drupal/core-project-message drupal/core-recommended drupal/ctools drupal/field_group drupal/field_permissions drupal/metatag drupal/pathauto drupal/redirect drupal/xmlsitemap drush/drushYou then need to run composer require [OUTPUT] --update-with-all-dependencies
This updated all the packages as suggested. It also updated Drupal 9 to 10 so there is no need to require Drupal 10 explicitly as shown in step 2 on Drupal.org. So be careful.
Maybe you could remove the drupal/core-composer-scaffold drupal/core-project-message drupal/core-recommended so as not to update these to the latest which is 10 and only run the script on the modules and packages. However, I found no issue also updating the core packages at this stage and was able to proceed. I will be testing this assumption on other upgrades however as the script seems a nice one to have in the composer tool-belt.
Now to continue with the Drupal 10 upgrade, hooray!
First, you need to run cache rebuild, I did this with Drushvendor/bin/drush cr or drush cr if you use Drush Launcher.
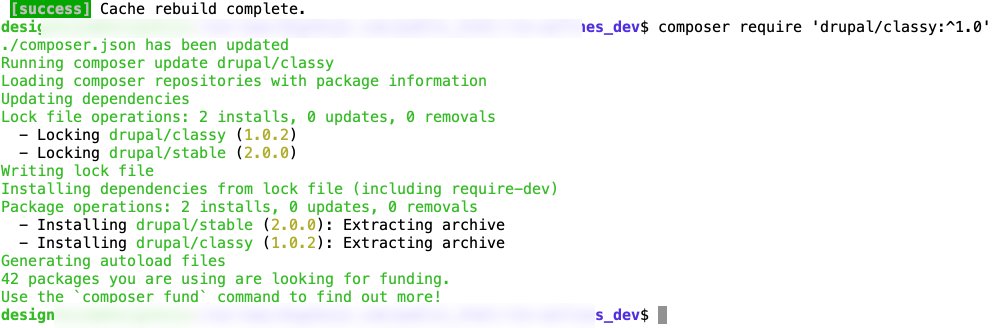
Then, I needed to add Classy contributed theme (https://www.drupal.org/project/classy) as it is suggested on the status page.
composer require 'drupal/classy:^1.0'
This will also add stable9.
I should have removed CKEditor in Drupal 9 as I have already stated but if you still need to use CKEditor (4) you will need to install the contributed version as suggested.
composer require 'drupal/ckeditor:^1.0'
With the necessary contributed modules added, I ran the database update as shown in step 4.
Step 4vendor/bin/drush updatedb
There are 3 updates that are needed. Since I am using Drush you get asked do you wish to run the specific updates. At the prompt press enter to say yes.
Step 5
The last thing you need to make the instance secure again by changing the permission back to read-only.
chmod 755 web/sites/default
chmod 644 web/sites/default/*settings.php
chmod 644 web/sites/default/*services.yml
And that is it, your site will now be updated. Congratulation you now have a Drupal 10 site.
Thanks for reading this far. If this was helpful be sure to sign up for my newsletter. I write about using Drupal, front-end development, and also design. The cross-over of development and design.
However, I have not quite finished this article. I am going to add a few notes below to show how I did the production site. In time I think I will move to a Git-managed production environment but for now, I manage production updates and upgrades within their own environment.
Updating the Production Site
For the production site, I first got everything up to date as per the test site since this seems to work. Things to note are when I did the update on the dev testing site I ran into a few issues with dependencies so I decided to upgrade all modules to the latest. By that I mean even though I was using the recommended version of ctools, which was 3.13, I upgraded to 4.0.3 which is listed also as an available module. This was done automatically in the step 2 and 3 alternative section I have written about above.
To upgrade ctools to 4.X you need to run composer require.composer require 'drupal/ctools:^4.0'
After updating to the most current version of ctools I continued with the upgrade process. The following are the steps I took for the production site.
1 Remove Deprecated Modules and Themes
Without Drupal update status installed, I continued with the other jobs such as uninstalling Color and RDF modules and Bartik and Seven themes. These are shown as deprecated on the status page: /admin/reports/status.
These are done on the respective pages for modules and themes as outlined above.
2 Make the few site-specific modifications
These will be different on every Drupal site but I will list what I had to do below.
- I removed the Show Title as a composer require and added it as a custom module but using the already patched version from dev.
- Add Drupal version core requirements info to theme info.
With the production site prepared, I decided to do a test run on an instance of production.
On how to make a copy of your site using the CLI please check the article How to duplicate a Drupal site (coming soon).
3 On the new instance I did the final checks
The reason I did a final check is that the development version of the site is not a 100% identical configuration. It is a testing environment so I wanted to make sure that what I had already tested and documented would also work on the production site. Call me over-cautious but I'd rather spend an extra 15 minutes doing this than messing up my production site. I also make a backup zip archive to go with the pre-upgrade database that is made when duplicating the site.
So now for the final dummy run:
- Switch CK editor 4 for 5 & uninstall 4. As I have already pointed out if you don't need to have CKEditor (4) installed it is best to uninstall it before the upgrade.
- Install Upgrade status
I feel this is a good idea even though I probably didn't need to since we have already done an upgrade. I did it more for peace of mind than anything else but also for this article to show that you may not get a 100% score if you are using contributed modules to replace deprecated modules.
Upgrade status shows Stable and Classy are deprecated as expected. You can leave them if you need to use them in Drupal 10 and add the contributed after the composer upgrade.
With this Upgrade Status show 82% which is fine.
Next, uninstall Upgrade Status 3.18 and composer remove.
4 Run Composer Upgrade
I ran through the same process as outlined, even though I was sure I would need to run the composer command I had already used to bring all dependencies up to date.
Yes, I got the composer message, Your requirements could not be resolved to an installable set of packages, on the production site so I used the script above at Step 2 & 3 Alternative, which include again below.
composer show --no-dev --direct --name-only | xargs
[OUTPUT]
composer require [OUTPUT] --with-all-dependencies
vendor/bin/drush cr
As I had assumed this worked so I continued with adding the few contributed replacements I needed for Classy theme. This is shown on the Status page as my theme has Classy set as the base.
Then run the database update and change the perms back as per the upgrade info.
Dummy run done!
Now you can do this on the Production Site
Repeat from step 3 in this section; Updating the Production Site. If you do it exactly the same and immediately following the dummy run you shouldn't need to add Upgrade Status. One thing I probably should mention is you are best to put your site in maintenance mode to run the upgrade. I run all development and staging sites in maintenance mode.
Summary
In this article, we have looked at an in-depth process of upgrading a Drupal 9 site to Drupal 10. This first site I did had limited added modules so was straightforward once it was prepared but also presented some challenges as I found out.
We first looked at the preparation steps needed and then did final checks using the Upgrade Status module. Next, we fixed the things that the Upgrade Status module brought to our attention. I also tried to do pre-upgrade work to remove dependency on Classy theme but decided to do this work in Drupal 10. With the green light from Upgrade Status, I attempted the upgrade. After a few failed attempts and updating dependencies that surfaced by composer, I was finally able to upgrade my dev site.
After upgrading the dev site, I upgraded a staging instance of the production site and then the production site. The main point of this is to make it obvious you should be 100% confident the upgrade will work before doing your production site. You should also have a complete backup of code and the database archived.
That's it I will be writing more about Drupal and investigating some of the questions I now have from this process, such as using update with all dependencies every time I do updates. I am a designer at heart so I will also be continuing on my journey to help developers learn more about design and help designers learn more about development, so if modern front-end development and design interests you be sure to sign up for the newsletter below.
Thanks for reading! Drop your email below to get more great articles on Drupal, front-end development, and design. Until next time, stay cool to after school!