The module that holds your Drupal site together. Through its powerful SQL query builder, you can build beautiful views of your content.
Talking about Drupal without mentioning views would be sacrilege. Views has been included in core since Drupal 8 but was one of those contributed modules that was installed with (almost) every site. Well, it was for me.
With a strong understanding of Views as a Drupal developer or site builder, whether you use Drupal as a full solution or as a headless CMS, you can create beautiful lists of information (text, images, video, or anything you have added as a field1) with a click of a button and then present your beautiful list as a page, as an attachment(view) on a page, or a block(view) in a sidebar.
In this article I will be looking at core Views in-depth, that is views that come with every standard installation.
1 This list is only an idea of what information you can use. In the past, I have included data from an API and merged it with content field data in a pre-render hook. The pre-render hook is one of the many hooks that can be used in the Views rendering process to modify the view before being output to the page.
Overview of what we will cover in this Drupal Views Quick Start Guide
In this article, we will:
- Take a quick look at administration settings for Views.
- Look at some of the views that come with a fresh install, namely the front-page view and the content management administration page view.
- See how they are built with Views.
- Modify the basic output of the default views.
- We will then look at how we can add displays to a view or duplicate and then modify a view. In doing this we will learn about the types of views that can be created.
- Then, we will look at creating a view from scratch.
By the end you will be views Ninja, you'll be slicing up your data an' flinging it around your site elegantly as a seasoned Druru or Druid.
Okay, let's get started and take a look at the Views management page and Views settings.
Administration Pages
All of the admin views are built using Views too. It wasn't always this way but now Media and file management to users and roles lists and the more obvious pages such as content are all set up using views. This is a great feature of Drupal as all these views can be found on the views pageManage > Structure > View
admin/structure/viewsWhy is it so great? As you will see you can either add a display or duplicate a view and then modify it for your own usage and the fact that it is used as the building block of the Drupal ecosystem is testament to how powerful it is.
Views Management: Overview page and Basic & Advanced Settings
The view Management page is where all your views are listed. You can find it at the following path.
Manage > Structure > Views
/admin/structure/views
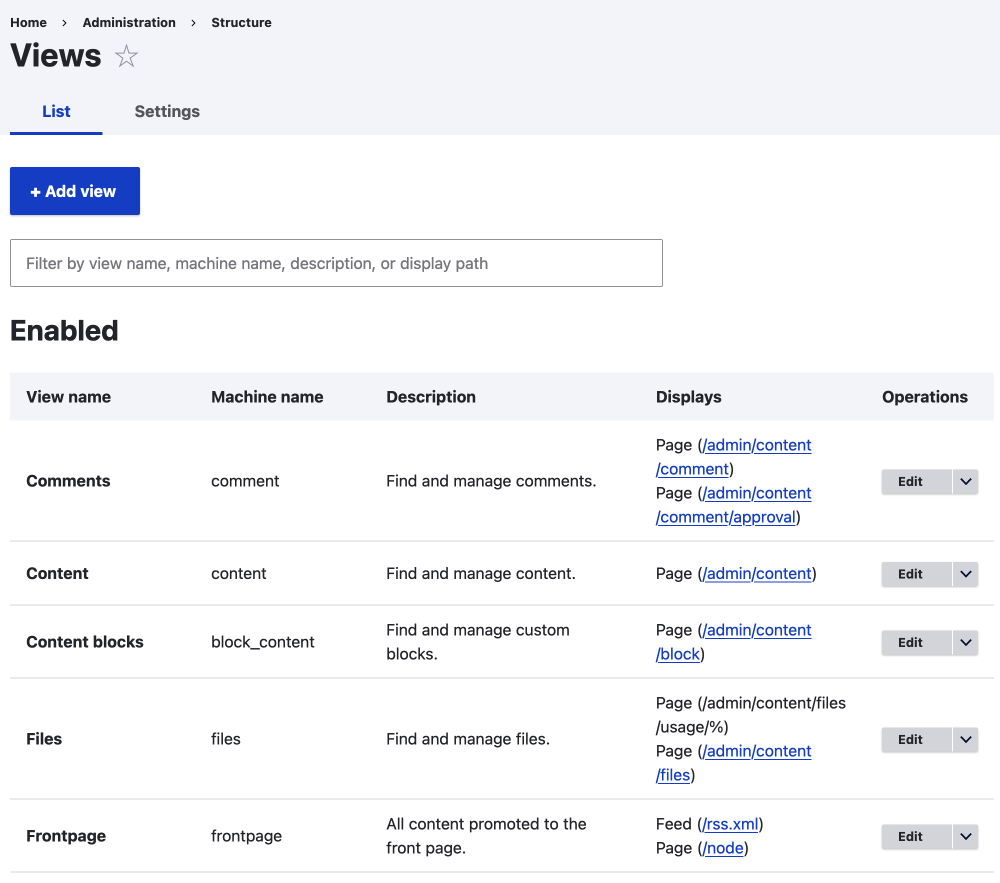
This page lists all the current enabled and disabled views. It gives you a broad overview of the views. As you can see in the image it has the View name, Machine name, Description, Displays, and an edit button in the Operations column of the table.
We'll come back to this in a minute but first, let's take a quick look at the Settings tab.
Views Configuration Settings Pages
Use the Settings Tab
/admin/structure/views/settings
When you first install Drupal, the Views module doesn't show the master display. To show the master display will be a personal preference but it is good to know you can as it gives you a better understanding of how Views work. To show the master display you can check the check box on the settings page "Always show the default display".
You'll notice I use the word master display even though it calls it default. The reason for this is it used to be called the master display and this seems a better name because as such the default display can not be viewed at URL or used as a block. The only place you see it is on the view displays page. It is the master from which everything else can be created and modified. That said from now on I will call it default.
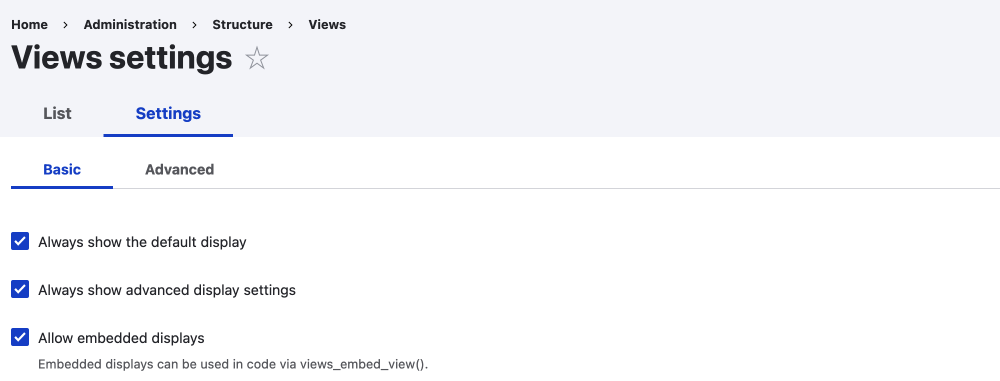
That's better, now we can see the default display which is the same as the page display or the first display you make when creating a new view. The only difference at the time of creation is the display setting section, the top of the second column on a desktop display or section if using mobile.
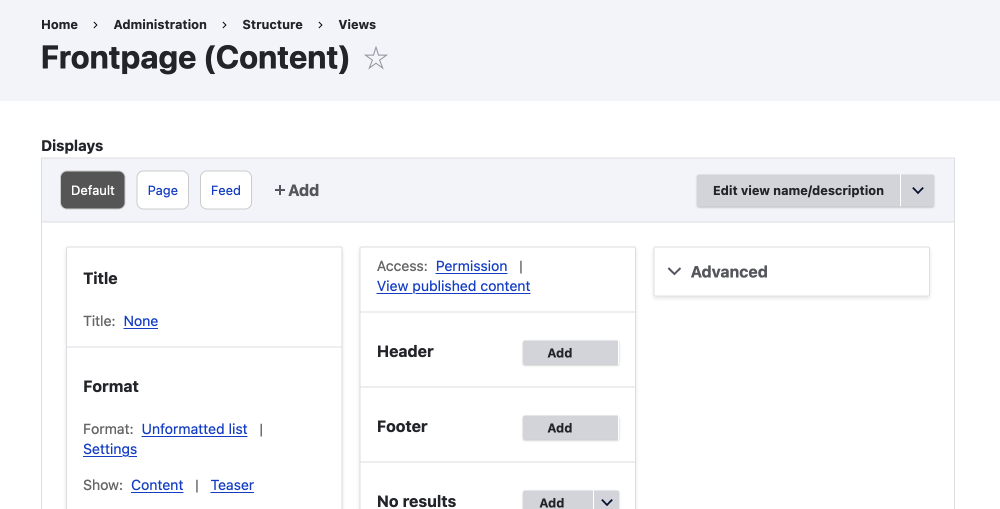
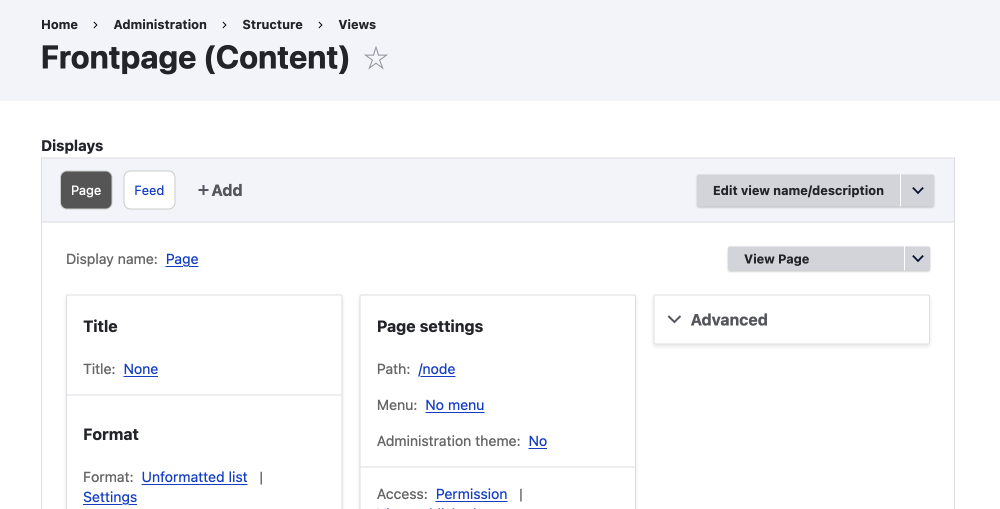
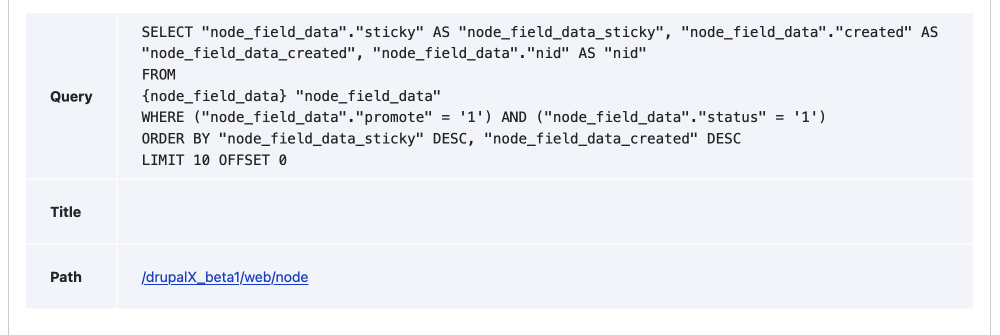
Other things you can do on the settings page are enable live preview settings such as show performance statistics and visual SQL rendering, which if you are unfamiliar with SQL is a great way to see how the database is being queried. I suggest you visit the settings pages and check out the basic and advanced settings for yourself.
Contextual Links
One other feature that is worth pointing out is the contextual edit button. This isn't a Views specific feature but when you are logged in you can hover over the view on the front-end and you will see the view outline and the small pencil edit button. You can click on the pencil button and you get various options depending on the type of component it is associated with and also what permissions your role has for editing and configuration. This contextual edit button functionality is disabled on the Drupal system views however. If you want to enable it, you can by going to the advanced section on the view configuration page and change contextual links from hidden to shown.
So that's the basic management and settings overview for Views. Generally, I don't touch the settings except for enabling the master default display. Next up, we will look at the default frontpage which is a great starting point for displaying data in the front-end.
Looking at some Drupal Pre-installed Views: The frontpage view and content management view
Both the frontpage view and the content view are page views, that is they are given a URL. The frontpage is given the /node URL (and then /node is set as the homepage on the basic site setting page) and the content view is given an admin URL, namely /admin/content.
This is probably a good time to point out that any page you create, be it a view or a content type page, and give an /admin/* path will use the admin theme which is set on the appearance page. There are more advanced ways to do this but at its most basic this is the default setting.
Other than both these views being pages, these 2 views have some interesting differences so we will take a look at them separately.
The Default Frontpage View of Drupal
The frontpage of a standard install of Drupal is a great place to start when learning about Views. Everybody who has installed Drupal will end up here.
By the end of this section you will have an understanding of the following:
- How you add a message when there is no content to display in your view. We will look at two ways of doing this:
- Using the UI.
- By adding a template to your theme.
- How the view displays the data once you add an article and how you can change it.
- How the filter settings work.
- How to sort your data.
- How to add pagination amongst other things.
Basic overview
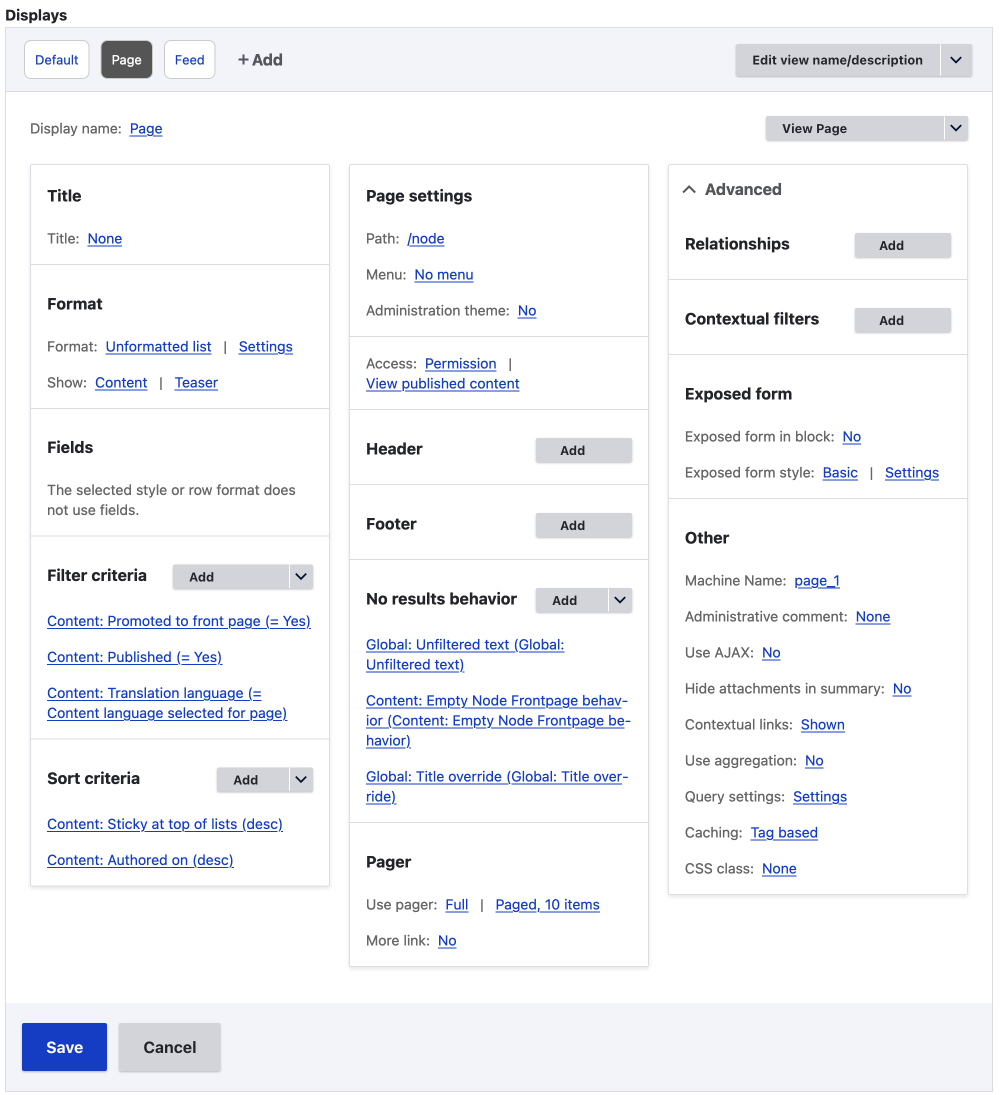
When you visit your new site you will see on the frontpage a welcome message. Since the frontpage is a view as already pointed out, it will be no surprise this is set up using Views.
If you check the Views GUI, use the contextual link to get there or go to the admin/structure/views/frontpage route, you will see the No results behaviour section. In this section, there are 3 system settings specifically for the frontpage.
- One of these is the global text area. You can add this to any view with your own message for when you have no results.
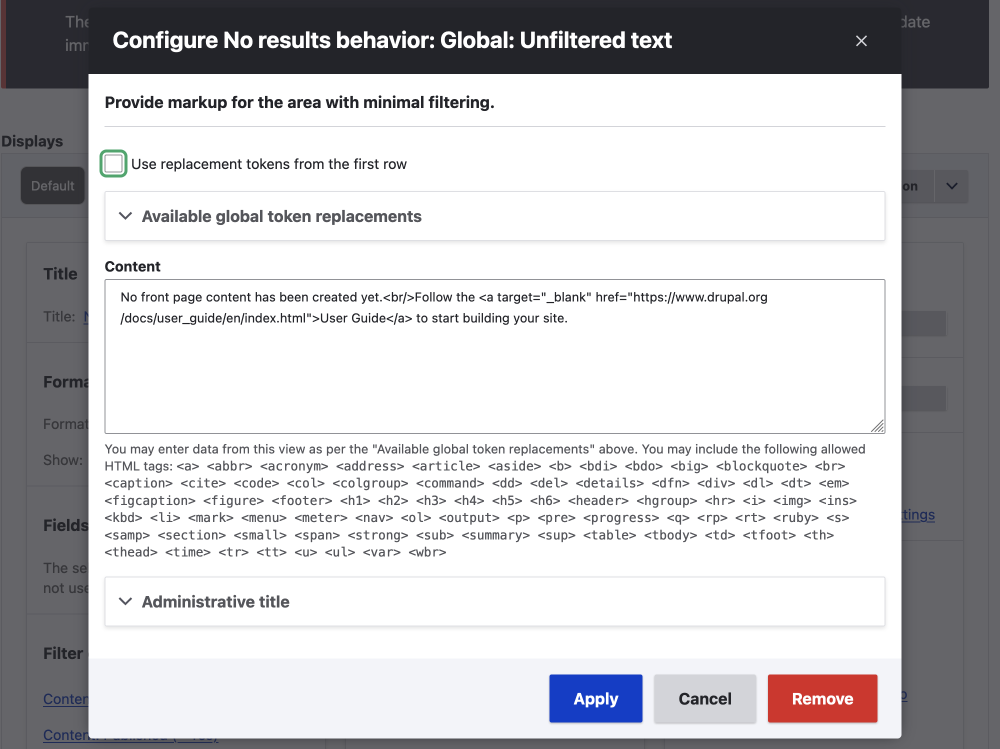
- Next is, Content: Empty Node Frontpage behavior - Provides a link to the node add overview page.
- And, Global: Title override.
This section is available to any custom view created and can be useful for when you have exposed filters that return no results. We will look at this more in building an advanced view later.
But wait the Global text area and the frontpage have different text.
Yes, you would be right if you had just created a new site because the theme will be set to Olivero. Olivero the default theme uses a template to add a more substantial welcome message than the system default. If you check the Olivero theme directory you will find the below code in the views template directory. And as you can see it uses the get started template.
/theme/templates/views/views-view--frontpage.html.twig
{% elseif empty %}
   {% include '@olivero/includes/get-started.html.twig' %}
 {% endif %}
Since this is an introduction to Views I am going not to go much deeper than this. If you like you can check out the themeing section where you can find things such as how to use twig templates and how to find which ones to use.
Related: Twig Debug and how to add templates to your Drupal theme.
While we are on the Frontpage view edit page let's look at the other sections quickly.
You will see 3 columns on a desktop display, which become stacked on a mobile view.
Data Settings
The first column is the data that will be displayed and how it will be displayed; filtered and sorted.
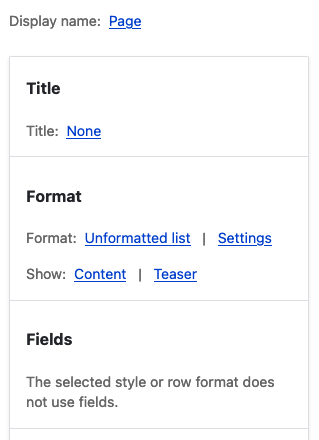
Looking at this view format you will see:
- It is an unformatted list.
- It shows content as a teaser view mode.
This teaser view mode is set up on the content type manage displays page. For this reason, you will notice the fields are not selected in view. Just take note of this now.
Using a View mode other than what is included will mean you'll need to create a new template and include the fields. This is an advanced topic so I won't go into it here. In the end, you will need to create templates to make your site shine so don't be afraid to add new view modes.
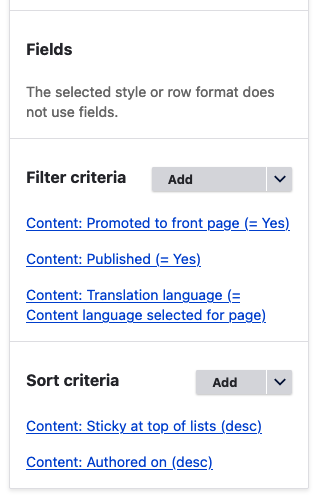
Further down this column, you will see the filter criteria and that it is set to show frontpage content. If you add an article to the frontpage you will see that the result behaviour we talked about above will be overridden.
Then at the bottom of the first column is the sort criteria.
Display Settings
The second column is the display settings. In this case, it is a page but if you click on the Feed display, which is set up by default as well, you'll see the settings available are different. For example, a page can be added to a menu and a feed can be attached to a page. Both need to have a path defined.
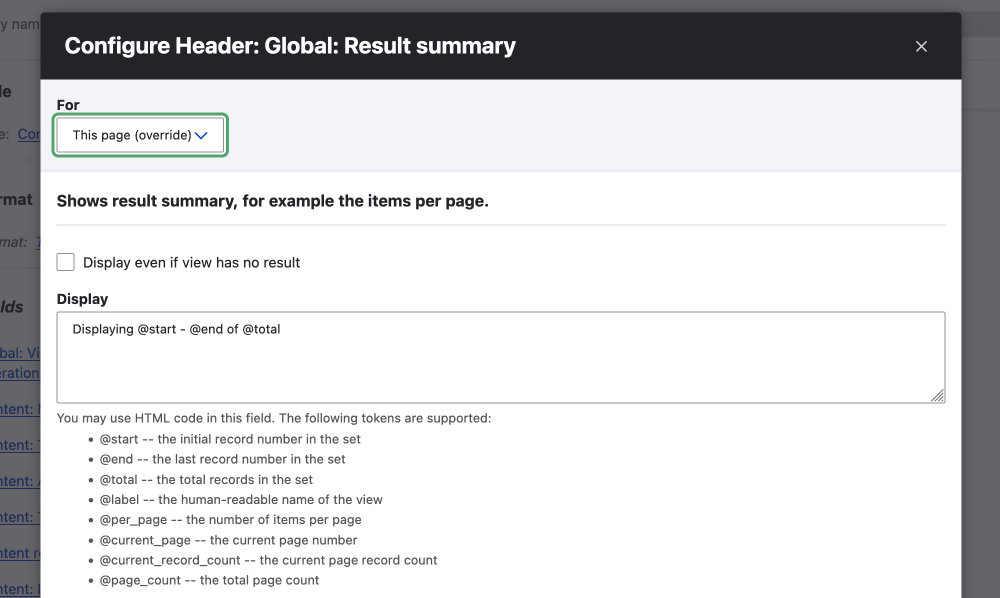
You'll notice you can add a header and footer, things such as a text message or a dynamically generated result summary. You can add a pager using the section at the bottom. This can create a nice pagination component. Once you have a lot of content you may want to revisit this to see what can be done.
Advanced Settings
Finally, we have the Advance section. You can define relationships and contextual filters amongst other things. These advanced settings are where some of the mighty features are. Since they are advanced we will look at them later.
You will also notice above the 3 columns on the right there is a button and dropdown. Depending on the display you'll be able to view the page or if it doesn't have a path then you'll be able to do all the other actions such as a plethora of duplicate actions or disable it and delete it.
If you have a site set up and running, have a look around, including below the displays section where there is a preview section. This is where you can test your display.
We have just looked at a front-end display, the Frontpage (Content) view. Next up we'll look at the default content management display.
The Default Content management page of Drupal
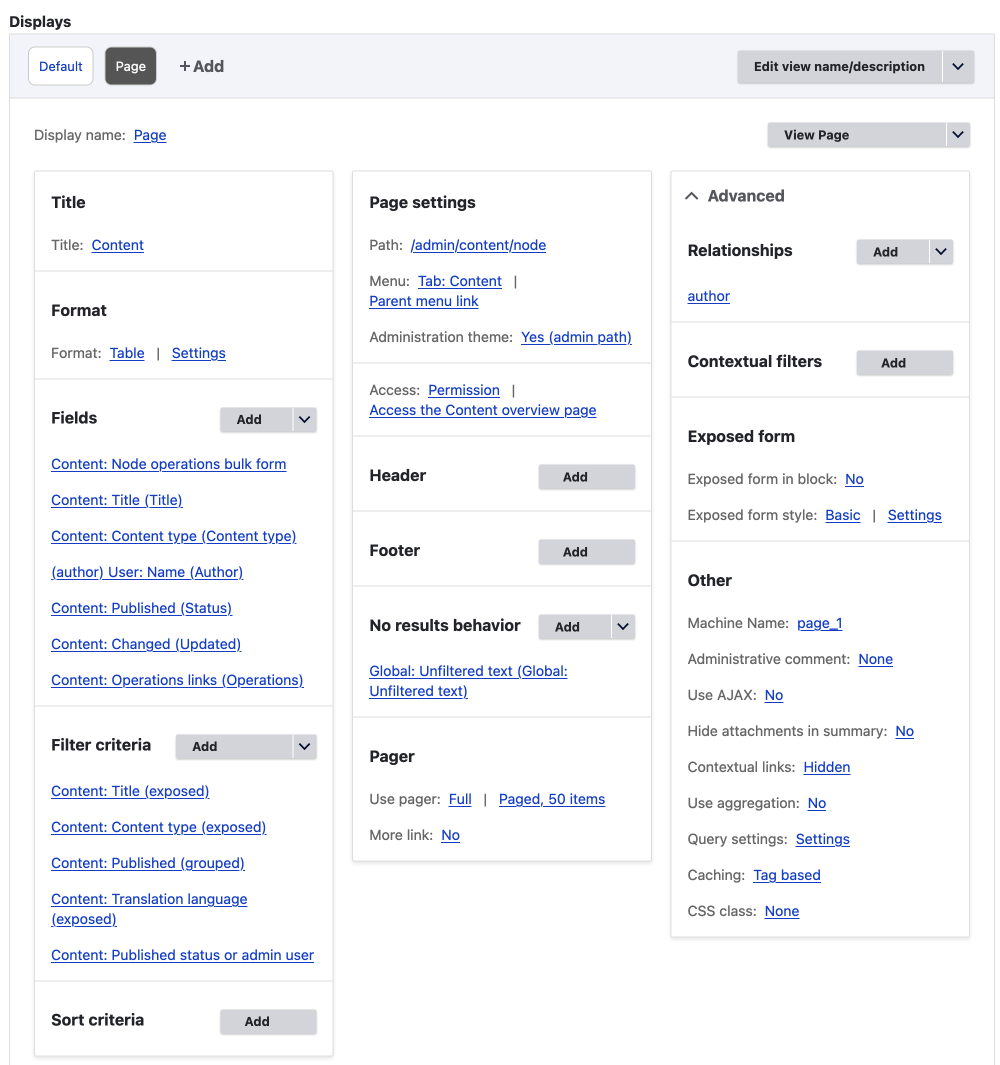
The content admin page is a little more utilitarian, it uses a table layout which means you have to add fields directly to the view, you can't use a view mode as the Frontpage view does. The view allows you to select and modify pages in bulk and it also gives you an edit link so you can access the edit page directly from the page view. It also has an exposed filter so you can, wait for it, filter the content.
Basic overview
If you want to edit the content management view you will need to visit the Views page in the structure section of the admin.
As already pointed out, the default admin views in Drupal don't have the contextual edit link enabled. If you want contextual links shown, this can be done in the advanced section.
Manage > Administration > Structure > Views
/admin/structure/views
On the Views page, use the edit button in the operations column.
Once you are editing the view you will see that the format is set to table. When using a table you can't choose what to show like you can when using other formats. The only option is fields.
Have a check over the fields present and the filter criteria settings for the view.
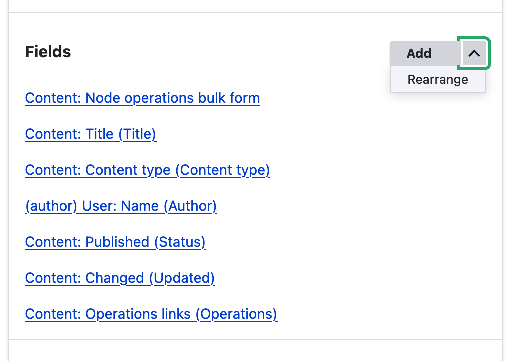
You can add any new field you like with the add button and also the re-order fields using the small dropdown arrow and clicking rearrange.
The filter section
The main thing to notice here is that they are all exposed or grouped filters except the Published status.
The exposed and grouped filters both allow the user to change the filter.
- Exposed will allow you to filter on pre-set choices dynamically created from the available data.
- Grouped allows you to set up your own filter groups based on available data.
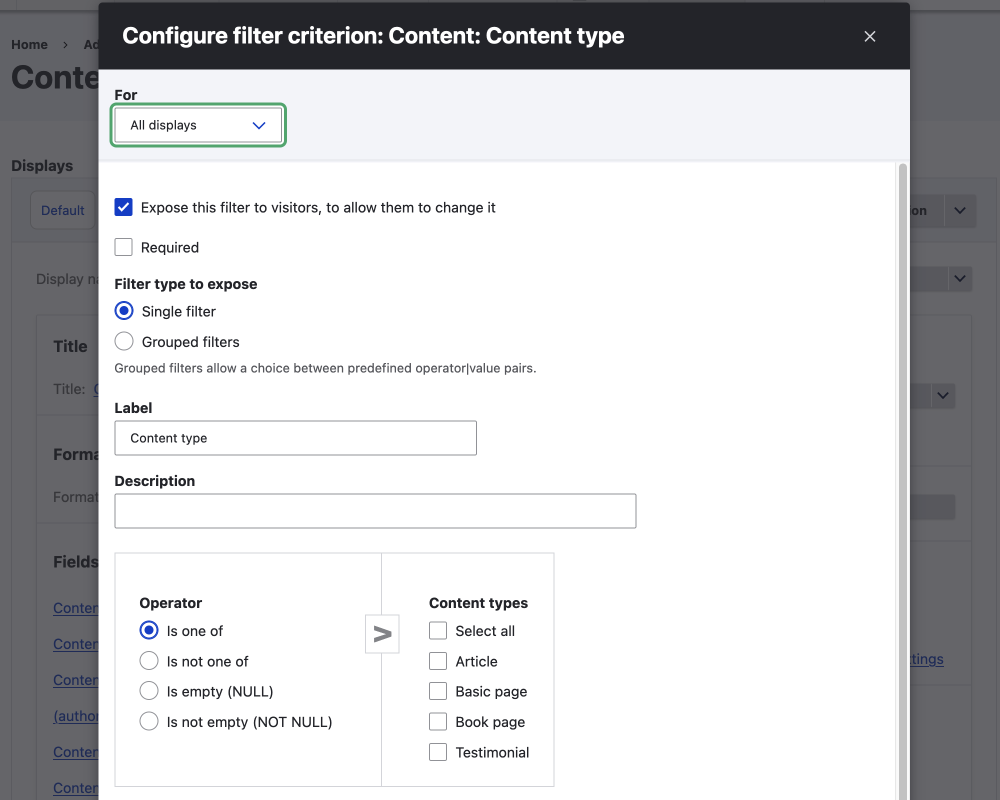
The best way to see how these work and see what options you have is to check them out. Pretty much any sort of filtering is possible.
Published status filter
The only other thing I will point out at this stage is the access setting in the filter criteria. It is set to Published status or admin user. This filters out unpublished content if the current user cannot view it; a useful built-in filter.
Sort the view
There are no sort criteria set like the frontpage view. Sort is done in the table settings. You can select a default sort by using the radio button in the table setting dialog. You can also enable sort on any field you like. This adds a small icon next to the table column title to indicate it is sortable and when you click the icon the table data is sorted.
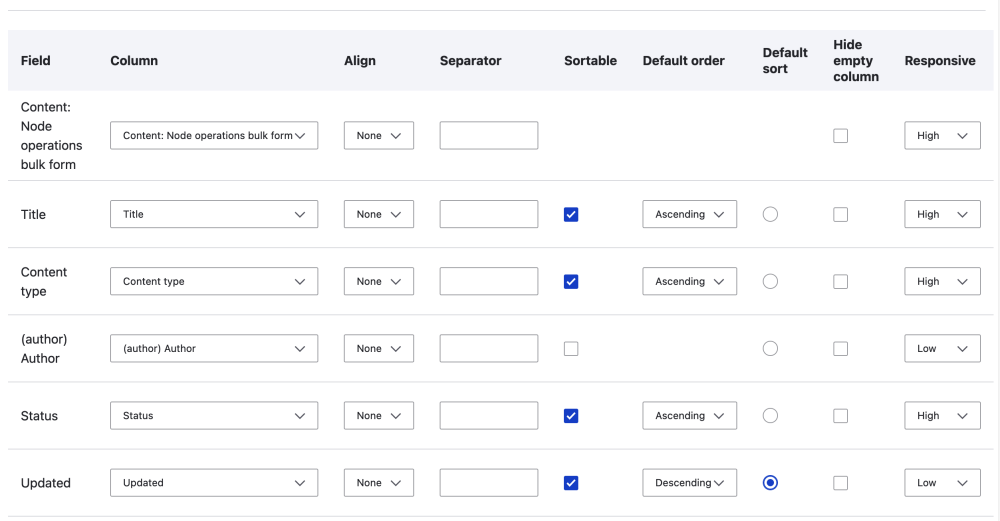
This sort of table view with exposed filters can be used on front-end pages for anonymous visitors if you like.
You can also use other formats such as unformatted lists with a filter to give anonymous visitors the same functionality. However, if you want the table sort functionality you'll need to you a table or set up an exposed sort or a more advanced faceted search.
So now we have an understanding of a few views that ship with your fresh install of Drupal, let's take a look at how we can modify these 2 pages, how we can add displays to them, and how we can duplicate them.
Add Displays and Duplicating a View
So with what we know now about the default views and how we have a master default display let's look at the 2 ways you can use existing views to create a new view display. Both ways will have their uses and you will find your own preferences as you work with developing sites.
Add a display to a view
What I find is I will add displays to an existing view if the change is minor or I want to add a block view in a region or on a dashboard with a more-link to the page. In an ideal world, you will build your master and then add displays and then override the small differences. In an ideal world, you will build your applications in this way but sometimes you will have afterthoughts or requests and need to make minor adjustments to the view and then methodically adjust all overridden view displays one by one. Let's create a new display.
How to Create a display and override settings
To add a display is easy, you can use the +Add link in the top section that lists all the displays in the view.
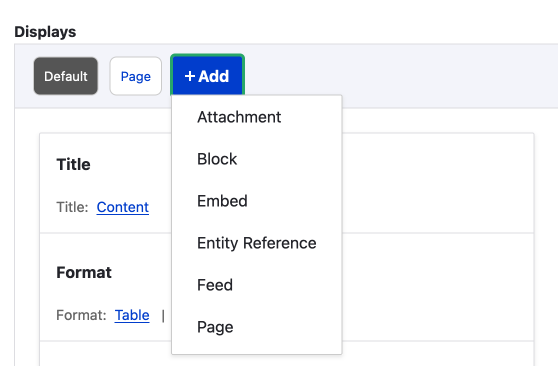
- Click on the Add+ link
- Choose the type of display you need.
- Make the change you want.
- When making changes you can do it for All Displays or This page/block
- Overrides are shown in italics
- Click Save
Add a display by duplicating a specific display
Another way you can do this is on any of the displays, use the context menu in the top right, click this and then use one of the duplicate options. The difference in doing it this way is you are duplicating the display you choose to duplicate, the add button duplicates the default display.
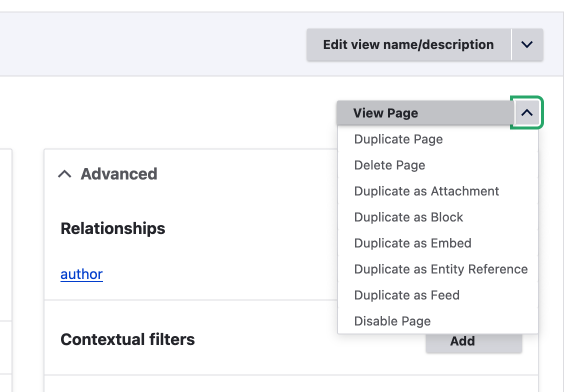
If you are duplicating a view page display, as well as changing the view URL, you will also need to turn off the Menu or make a new menu. If you don't then you may not see your view(s) as they will share the same menu route, I've been here so I thought I'd point this out.
That's it for creating a new view display. This is a great way to keep views that are closely related together. That's the way I like to use this. If you want to build a new view based on an existing display but then modify it, that is also possible. Let's do that next.
Duplicate a View
Another way is to duplicate the entire view and build out a new view.
This is a good option if the view isn't part of the same section on the site. Say you want to use the frontpage view on a landing page and filter it differently or you want to use the content management page and want to add bulk editing capabilities. I find that when you want to make big changes to the fields included, instead of using the override functionality, you might be better to break it out and start fresh. This in the end is a preference and there is no right or wrong way.
How to Duplicate and modify a view
To duplicate a view is as easy as using the dropdown next to the Edit view name/description button at the top right of the displays section.

- Click on the down arrow and click Duplicate view.
- Add the new name for your view.

- Click Duplicate.
Once you have done this you can make changes in the same way you do when duplicating a display. As noted above, if you have pages then you'll need to change the paths and menu otherwise you won't be able to view the pages.
Development Tip
When planning your site you will probably want to create a master display for certain sections or components and then make displays. Once you have everything set up you can then override what you want to. You may also find that you can dynamically modify a view or use contextual filters by using parameters from the URL of the page that the view is attached to. This means one view display can be used across hundreds of pages and display different content. Concepts like this are advanced topics which I will cover in the future but the main point I want to emphasize is planning your site will allow you to use Views more intelligently.
That's it for duplicating a view. The best advice I can give right now is to click around and see what you can change. Nothing is wrong and you can do pretty much anything you can do with writing code all with the UI.
Next up, Creating a New View.
Creating a New View
In this article, we will be creating a new view in Drupal. If you have been following along then you will already be quite informed about what Views is and how to add data to your view, filter it and sort it.
You will also know that you can add headers and footers to your view, plus other features such as no-results messages and pagination. If you haven't read the first three parts of Views, The Drupal GUI SQL View Builder, I suggest you check them out as they run through the views that ship with Drupal and how you can modify and duplicate them.
There are 6 types of views you can make with a standard profile install of Drupal. We won't cover them here in any detail but they are:
- Attachment
- Block
- Embed
- Entity Reference
- Feed
- Page
The 2 that will be most useful starting out are page and block views. Pages having a path and blocks can be placed in regions on your site. We have already looked at page views in the first parts of this get started with Drupal Views article. Some block views you can check out are the recent content and who's online block.
Remember to see what type of display a view is you can check the dashboard display column.
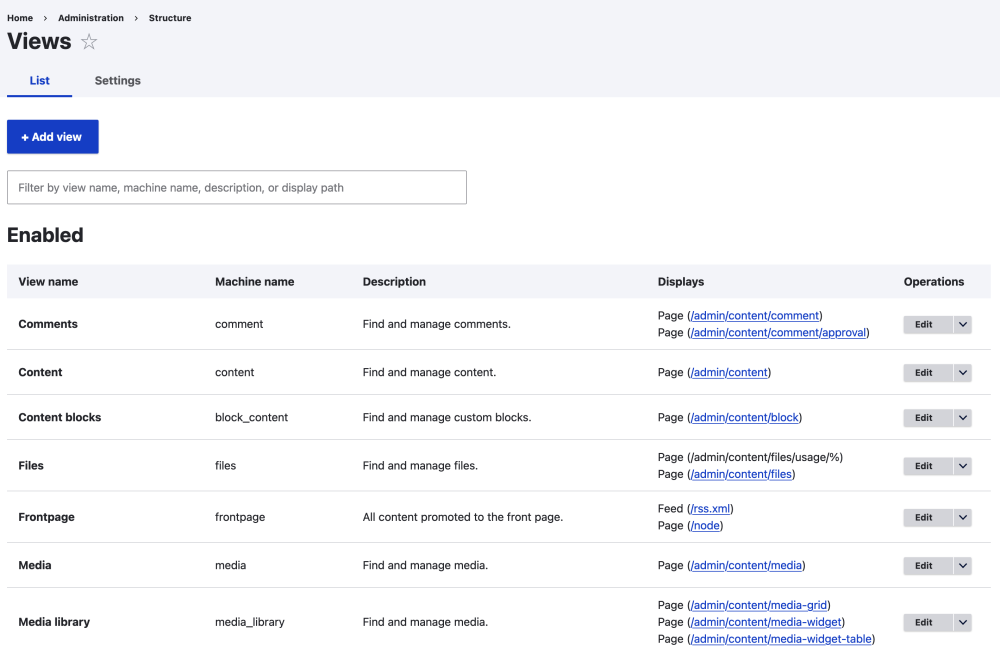
Okay without any further ado, let's create a view.
How to Create View in Drupal
On the Views dashboard page or from the menu if you are using the Admin toolbar.
- Click Add View.
On the add view page
- Fill in the View name and description
- Define the basic view setting

- Check either Create a page or Create a block
You don't have to do this now if you want to set up a default display first. We talked about this in the other parts but if you don't create a page or block then when you click save and edit you will be directed to the default display.
If you do decide to do this now you will be given some options for the page and block view. Options such as path, format, number of items to display, and use of a pager. Some basic settings to make the view usable.
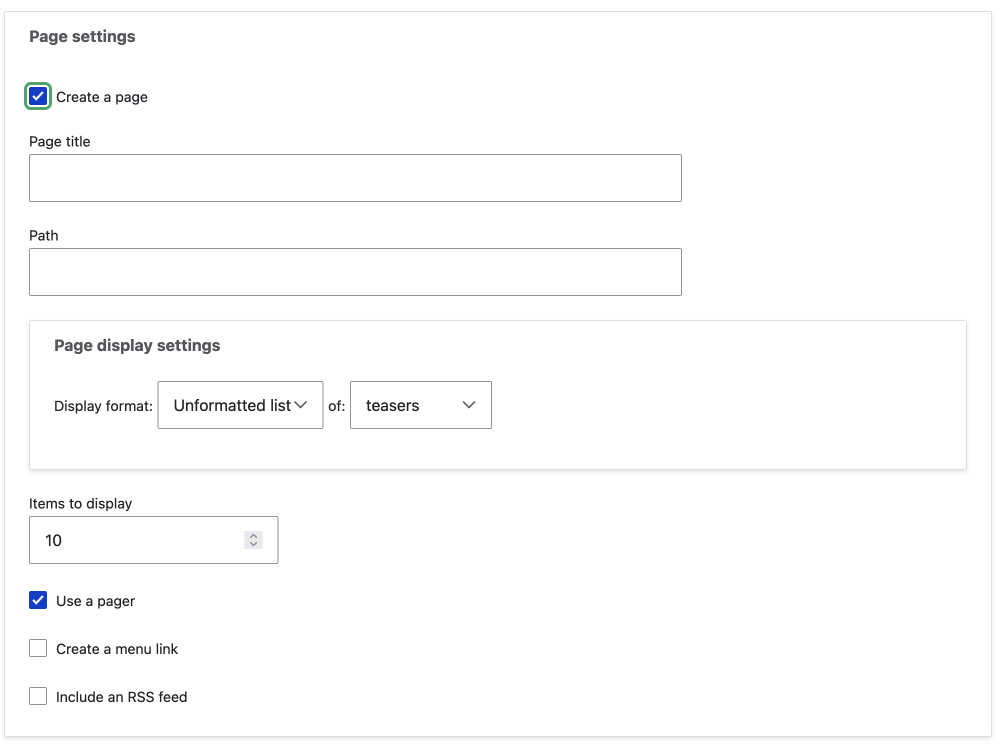
You only have the option to create 2 of the displays now, page and block, and if you want to create a feed when you add the page. The other types of views are more advanced and will be covered in a later article but you'll need to make them on the view configuration UI after you click save and edit.
- Click Save and edit.
Now you will be on the view configuration page, with the 3 main sections we covered above, where you can fine-tune any of the settings if need be. Have a play around.
To recap the 3 sections.
- You can add data and filter in the first section/ column
- Adjust the display settings in the second column
- Make advanced settings in the third column/section.
If you want to create one of the other types of view, namely an attachment, embed, entity reference or feed, this is where you do it. Click on the +Add button in the displays section.
We will cover these other types of views in another article.
So that is it, you have now modified, duplicated, and created a view and Views displays.
Wrapping up: The birth of the Drupal Views Ninja
Wow, that is a lot of stuff to absorb so let's do a quick review.
First, we have learnt about getting started by checking the settings of Views so that Views is set up how you like it; giving you live feedback on the things that are important to you. This was done in the on the settings tab where there are various basic and advanced settings.
We then looked at the default views of the frontpage and the content management to get an idea of how you can use Views.
Then we looked at how to modify a view by adding a display or duplicating the view.
Finally, we set up a basic view from scratch.
Even after this, however, we have only touched the surface and in future, I will be sharing some of my favourite creations I have made using views and exploring advanced Views and how you can enhance them with contributed modules and customizations. Check below for some related Views content.
Views, as you can see, is an amazing piece of software. Using it to create views of your content all from the UI can save you days if not years of time so you can spend more time doing the things you like, whatever that may be.
Thanks for reading and if you are interested in tech and design be sure to sign up for my newsletter. I share a myriad of cool content on how to design and build amazing front-ends. Until next time, stay cool my friends.