The code in this article is Vue.js v2.x, I will follow up with a Vue.js v3 update for changes if needed, it is my understanding that this work is pretty transferable to Vue.js v3.
A bit of a back story on the reason behind this post if you don't mind. If not skip to setting up dynamic components section.
I had been working with a Vue.js app I had set up late last year when routes weren't thought of and things were rosy just to get a single page app (SPA) fired up. All was new to me.
From there I thought my SPA needed to have separate pages and merrily went along with the dynamic component pattern to achieve this. All was working just fine when then I thought I'd use this for my new site. So I set it all up, nice I got a site with a home page and an about page.
This was not a website though.
What do mean? Not a website you ask? Well, the URLs didn't change even though the content did and that was just a start. Worst of all the pages didn't load at the top on change, new pages loaded at the same scroll position. This behaviour is obviously fine if you are making an app feeling application and something that doesn't have scroll. That's not what I wanted or needed, I wanted the URLs to change for better SEO and when someone navigates to a new page I want them to be at the top, I think that person might want to be at the top too so overall not a great user experience.
That's where Vue Router comes in. This post will be a high-level overview of getting it set up and to finish off will show the difference between what I feel Vue Router can do and what dynamic components can do and why I would choose one way over another.
I should also note from what I have read that for more automated routing NuxtJS is possibly the way to go. However, having an idea of how routes work under the hood can't be a bad thing, let's jump in.
Let's look at the set up of a basic built-in dynamic component
This assumes you have created an app using vue create my-custom-project.
To add an about page to my basic Vue CLI project I discussed above I used dynamic components so that when the link in the header navigation was clicked it would load the set currentPage to show the correct component in the
At the most basic level, the code in the template of the App.vue looks like this, where currentPage is a data property. What happens when you click the Home link is currentPage value becomes HelloWorld and then that is passed to or bound to the component using v-bind:is. This grabs the HelloWorld component imported in the script and places the content in the component element and renders it to the page.
<template>
  <div id="app">
    <header>
      <nav>
        <ul>
          <li v-on:click="currentPage = 'HelloWorld'">Home</li>
          <li v-on:click="currentPage = 'About'">About</li>
        </ul>
      </nav>
    </header>

    <component v-bind:is="currentPage" msg="Welcome to ヴユ 👋"></component>

  </div>
</template>
This is the code in the script section, we have imported the components and then registered the components in our export default object. The default currentPage data value is set to HelloWorld to load the HelloWorld.vue as our homepage.
<script>
    import HelloWorld from './components/HelloWorld.vue'
    import About from './components/About.vue'

    export default {
        name: 'App',

        data: function () {
            return {
                currentPage: HelloWorld
            }
        },

        components: {
            HelloWorld,
            About
        }
    }
</script>
Nice! But as stated scroll behaviour is not what one would expect and URLs don't change. So let's look at fixing that.
Setting Up Routes for an App that was installed without Vue router
Per the official doc at https://router.vuejs.org/installation.html, on the above install created using the Vue CLI we can run vue add router. This will generate all the needed code with 2 sample routes. However, be warned your App.vue file will be overwritten.
If you run the add command you will also be asked if you want to use history mode, I would suggest you do as this removes the #hash in the URL alias as I later found out, for more details about #hash keep reading.

For the sake of this article, we will add the router manually. All the below is done with the vue add command.
To use Vue Router we need to install the vue-router package, we can install this using npm install vue-router. This will add it to our package.json and download the package and place it in the node_modules directory.
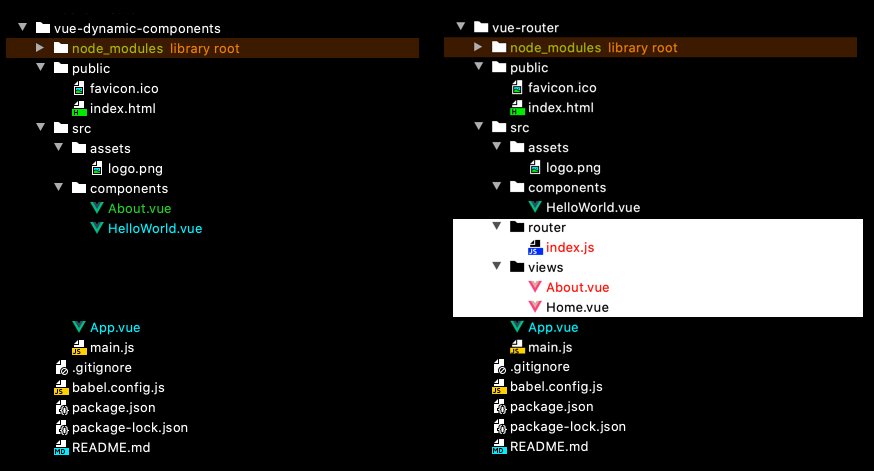
With that done, let's look at what we need to add to our file and directory structure to use the router.
The main difference in the set up is that we need to add the router file, this file is placed inside a new router directory in the src directory to keep things tidy. The other main difference in using the Vue Router is that it uses views instead of components to show the pages, views are essentially components and use the .vue extension, let's add 2 views, a home.vue and an about.vue in a views directory
Now we have this, the file structure on the right has the extra directories and files added as explained above.
Let's now add the code to our files.
Router.js
In the index.js in the router directory we need to add this code.
import Vue from "vue";
import VueRouter from "vue-router";
import Home from "../views/Home.vue";

Vue.use(VueRouter);

const routes = [
  {
    path: "/",
    name: "Home",
    component: Home
  },
  {
    path: "/about",
    name: "About",
    // route level code-splitting
    // this generates a separate chunk (about.[hash].js) for this route
    // which is lazy-loaded when the route is visited.
    component: () =>
      import(/* webpackChunkName: "about" */ "../views/About.vue")
  }
];
This imports all that we need, makes a routes array with route objects that have the path, name, and components properties.
Then we add options to our new Vuerouter and export it.
const router = new VueRouter({
  routes
});

export default router;
The Views
In the views file we created earlier let's add our template code
The about.vue
<template>
  <div class="about">
    <h1>This is an about page</h1>
    <p>Spicy jalapeno bacon ipsum dolor amet exercitation voluptate magna ....</p>
  </div>
</template>
The home.vue has both template and script block.
<template>
  <div class="home">
    <img alt="Vue logo" src="../assets/logo.png" />
    <HelloWorld msg="Welcome to Your Vue.js App" />
  </div>
</template>
<script>
// @ is an alias to /src
import HelloWorld from "@/components/HelloWorld.vue";
export default {
name: "Home",
components: {
HelloWorld
}
};
</script>
The home.vue links to our HelloWorld component so we need a script block to do this , we could also link up the About.vue component but would need to rename it for it to work.
There is nothing to do in our component files, they will work as before in this simple example.
App.vue
We now need to replace our header nav li items from before with router-links with to attributes.
- <li v-on:click="currentPage = 'HelloWorld'">Home</li>

+ <router-link to="/">Home</router-link>
And then replace the dynamic component with the router-view
- <component v-bind:is="currentPage" msg="Welcome to ヴユ 👋"></component>

+ <router-view />
There is no script block in our App.js so we can delete that.
main.js
In main.js we needed to import the router and we need to add it to our Vue instance.
import Vue from "vue";
import App from "./App.vue";
import router from "./router";

Vue.config.productionTip = false;

new Vue({
  router,
  render: h => h(App)
}).$mount("#app");
So with that done, we have a basic app set up with two pages and custom URL paths.
Fixing Scroll Behaviour and Removing the # from our Paths
Some finishing touches now. We have routes but they have a hash in them as illustrated in the image below.
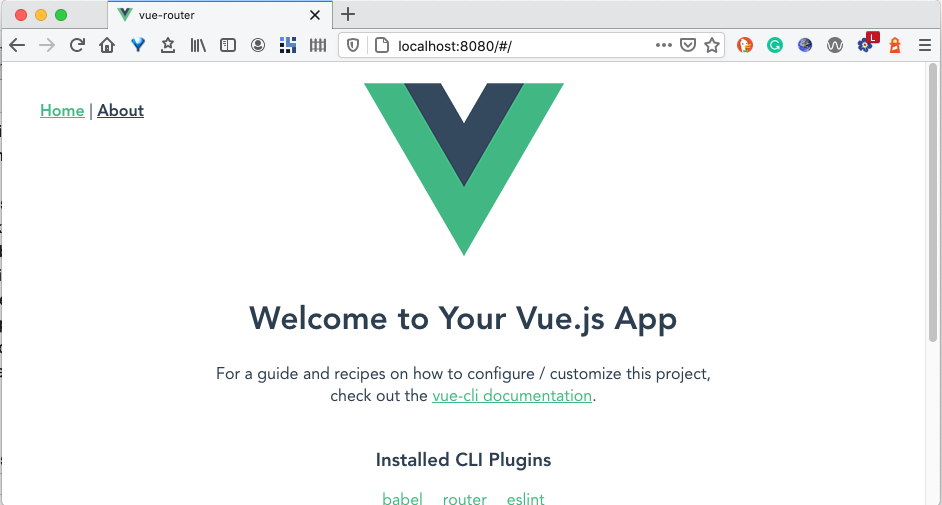
To remove the hash from our URLs add mode: "history" to the router/index.js.
const router = new VueRouter({

  mode: "history",

  routes,

  scrollBehavior(to, from, savedPosition) {
    if (savedPosition) {
      return savedPosition
    } else {
      return { x: 0, y: 0 }
    }
  }
});

export default router;
Then to stop this strange and unworldly scroll behaviour we need to set scroll behaviour and set it to return x:0 y:0. Scroll behaviour takes 3 arguments, we can remove these if we like or add the conditional as I did to stop the linting errors I was getting.
Final thoughts
Overall this is a much better solution for a website, even though we will still need to add meta etc.
For a SPA that is small in footprint and has no scroll the dynamic component method is nice, over time I may change my opinion on that though.
I hope that was useful for you, in upcoming articles I will be looking Nuxt.js, adding meta for SEO, transitions for page loads in Vue.js plus a bunch of other topics closely related to frontend design and development, plus I have some special ideas brewing. Thanks for reading and if you have any question make sure you DM or ask me on Twitter.
The website mentioned is https://simonramsay.net, currently in development.
I also wrote about using this site to load content to simonramsay.net using Drupal API and Axios and Vue.js