This article uses illustrations from CKEditor (4). Apart from this, nothing else has changed, and the information is relevant to CKEditor 5.
For me, text formats are an important feature because they give you the powerful ability to set up text areas how you like. You can configure your text areas from plain text to fully featured WYSIWYG editors, and then you can grant permissions on these text formats to any user based on the role of the user.
Setting Up text formats in Drupal
In all cases, from the most simple configuration to the full feature WYSIWYG, the same basic configuration workflow is true.
On a fresh install, there are 4 text formats available, but you can add as many as you want. In this article series, we will:
- Have a look at the 4 text formats included with a standard install profile and how they are set up.
- Create a new text format, one with limited WYSIWYG features, that allows people only to use text, bold text, and lists. (Check my newsletter for a heading text format.)
- We will look at how we can set one or all of the available text formats on a text area, which includes being able to set a default text format. This can be done on a text area by text area case. (Check my newsletter for a heading text area that only allows a heading text format.)
- Adding custom styles to element in CKEditor.
The four text formats available with a Drupal standard install
On a standard Drupal installation out of the box, you get:
- Basic HTML
- Restricted HTML
- Full HTML
- Plain text
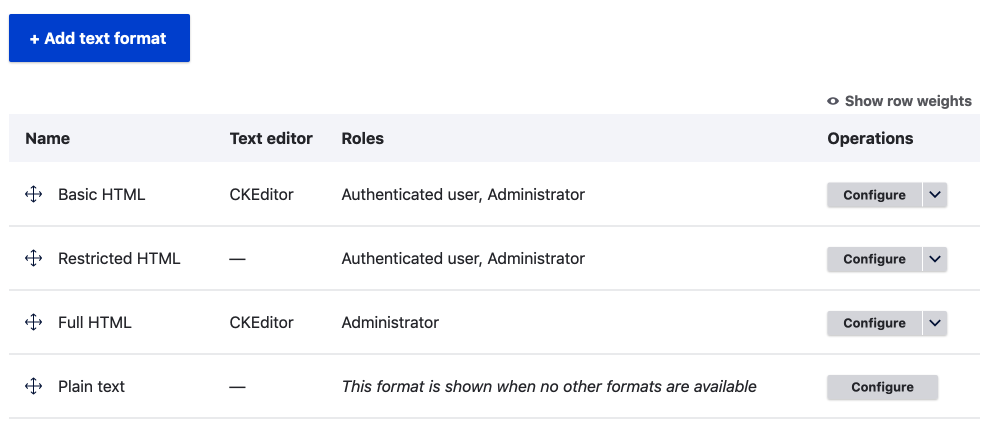
You can see on the text formats and editors page what the basic settings for each format are and whether the text format uses a text editor. You can also rearrange the default order on this page by using the drag icon on the left if you so wish. By default, text areas are set to Basic HTML for the article and the basic page content type due to the order on this page.
Edit a text format or Create a text format
To edit any of the default text formats, you use the edit format button, and you will get the setting form for the text format. It is broken into sections which vary depending on if a text editor is used or not.
If you are creating a new format, you can use the create format on the overview page and then you will have the same page presented as the edit page.
Roles & Permissions for text formats
First up, you have the name and then roles that can use the text format.
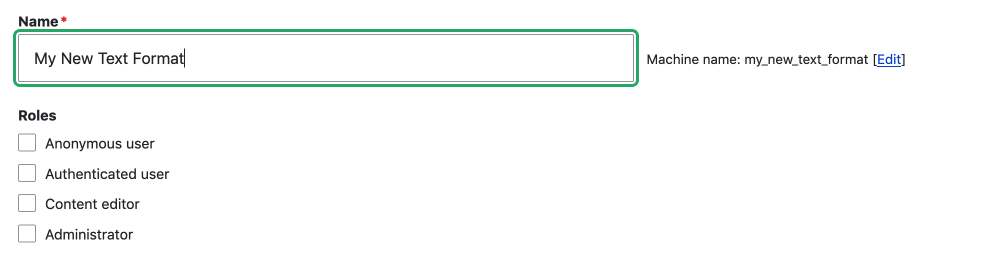
Note you can change the name if you like but can't change the machine name. In the case that you are adding a new text format, you can change the machine name if you so please.
Changing Machine Names
In the case of a new text format changing the machine name may not be that necessary. However, it is good to know that you can by clicking on the small edit button. This feature is useful when creating fields in a content type as you can prefix your machine names to make them easier to find in the system.
Limiting Usage of text format on text fields
We are going to take a slight detour here before we continue with the rest of the text format settings and see how they are used with text areas.
When setting up a text format you can configure the allowed roles as pointed out above. Something that was in Drupal 7 is now in a contributed module and that is the ability to limit what text formats a text area can use.
This feature also looks like it will be added to Drupal core shortly. What this does is allow the site builder to limit which text formats can be used on a text area. This is an awesome and much-needed feature, so be sure to check it out by using the Allowed formats module or by patching core with the patch from this issue; Allow text field to enforce a specific text format.
Okay with setting up permissions and limiting the usage of text formats let's continue.
Text Editor or no text editor
Next, you can see the Text editor setting. If it is set to none then you will only see the select menu. If you have the CKEditor selected, the default editor that ships with Drupal, then you will see the toolbar. The toolbar area is where you can drag and drop the icons from the available icon set to the active toolbar or remove them if you like.
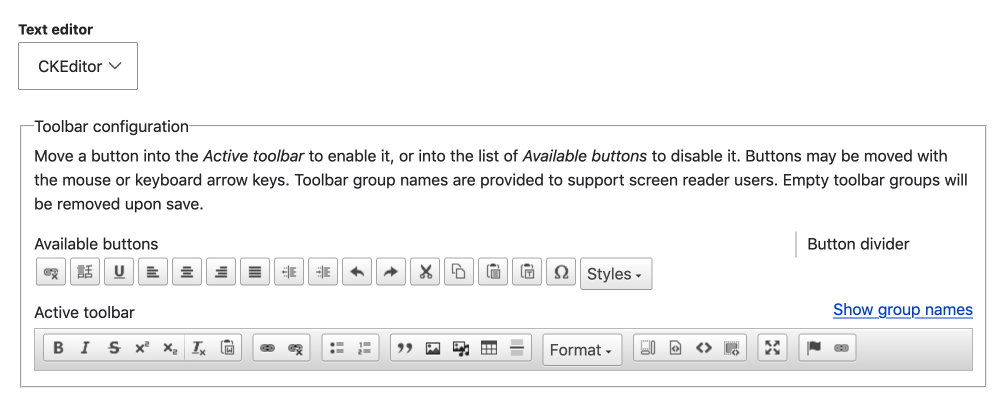
Toolbar configuration
If you are adding extra functionality to the core system, such as better linking or enabling the Media module, then you may have installed a module. By installing a new module you will then have a new icon or icons in the available icons set. An example of these are the Linkit, Entity Link, and Anchor link, these are all CKEditor libraries/packages and by adding them the icon is added to the available icon set and is part of configuring extra functionality. You can read about how I added Anchor Link Module and Media and configured the CKeditor to use them in the following respective articles.
Related: Setting up Media Module
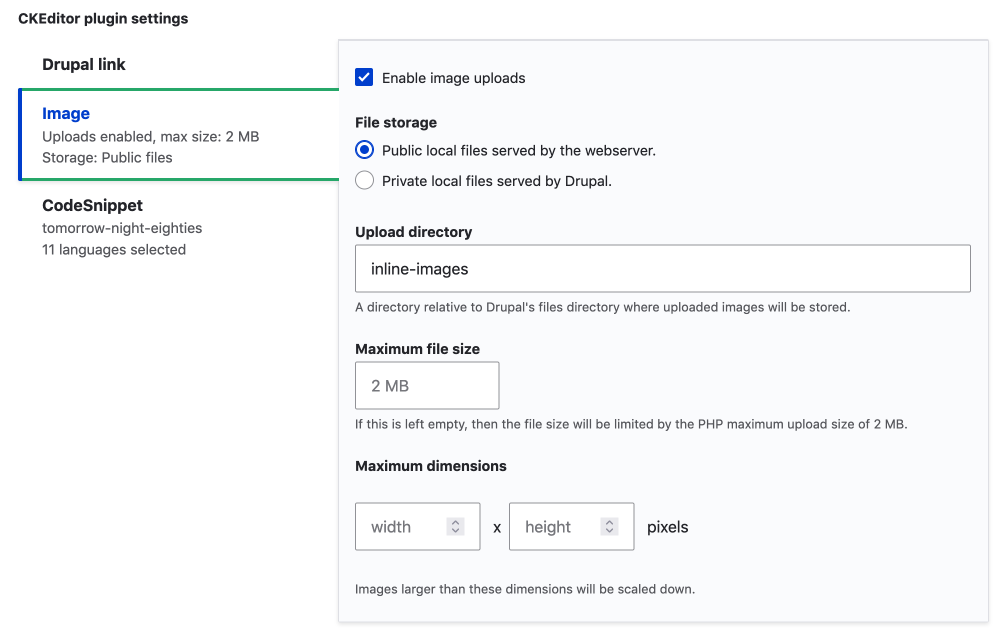
CKEditor plugin settings (only available if using CK Editor)
When adding new functionality by dragging an icon into the active toolbar as described, you may then get some extra settings.
Enabled Filters
After the toolbar, you have the available filters that come with Drupal or have been added via a module. This is where you enable certain filters for the text format. Just by adding the icon, it doesn't always enable the filter and functionality, so make sure you enable it if need be.
When you enable a filter, you will then sometimes get some options to configure the feature further at the bottom of the page.
Filter processing order (only presented if you enable filters)
Next, you can organize the filters added, sometimes this is important so when enabling a feature be sure to read the instructions carefully as some filters need to run before others to work correctly.
Filter settings (only presented if you enable filters)
Finally, at the bottom, there are some filter settings that you may need to set up for the best user experience.
Filter
What this is doing is cleaning up the text areas text input before it is rendered to the screen. For example, if you have limited HTML or the ability to add classes to certain elements but not others then you may technically be able to add a certain HTML element in the text area but when all the filters run it will be stripped out when rendered or in the case of Media, the media entity reference code that is needed to add the images or other media asset to the WYSIWYG is stripped out or more correctly replaced with standard semantic HTML to render it correctly. All this comes with Drupal and is fully configurable using the UI.
That's it, it might seem like a lot, and it is, but setting the text formats up is an important step in any Drupal set up, especially when you have many different users with different roles and needs. So be sure to get familiar with the idea of text format so you can provide hassle-free and fluid user experiences for managers, creators, and other people who contribute to the site.
I think it is a good thing to point out again the importance of adding the functionality where you can limit text format on text areas, so I will mention that again here. Be sure to implement that by either using the module or patching as mentioned at the beginning of this article.
If you enjoyed this article and would like to learn more about Drupal and creating beautiful front-end experience for content creators and readers then be sure to sign up for the tech and design newsletter.
Thanks for reading!