If you read part 1, and I hope you did, you would have learnt about the master branch and how to make a new branch, which is pretty cool; you can make changes in the new branch and always have a copy you can go back to.
However, as with having a master with no branches, this becomes pretty limiting. In fact, not only limiting, but downright not use-able in a production (live) environment. Go back and load up your project in the browser (pretend the site is live) and checkout your branch. See what happens? That's right, all the changes are reflected in the browser!
I hear you say, but I wouldn't do that on a live site and would upload it to the server and okay you are right. However, how is that done?
In this article, we are going to look at making a repository remote so that we can safely switch branches and have the "live" version safe in a remote location.
First, we will look at using a remote site such as GitHub to store our repository.
We will then look at the same concept but with a live production server, in part 3 (the next part).
Then in Part 4, we will look at using GitHub as a middle remote repo that is the source of truth and push to a live server through that. But let's not get too far ahead.
Using a remote repository to store and share your code
You will need a Github account, so if you don't have one visit Github.com and sign up.
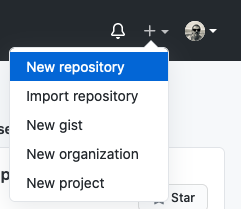
Once you have an account create a new repository by using the + sign in the top navigation bar and use the new repository link.
This will take you to a page where you can fill in the details of the repository. You can fill in what you like but at a minimum, I suggest the below.
- Add a name
- Choose public or private. This is up to you but one thing to think about is what license you will give it. Maybe for a first repository, this doesn't really matter but in the future the license is important, so I will make it private for now.
- Add README.md, I check this as having a README is good practice.
- Click Create repository.
This will bring you to a new page with your README file. Congratulations you have now created a remote repository with a master branch named main.
Let's now clone this to your local.
Copy the Repositories URL
I am going to use SSH, but you can also use GitHub personal access tokens, to access the GitHub repository.
Please check out how to set up SSH using the SSH article or if you want to use a personal access token, Github has all the information you need.
To clone the repository to your local system, copy the URL from the Code button on the Github repository page, which will either be the SSH or the HTTPS URL.
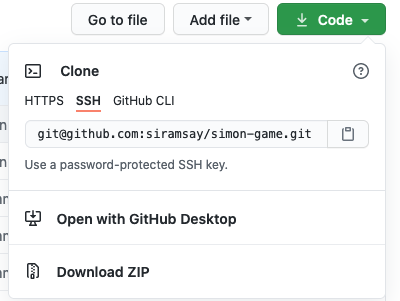
For SSH the URL will look like this git@github.com:siramsay/my-new-repo.git
and if you choose to use personal access tokens use the HTTPS URL https://github.com/siramsay/my-new-repo.git
Clone your new repository to your Local
Move to your local system and open your CLI. I use Terminal on Mac for this job. I hear PowerShell is a good option on Windows.
Move into a directory where you want to keep the repository locally, I use the Sites directory.
cd ~/Sites/Use the git clone <repository address> command to download the repository to your local system
git clone git@github.com:siramsay/my-new-repo.gitChange in the directory using cd and list the directory contents.
cd my-new-repo
ls -la
Use ls -la to see dot files
Use ls -ls if you don't want to see hidden dot files
You should see the README.md & .git directory.

Working with you Local Git Repository
Now make a change to the README.md file, you can do this in you favourite editor or by using nano.
Once you have made some changes run the push git command, notice how Github creates the master branch with the name main, so we have to push to main, also notice that we are pushing to the origin. This is an important thing to remember that the remote branch is the origin.
git push -u origin mainGo back to your Github remote repository in your browser and look at the remote README file.
What no change? what's going on? Can you work it out?
See if you can work out why before reading on.
Spoiler Alert
Go back to the CLI and check the status by using the git status command you learnt in part 1.
Okay, so you should see the following output to the CLI.
Changes not staged for commit:
(use "git add <file>..." to update what will be committed)
(use "git restore <file>..." to discard changes in working directory)
    modified:   README.md
To fix this use the git add and git commit command. If you need a refresher go back to part 1. Run the commands and then run the git push command again.
git push -u origin mainThis time you will see that the changes are pushed to the remote and by checking the repository on GitHub you will see the changes are reflected. Nice work again.
Create a new Branch on the Local
Have a play around on your local repository trying the commands from part 1. Here is a list of things to try:
- create a new branch.
- make some changes to the new branch.
- push the new branch.
- merge the new branch into the main branch.
- push the main branch.
Did you have any issues? What did you find out?
Hopefully now you are comfortable with cloning a repository, making changes, and then pushing back to the remote origin.
A note on the origin
As you will have noticed when we push code to the remote, which is the original version(not always the "original" version but that's another story), we say push to the origin <branch>. Origin is an alias that is set up when you run the clone command. You could also run git push -u <url> main. If you check in the .git directory you will see a config file. Open up the config file and you will see the [remote "origin"] as shown below. You could in fact change that alias but we won't as using origin seems like a good name.
[remote "origin"]
    url = https://github.com/siramsay/3D-CSS-Library.git
    fetch = +refs/heads/*:refs/remotes/origin/*
Well that's about it for this part, you can also do the same by creating a git repository on your server and cloning from that and when you do you will be pushing live. I will cover that in in Part 3.
Thanks for reading, be sure to sign up to the newsletter and see you next time.