Foreword
I still use jQuery if websites I work on have it available. It isn't really needed these days since modern browsers support vanilla JavaScript, but hey it is nice to use when it is included.
That said, after I finish working on something in jQuery, I usually like to refresh how it can be done in JavaScript. I think this is a smart way to learn as even though jQuery is JavaScript, it has a slightly different syntax and ways of doing things. Knowing and seeing these differences makes you a stronger programmer. I recommend using jQuery to learn, as it is simpler to understand a lot of the time. From the jQuery site: It makes things like HTML document traversal and manipulation, event handling, animation, and Ajax much simpler with an easy-to-use API that works across a multitude of browsers.
Building a Video Player Component
Just recently, I had to implement a YouTube video player that was hidden behind a hero image to start. To play the video, you click on a play video button on the hero, and the video player slid down over top of the image and started to play.
The video needed to be 100% width of the browser, so the height of the video was set to auto; this was done with CSS.
To make this work, I need to calculate the implicit height of the video. This was calculated when the video player was opened and also recalculate when the browser is resized.
Preparation
If you want to follow along you will need to use dev tools, for more info on that please check How to use developer tools.
Using Web Developer Tools
In your browser, use the below to open Development tools and then the console:
Option Command I
⌥⌘I
To open console
esc
Firefox
- Hamburger > More tools > Web Developer Tools
- 3 dots top right of dev tools > Show Split Console
Chrome
- 3 dots > More tools > Developer Tools
- 3 dots top right of dev tools > Show Console Drawer
You can use my boilerplate to set up the project locally.
Next up, you'll need a basic page; I will outline the basic setup below. It is a modification of my development boilerplate you can download from GitHub using the following link: https://github.com/siramsay/bare-bones-boiler-plate
Once you have a copy set up locally, we will make a few modifications.
Setting up your HTML
We will use a basic page with 2 boxes. For the boxes, we use article elements, but you could use anything. The articles have unique IDs, that is the important thing.
<main>

-  <article>Content</article>
-  <aside>Aside</aside>
+  <article id="jquery">jQuery</article>
+  <article id="javascript">JavaScript</article>

</main>
You'll also see we have linked jQuery and CSS in the head. And at the end of the document we have a link to the JavaScript.
<link rel="stylesheet" href="https://cdn.jsdelivr.net/npm/normalize.css@8.0.1/normalize.css">
+ <script src="https://code.jquery.com/jquery-3.7.1.js" integrity="sha256-eKhayi8LEQwp4NKxN+CfCh+3qOVUtJn3QNZ0TciWLP4=" crossorigin="anonymous"></script>
</body>
+<script defer src="action.js"></script>Setting up your CSS
CSS lays out our page and sets the sizes of our 2 boxes and colours them too.
Add the following code below the main CSS rule.
article {
  display: grid;
  place-content: center;
  &#jquery {
    width: 100px;
    height: 200px;
    background-color: royalblue;
  }
  &#javascript {
    width: 100px;
    height: 200px;
    background-color: yellow;
  }
}
If you open the HTML up in your browser, you will set 2 rectangles, one blue and one yellow, both 200px high.
Okay, so now we are ready; let look at how we can get it set heights using jQuery and JavaScript.
The JavaScript
First, open the console as described in the introduction.
Next, open the action.js and add the following code.
Get the boxes reference from the DOM.
const $jquery = $("#jquery");
const JavaScript = document.getElementById("javascript");
The code above first sets up 2 variables for the boxes. The first one is jQuery, the second in standard JavaScript. They do the same thing.
Get the value of the height and width
let $jqueryWidth = $jquery.width();
let $jqueryHeight = $jquery.height();
let JavaScriptWidth = JavaScript.clientWidth;
let JavaScriptHeight = JavaScript.clientHeight;

console.log('jQuery Width: ', $jqueryWidth);
console.log('jQuery Height: ', $jqueryHeight);
console.log('JavaScript Width: ', JavaScriptWidth);
console.log('JavaScript Height: ', JavaScriptHeight);
The next four lines set up variables for the height and width values of the boxes. It gets the height and width value from the variable set up in the first two lines. Again, jQuery first and then standard JavaScript.
Finally, we log the values to the console. You should see something like the image below.

Great, the values are what we set in our CSS.
Set New Values for the height
$jquery.height('100px');
JavaScript.setAttribute("style", "height: 100px");
Again jQuery syntax followed by JavaScript.
What this does is add an attribute to the element. This is somewhat clearer in the JavaScript. If you look at the HTML, you will see the below code.

However, if you console.log the height again (see the image at bottom), you will see it won't have changed. If you need the height applied to your variable, you will need to reassign the new values again. Just repeat the reassignment like so.
$jqueryHeight = $jquery.height();
console.log('jQuery Height: ', $jqueryHeight);

JavaScriptHeight = JavaScript.clientHeight;
console.log('JavaScript Height: ', JavaScriptHeight);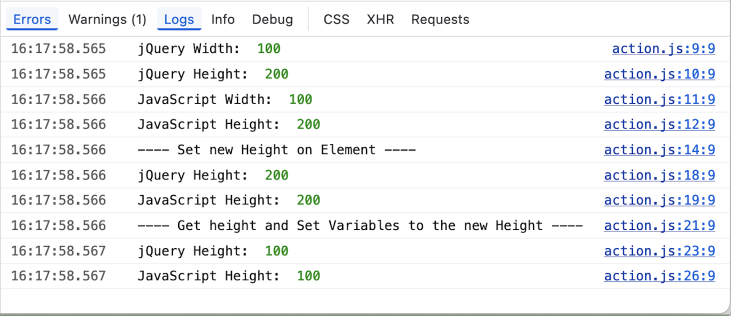
Summary
So that's it for this part. We have learnt how we can get and set the height of an element in JavaScript and jQuery. We have also learnt that when we set the new height, it adds a style attribute directly to the element and this doesn't affect the value we have assigned to our height variables. If we want our height variables to have the new height value, we need to reassign them.
In the next part, we will look at the resize event listener.
Thanks for reading. If you enjoyed this and are starting your journey into front-end web development, be sure to sign up to my newsletter. I write about front-end development and design, and using frameworks such as Drupal and Vue.js and other technologies.
Until next time, seize the day!