This article is part 2 of a 3 part series on building an image slide and reveal viewer as illustrated below. After part one of this series we had a basic proof of concept but as such not a working solution. This for me, and I would say a lot of developers, is a common way to work on a problem. I versioned it 0.1 to indicate it's at such an early stage.
In this second part, we will look at developing a usable version for desktop and in part 3 we will tackle mobile and in particular touch screens. By the end of part 3, we will have a working version. However, this will not be a final version as I feel that a full re-factor could be done or at least explore a little further. I will explain what I mean in the review so make sure you read to the end.
Also, the code hasn't been fully tested across all browsers and devices. Never fear, however, as you will learn stuff that can be used elsewhere and this article series is more about problem-solving and the steps taken to arrive at a solution. Let's look at what we will learn in this article.
Version 1 and what we will learn
The following is what we will learn. It is in the order that certain features and functionality that were needed became apparent:
Add a handle to the UI (part 2a)
- Adding a "handle" to "click and drag". CSS position
- Add Hover to the image to show the handle.
- Turn off events in the Window using the window variable.
Make responsive for mobile to desktop (part 2b)
- Responsive design and how to get images to respond to browser resizing.
- Adjust the function to use % for large screens and screen size for smaller screens.
And in part 3 we will make it work on mobile touch screens and learn about how hover acts on touch screens.
- Touch Event
- Hover and touch
- Mouse Click & Touch events
- @Media queries level 4
Gitting set up
Excuse the pun.
If you want you can also learn about Git and branching & commit history but only if you work with my Github repo. Here is the link to the starting branch https://github.com/siramsay/image-hide-reveal/tree/proof-of-concept-0.1 Grab that and get ready to code.
The Image Reveal and Hide Slider
Hopefully, you have the code at the stage I left it at in the first part by now. The code should have
- The images set up with wrappers
- An on mouse move event listener set on the outer wrapper of the images.
- It should also have the mouse tracking so it is restricted to the wrapper, this was done using the x property of the DOMRect object.
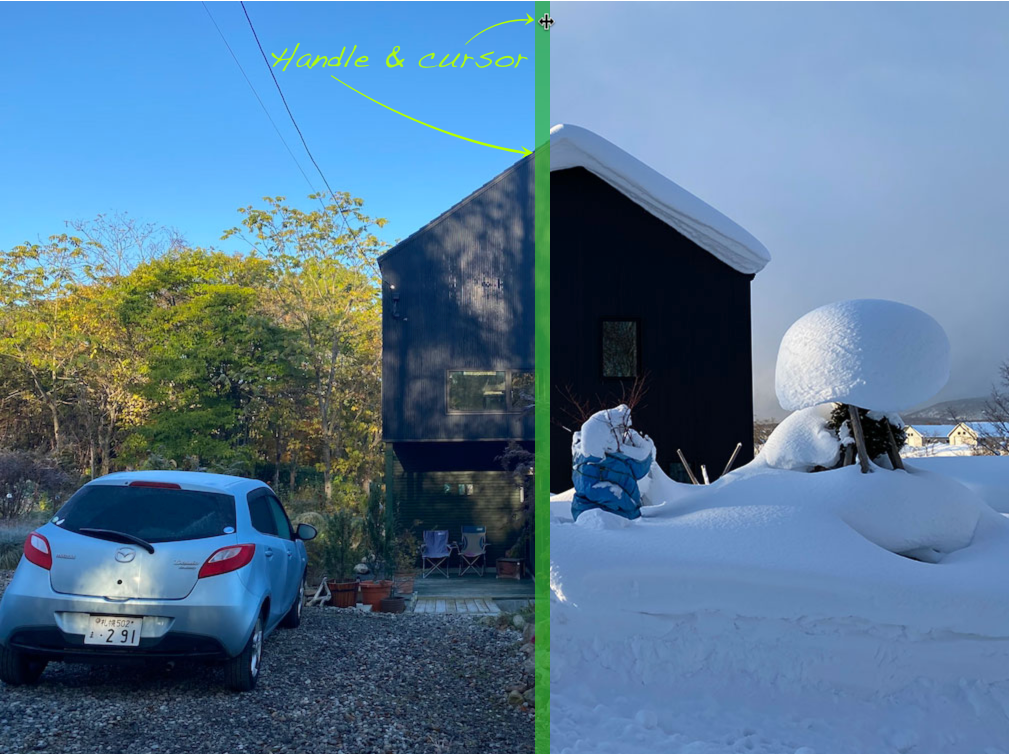
The next thing we will do is add a handle to the top image that appears on hover and can be used to adjust the width of the top image to reveal and hide the bottom image.
Adding a "handle" to "click and drag"
After completing the proof of concept, the first thing I wanted to do was add a bar on the top image that acted as a handle to control the reveal and hide functionality as illustrated below.
This is an easy thing to do. First, add another div element to the HTML markup. Add it after the top image inside the wrapper we already have.
<div id="outer" class="outer">
    <div class="image"><img src="winter.jpg" alt="add an alt"/></div>
-   <div id="top-image" class="image top-image"><img src="late-summer.jpg" alt="add an alt"/></div>
+   <div id="top-image" class="image top-image"><img src="late-summer.jpg" alt="add an alt"/><div id="handle"></div></div>
</div>
Add the CSS below to position it absolutely within the wrapper. Then position it to the right and top. You can also style how you like. I added a background colour, width, and also the cursor of col-resize for now.
#handle {
  position: absolute;
  right: 0;
  top: 0;
  width: 15px;
  height: 99.01%;
  background: #37b822ad;
  text-shadow: 2px 2px 4px;
}
Related: CSS Position Property for beginners.
Note that the parent element also needs to have a position property set on it. In this case, it is the outer div element.
While we're at it let's add the style to hover pseudo-class instead or more correctly make the handle appear when someone hovers over any part of the image. To do this add :hover to the outer wrapper but target the handle and make it display block. On the handle add display:none.
#handle {
  position: absolute;
  right: 0;
  top: 0;
  width: 15px;
  height: 99.5%;
  background: #37b822ad;
  text-shadow: 2px 2px 4px;
  cursor: col-resize;
  display: none;
}
.outer:hover #handle {
  display: block;
}
The handle now shows when hovering over any part of the image but the JavaScript is still triggered on the mouse move event. Let's fix that now.
branch: add-handle-with-hover
commit fd9bd5aa137e88623d0ca492b58b1ffdbaff0a4f
Move the event trigger to a mouse down event listener
For the handle to work you need to add an event listener on the handle with the steps below:
- First, select the element; in this case the element with id handle.
- Add an event listener to the handle and make it mouse down.
- When you click handle (mouse down) you need to invoke the mouse move we had before. The easiest way to do this is by wrapping the previous code in the mouse down event listener.
Below is the full JavaScript code.
const trackerElement = document.getElementById("outer");
const topImage = document.getElementById("top-image");
const handle = document.getElementById("handle");

handle.addEventListener('mousedown', function () {

    trackerElement.addEventListener('mousemove', trackMousePosition);

    handle.onmouseup = function (e) {
        trackerElement.removeEventListener('mousemove', trackMousePosition);
    };

    function trackMousePosition(theEvent) {

        const trackerDOMRect = trackerElement.getBoundingClientRect();


        let mousePointerPos;
        mousePointerPos = theEvent.clientX - trackerDOMRect.left;

        let imageWrapperWidth = mousePointerPos / 10;
        topImage.style.width = imageWrapperWidth + '%';

    }
});
You also need to add a mouse up event and remove the mouse move. Otherwise, the mouse move event will continue to work.
Turn off events on using window
Once you have added the click and drag you will find that it will continue outside of the image's area. To control this we can use the window object, that is the full browser window, and add a mouseup event that removes the mouse down event. You can use the same code as the mouse event to remove the listener.
handle.onmouseup = function (e) {
  trackerElement.removeEventListener('mousemove', trackMousePosition);
};

+window.addEventListener('mouseup', function (event) {
+  trackerElement.removeEventListener('mousemove', trackMousePosition);
+})

function trackMousePosition(theEvent) {
branch: https://github.com/siramsay/image-hide-reveal/tree/add-mousedown-to-tri…
commit: https://github.com/siramsay/image-hide-reveal/commit/176341babfc4c9cb43…
Let's fix a couple more things to make the user experience a little nicer. The first thing is to add user-select: none to the image elements to disable that horrible select highlight and the second is to stop the slider from dragging over the right edge.
Add user-select: none; to disable image highlighting
This is an easy fix. Add the property to the image class as shown below.
.image {
  position: absolute;
  user-select: none;
  -moz-user-select: none;
  -webkit-user-select:none;
  -webkit-touch-callout:none;
}
branch: https://github.com/siramsay/image-hide-reveal/tree/add-user-select-none…
commit: https://github.com/siramsay/image-hide-reveal/commit/b8813e65a7112a713b…
Stop the handle from going off the right edge using a conditional
If you check the code and your working version thus far you will see that the handle can be dragged over the right edge of the image. To stop this we can check if the image wrapper width is less than or equal to 100 and if so use the current per cent value. If the value is great than 100 it will use the else condition and set the top image width to 100%. See the diff below.
let imageWrapperWidth = mousePointerPos / 10;

-topImage.style.width = imageWrapperWidth + '%';
+// Stop handle from going more than 100% width
+if (imageWrapperWidth <= 100) {
+  topImage.style.width = imageWrapperWidth + "%";
+} else {
+  topImage.style.width = "100%";
+}
branch: https://github.com/siramsay/image-hide-reveal/ (master)
commit: https://github.com/siramsay/image-hide-reveal/commit/15f9601119d1ce4655…
So now we have a working desktop version but if you make the screen less than the width of the images the viewer doesn't resize. That's what we will do in part 2b, we will make this responsive.
Thanks for reading part 2a, I will be adding the next part very shortly. Let me know what you think and if you want to know first when the article goes live, make sure to sign up below for the newsletter.
Next: Splitting code for mobile and desktop screen sizes Part 2b