In this article, we will create a new two-row layout for the Drupal Layout Builder module.
The new layout will work with attributes for sections and regions added using a module, such as the Layout Custom Section Classes & Attributes module. If you would like to learn more about adding custom classes to your sections and regions, I have written about it in the Styling Layout Builder Pages in Drupal article.
The new layout will also work with the drag-and-drop functionality, by ensuring the code is structured correctly.
In part two, we will look at creating advanced layouts by creating a class that extends the base class. This allows you to add a custom way of adding CSS classes to your sections and regions.
Let's first, however, create a simple layout.
Creating a New Layout for Layout Builder
Creating a layout is pretty painless. To make a new layout available to Layout Builder, you only need to add two files to our theme.
All you need is a new layout YAML file and a twig template. Drupal core will look after the rest for you. The following is all the code you need, and the layout will work with the drag-and-drop UI.
The following should be added to a YOUR-THEME.layouts.yml, and placed in the root of your theme.
layout_tworow_section:
  label: 'Two Row'
  category: 'My Layouts'
  template: layouts/layout_builder/tworow_section/layout--tworow-section
  default_region: first
  regions:
    first:
      label: First Row
    second:
      label: Second Row
  icon_map:
    - [ first ]
    - [ second ]
By looking at it you can see:
- The name (label) of the layout.
- Where the template lives.
- That it has two regions and which one is the default region.
- There is a description for an icon map. This shows in the UI when you add a new section. Please check Drupal.org for a more complex icon map example.
Next, we need to add the following code to a layout--tworow-section.html.twig
Add the template to a layouts/layout_builder/tworow-section directory as the core Stable9 theme does. This isn't 100% necessary, but keeping your layout with all its related files is good practice, as you will see when adding CSS later.
The most important thing to note is the path should match the template key's values in your layout YAML.
{#
/**
 * @file
 * Theme to display a two-row layout.
 *
 * Available variables:
 * - in_preview: Whether the plugin is being rendered in preview mode.
 * - content: The content for this layout.
 * - attributes: HTML attributes for the layout <div>.
 */
#}

{% if content %}
  <div {{ attributes.addClass('layout layout--tworow') }}>
    {% if content.first %}
      <div {{ region_attributes.first.addClass('layout__region first-region') }}>
        {{ content.first }}
      </div>
    {% endif %}
    {% if content.second %}
      <div {{ region_attributes.second.addClass('layout__region second-region') }}>
        {{ content.second }}
      </div>
    {% endif %}
  </div>
{% endif %}
Things to note are:
- For modules to insert attributes and classes, we need to add the attributes to the div wrapper. That is the {{ attributes }} and {{ region_attributes.REGION }} in the above code.
- For the drag-and-drop to work, your region's content areas, called block elements in the Drupal documents, need to be direct children of their region. This is done using the
region_attributes.REGIONin the region div wrapper and then adding the regions registered in the layouts YAML inside the wrapper ascontent.REGION. - You can also add some classes to the attributes using the addClass() template method.
Adding Layout-specific CSS
For our simple 2 row layout, we don't need CSS, but if you do, you can add this to your library's YAML file for the theme.
Add the below to YOUR-THEME.libraries.yml
layout_builder_tworow:
  version: VERSION
  css:
    layout:
      layouts/layout_builder/tworow_section/tworow.css: {}
Then add the library in the library key of your layout YAML
 template: layouts/layout_builder/tworow_section/layout--tworow-section
+library: YOUR-THEME/layout_builder_tworow
 default_region: first
 regions:
   first:
Finally, add the tworow.css file to the layout directory.
I don't need CSS for the 2-row layout since the layout doesn't change between mobile and desktop, and it inherits the 100% width layout rule from the theme's global CSS rules.
If you want to see some examples of CSS rules you may want to add, check out the core Layout Discover module, the Layout Builder modules, or the Stable9 theme. These can be found in core/modules/ or core/themes directories. These are the default layouts.
Enabling the new layout to be available
Once you have created and registered the layout for your theme, it is ready to be used.
However, if you use the Layout Builder Restrictions module, you may need to allow the use of it. You do this on the manage display page in the layouts available for sections section.
See the Layout Builder Restrictions article for more info on restricting layout usage.
A Simple Example of using Configurable Attributes (from modules) in your Templates
Now let's modify the template code to add the container inside the section wrapper.
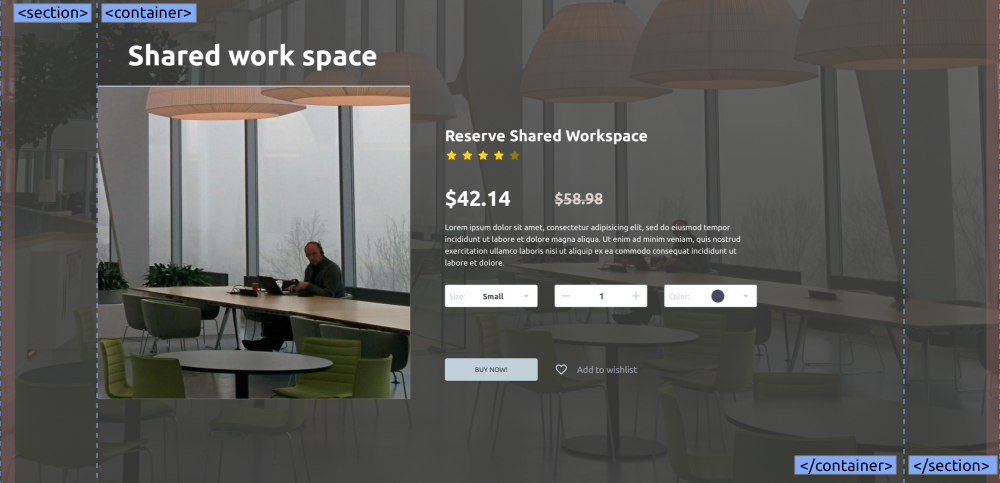
The container is placed inside the section wrapping the content regions. I have done this so you can use the Layout Builder Background module to add backgrounds to the sections that are 100vw, but also allow the content to be restricted to a max-width if a container is added.
I first wrote about this in my newsletter a few months ago, in a short piece which introduced some twig tags, filters, and attribute methods we can use to modify Drupal templates; Twig to the Rescue: Using .hasClass(), |without(), .removeClass(), {% set %}, and ternary statements.
We will look at it in more detail below, however, if you are interested in the |without() filter you will need to check the newsletter as we won't cover that in this article.
The Basic Markup
Let's first look at the minimal code we need to achieve this.
<div class="section">
  <div class="container">
    <div class="region">
      <!-- Content -->
    </div>
  </div>
</div>
The template we created in the first part doesn't have the inner <div class="container">, so let's add that now.
Modifying a Twig template with Twig tags and Drupal Attributes' methods
We want to add a class to the new div with the container class. Since the container class is from the Layout Custom Section Classes & Attributes module, it is available in the attributes object.
<div {{ attributes.addClass('layout layout--tworow') }}>We have already added the attributes to our section wrapper, and we have also added some unique layout classes using the addClass() method.
To see what classes are available in the attribute object you can toggle the twig development mode on and dump the attributes variable in your template like so.
{{ dump(attributes) }}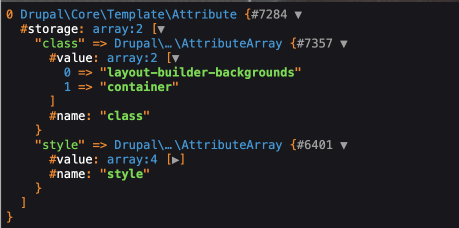
Development settings can be found in the configuration section of your site if you have the permissions to use it.
Manage > Configuration > Development > Development settings
/admin/config/development/settings
One of the classes in the attributes object we want to use is the container class, which is added using the Layout Custom Sections Classes and Attribute Module. You could also use a custom (PHP) class to add custom settings to your layouts, we will look at that in the advanced layouts.
As our code shows, we don't want the container class to be on the section wrapper but on an inner wrapper. To do this, we can use a few twig methods and filters.
-
First, let's set a new container variable.
Use the set tag, hasClass() Drupal template method, and a ternary statement to achieve this.#} +{% set container = attributes.hasClass('container') ? "container" : "fluid-container" %} {% if content %} -
Next, remove the container from the section attributes.
-<div {{ attributes.addClass('layout layout--tworow') }}> +<div {{ attributes.addClass('layout layout--tworow').removeClass('container') }}> -
Finally, add the container variable to the inner wrapper.
This adds thecontainerclass or thefluid-containerclass which we set to the container variable in step 1.<div {{ attributes.addClass('layout layout--tworow') }}> + <div class="{{ container }}"> {% if content.first %} <div {{ region_attributes.first.addClass('layout__region first-region') }}>Don't forget to close the container.
         {{ content.second }}
       </div>
     {% endif %}
+  </div>
 </div>
If you don't set a full-back class to the container variable, you could use an if statement that only adds the inner wrapper if the container variable equals container.
{% if container == "container" %}
  <div class="{{ container }}">
{% endif %}
You will also need to add a conditional on the closing div too.
{% if container == "container" %}</div>{% endif %}
We have now added an optional container class to the region wrapper. To have any effect, remember to add a CSS rule to your theme.
Summary
In this article, we looked at how to create a simple layout for Drupal Layout Builder.
We started out by looking at the minimal code needed to create a new layout. That is, you only need to add a template and register it in a layout YAML file. As part of the basic setup, we discussed what attributes to add to the template markup to enable drag-and-drop functionality and also a good directory structure.
Next, we looked at how to add CSS and JavaScript to our layouts. You do this by registering them in the theme library's YAML and adding the library key to your layout YAML with the library name as the value. This means you can keep all the files for your layout in the same directory.
Then we had a look at modifying the basic template by using Twig tags and Drupal attributes' methods to remove the container class from the attributes variable and add it to an inner div. We did this so we can use backgrounds on our section that are 100vw, but restrict our content to a container with a max-width.
Even though what we have created is a simple layout, from here you should be able to create layouts that can be modified by content creators without knowing how to code. In the next few weeks, I will experiment with more advanced layouts, and write about some things to consider when creating them, so be sure to sign up for the newsletter if you haven't already.
Thanks for reading, and until next time, seize the day.