In this article, we are going to look at making a reveal and hide image viewer. These have many uses from comparing before and after of real-world locations to comparing your very own front-end development work with a design comp as I just noticed on a code mentor website.
For some examples of these in use I will make a separate article with some excellent use cases outlined but since this article is about building it let's get stuck in.
When first building the Slide Hide & Reveal Viewer I concentrated on the desktop version and wasn't too concerned about the width of the images, making it responsive, or touch usable on a mobile device for that matter. It was very basic but at the same time required enough basic knowledge and problem solving to get working.
So with that in mind, I will approach this article in the same way. I will build version 0.1 and then version 1 and then wrap up with goals for version 2. Are you ready to learn about getBoundingClientRect(), mouse move and click events, and see how I went about this? Well if you are, you are in the right place.
Version 0.1: a proof of concept
The first version was just a proof of concept and very basic. It didn't have a draggable handle; it just worked on mouse move. Let's look at what is needed to make this work and if you care to follow along, what you will learn.
Sorry mobile people. This won't work properly on your device. You can make it 0.25 the size and click on the image and the image will adjust size. But the mouse move doesn't work. In part 2 we will look at making it work on mobile touch screens.
See the Pen Reveal Image with Mousemove by Simon (@simonramsay) on CodePen.
What you'll learn
- Git init and basic Git commands
- Positioning and layers
- Element selection in JS
- Events
As well as the above you will learn about pseudo-code and how sometimes you just need to start for the solution to reveal itself. This is how I managed to create the reveal hide as when I started out I was really unsure how this could be done. However, after getting the first part completed the solution became obvious.
Set-Up
We have our basic boilerplate repository, it consists of an HTML page, a blank JavaScript file, and a CSS file with some very basic resets.
You can download it here or use git clone. This boilerplate centres the main wrapper using flexbox so if you are following along please be aware of this.
Related: Git: Working with a remote origin.
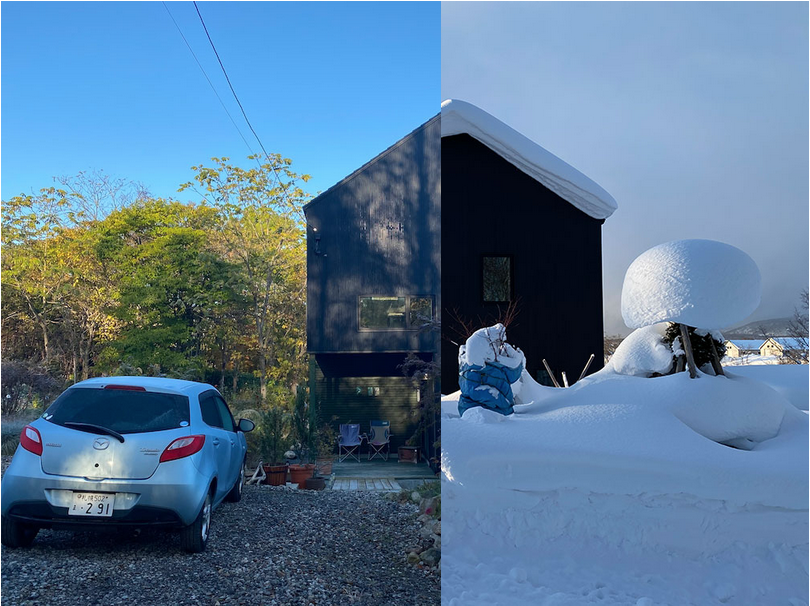
I have also provided some images if you need but if you have a before and after scene, you want to use then that would be cool.
Add Images to the HTML
First up we need to add the images to the HTML, this can be done using the image tag and setting the source to the image.
<main>
  <img src="winter.jpg" alt="add an alt"/>
  <img src="late-summer.jpg" alt="add an alt"/>
</main>
You will notice that by adding the images to the file that they will sit next to, or should I say, one following the other which is not what we want. The following image illustrates what I mean and it assumes you have the following CSS set on the main element which is included in the GitHub boilerplate.
main {
  width: 100vw;
  min-height: 100vh;
  display: flex;
  justify-content: center;
  align-items: center;
}
Add positioning to the image
To get our images to sit on top of each other we need to make the images absolute.
img {
  position: absolute;
}
Cool, now we have one image on top of the other.
Note that by using the boilerplate file the images will be centred as the main element has a flexbox display property set on it with align-items, justify-content, and min-height: 100vh; and height: 100vw;
Add wrappers around the images
As such, having 2 images sitting on top of each other isn't that useful as we can't really control the width of the images. Well, we can but then they will be proportional sized. To fix this we will add a wrapper around each image and then move the position property to the wrappers.
We also add position:relative; to our outer wrapper and set it to 1010px wide and the height to 757px; the actual size of our images.
<main>
<div class="outer">
<div class="image"><img src="winter.jpg" alt="add an alt"/></div>
<div class="image"><img src="late-summer.jpg" alt="add an alt"/></div>
</div>
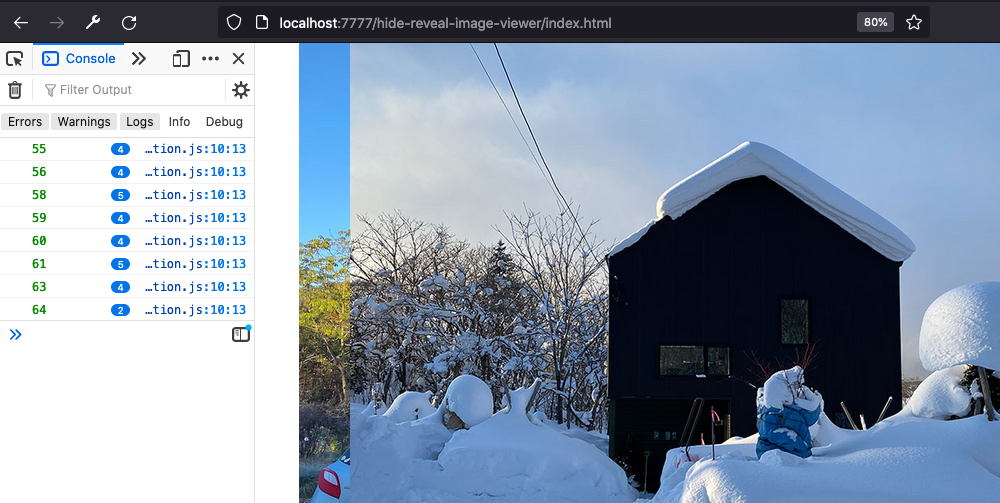
</main>Make the top wrapper 50% wide
Now add a width to the wrapper of the top image. We can do this by adding a second class to the wrapper and adding the width to it. Also, remember to set overflow:hidden;, otherwise, you won't see a difference. Good, now we have the top image only covering half the bottom image.
<main>
  <div class="outer">
    <div class="image"><img src="winter.jpg" alt="add an alt"/></div>
-   <div class="image"><img src="late-summer.jpg" alt="add an alt"/></div>
+   <div class="image top-image"><img src="late-summer.jpg" alt="add an alt"/></div>
  </div>
</main>
.top-image {
width: 550px;
overflow: hidden;
}
This is where I discovered the solution. Since being able to cover the lower image with a the top image and then being able to hide the image by adjusting the wrapper's width was exactly what I needed to do: The thought was if I can hard code the wrapper at 50% then I need to adjust the width dynamically and so that what I did. Onward!
Select the Top wrapper using JavaScript
In the last step, we managed to make the top image only cover half the underneath image, which was a step in the right direction. However, to control the width dynamically we need to make use of JavaScript.
To do that open up the actions.js file and add the following code to it.
const topImage  =  document.getElementById("top-image");
topImage.style.width = '75%';
This code selects the image wrapper that we applied the 50% width to and overrides the 50% and makes it cover 75%. Go ahead, change the value to 0 and see what happens. Also, note that I have used an Id, so make sure you add an id="top-image" to the wrapper.
Dynamically Change the Width with JavaScript
Cool, so we are almost there. Now, all we need to do is make it so we can change the width value from the browser window. There are many ways we could do this, but since the ultimate goal being to control the width with a handle and the mouse we will use a mouse event.
On Mouse move
We will use on mouse move to control this as it is the most simple solution to start. I have broken down the mouse event in the following steps.
- Chose an element to attach the event to. We do this by using the element variable we have already set up. In my case, I will use
topImage.
- Add an eventListener to the element:
topImage.addEventListener( );
- Add the type of event and the event to the event listener.
topImage.addEventListener('mousemove', Track The Mouse Position );
That's all, you can see that when the mouse moves that we are going to track the mouse position.
Tracking the Mouse position
Let's make our event now. First, we need to make the event a properly named function. I am going to name it trackMousePosition.
Next, we make the function and pass the event into the function.
topImage.addEventListener('mousemove', trackMousePosition );

function trackMousePosition (theEvent) {
alert ('the mouse moved');
}
So now when the mouse moves we can get an alert message. This is not very useful though so I will get the mouse position instead.
Since we passed the event into the function we have access to the event object.
The event object has all the information at the time of the event.
To look at all the properties available in the event object we can console.log(theEvent) in your code.
function trackMousePosition (theEvent) {
  console.log(theEvent);
}
Please note you can name theEvent anything you like, the most common names are e or event.
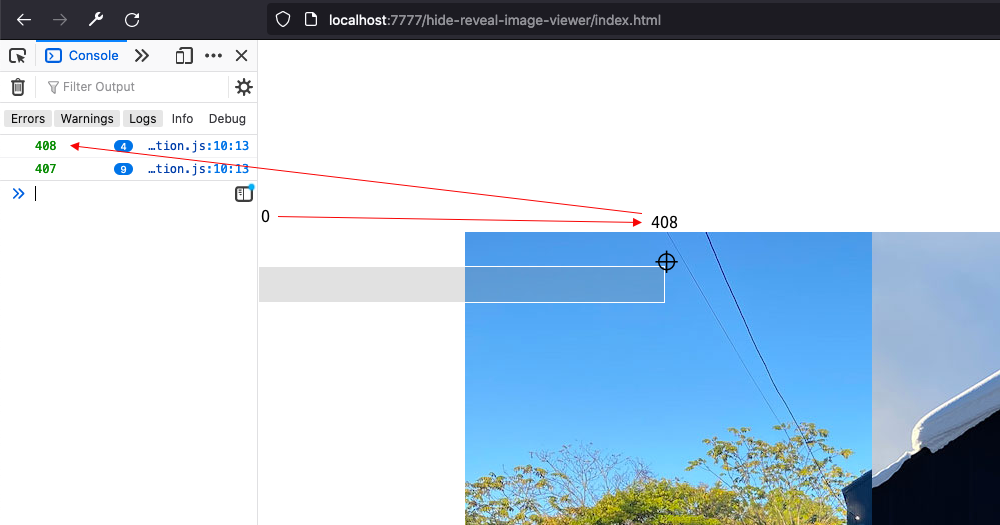
You will see we can get the clientX position, that is the X position in the client or browser at the time the event is generated (or fires).
We can make the client x position a variable and then console.log that.
function trackMousePosition (e) {
  var x = e.clientX;
  console.log(x);
}
As the mouse moves across the screen we can get the position. How cool is that? And now with this information, you can pretty much do anything you like, just have a think what this opens up to you.
By passing the event into the function we then have access to the event object.
Since we know that our image is 1010px wide then we can use the x to adjust the width of the element. To do that we can use the JavaScript style method and width property and then concatenate the px to it.
topImage.style.width = theEvent.clientX + 'px';Also, you will notice that since we are using the top image to listen for the event as soon as you move the mouse off the top image the top image width will stop resizing. This would be fine if we had a handle to click on to, as we will do in the next part, but for now, I think I will make the outer div the element that listens for the event. To do that add a new variable that selects the outer wrapper div and then added the listener to that.
+const trackerElement = document.getElementById("outer");
const topImage  =  document.getElementById("top-image");

-topImage.addEventListener('mousemove', trackMousePosition );
+trackerElement.addEventListener('mousemove', trackMousePosition );

function trackMousePosition(theEvent) {
    topImage.style.width = theEvent.clientX + 'px';
}
This works but we need to make sure the browser is also set to 1000px. Obviously, this is not that practical so what we need to do is convert the mouse position to a position in the wrapper. Luckily JavaScript has a built-in method for this too! Enter getBoundingClientRect();
So we have our proof of concept but now we need to calculate the position of the mouse on the image, no matter the width of the screen. As already state we have a JavaScript method that can help us with that.
getBoundingClientRect()
With getBoundingClientRect() and a little math, we can work out the position in the image wrapper. Let's take a closer look.
getBoundingClientRect() is a method and it returns a domRect object. We use the dot notation on an element like so, element.getBoundingClientRect(); and then we can console.log the value to see the properties and values of the element we called the method on.
var outerTracker = outer.getBoundingClientRect();
console.log(outerTracker);
/* output of console.log
DOMRect {
bottom: 945
height: 750
left: 201.5
right: 1211.5
top: 195
width: 1010
x: 201.5
y: 195
}
*/
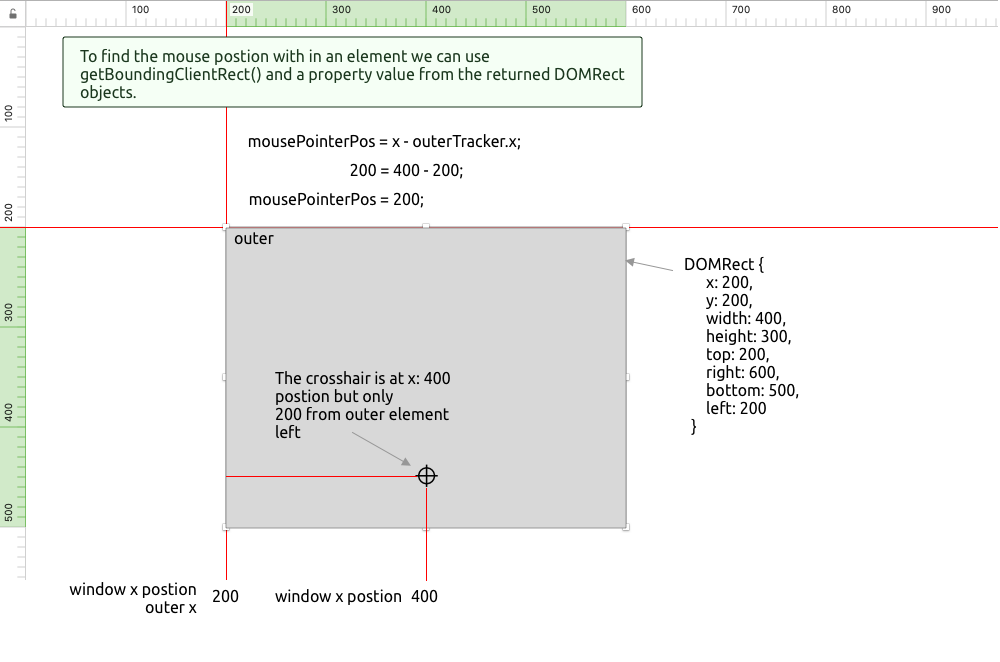
So you can see we have a few properties to work with. The best property to use in our case is the left side of the element or the x property. If we use that and subtract it from the width of the window we get the correct position in relation to the image wrapper as illustrated in the following diagram.
If you like we can then turn the value into a per cent, in this case, it is an easy calculation of dividing by 10.
function mouseMove(e) {

  var x = e.clientX;

  var outerTracker = outer.getBoundingClientRect();
  console.log(outerTracker);

  let mousePointerPos;
  mousePointerPos = x - outerTracker.x;

  imageWrapperWidth =  mousePointerPos/10;
  topImage.style.width = imageWrapperWidth + "%";

}
So our final code looks for the mouseMove function like this. It works as expected, when you move the mouse over the images the width of the top image wrapper is adjusted to reveal and hide the image in the bottom wrapper. If you want the complete code for this I have added it to the Github repo https://github.com/siramsay/image-hide-reveal/tree/proof-of-concept-0.1
Let's review this a bit in the next step so we can plan some improvements.
Review
So that's done we have a basic proof of concept but this is not ideal. Let's review this and plan version 1.
Evaluate and plan Version 1 with some notes on other features exposed during implementation.
- Better to have a handle to click and "drag" to better control the width of the top image. This will be not a drag method but an imitated drag method. I used the mouse down event and then inside the mouse down method I used the mouse move method we have already set up.
- This worked and I added the hover and the cursor to indicate this.
- This is still not 100% as the hover only works on the left side.
- Then I wanted to make the whole thing responsive. To achieve this I broke the code into 2 sections.
- For when the screen was wider than the container/wrapper.
- For when the screen was the same size as the container/wrapper.
I did this as using a per cent in small screens didn't work as the image becomes small with screen sizing, so it seemed easier to make the width of the wrapper the same as the actual position of the mouse on the screen. I could have calculated a per cent but this would have been extra unnecessary computing.
Conclusion
So that all for this article, we have a proof of concept and some notes on how I'd like to improve this. I will be doing this in the next article where we will look at various things, such as:
- How I dealt with having responsive images by needing to wrap them again. Otherwise, you get issues with the width controlling the height.
- How I needed to tap into some interesting level 4 media queries.
I will publish this shortly so be sure to check back or if you are gain sign up to my newsletter where I will share some inside knowledge, interesting front-end tech and UI hints, plus some periodic giveaways. You'll be first to know when the next part of this article goes live. The more sign-ups I get the faster I'll hustle!
P.S. In the meantime why not try and solve the problem yourself, I know you can.
P.S.S I am currently updating this article but part 2 can be found at the link below.